Car paint chips are a common problem for drivers everywhere. A small stone flying up from the road can leave an ugly mark on your car’s shiny surface. Over time, these chips can lead to rust and bigger paint damage.
Taking your car to a professional body shop for every small chip can be expensive and inconvenient. But the good news is, you can fix many paint chips at home with the right tools and techniques. Doing it yourself can save you money, protect your car from rust, and keep it looking great.
Many people think car paint repair is only for professionals, but with patience, you can get good results. This guide will show you each step, from cleaning the chip to finishing the paint. You will learn what products to use, how to avoid common mistakes, and when it’s better to seek expert help.
Let’s get started on restoring your car’s finish and protecting its value.
Understanding Car Paint Chips
Car paint chips happen when something hard hits your car’s painted surface and removes a small piece of paint. Most chips are caused by gravel, road debris, or even opening your door into something hard. If you ignore these chips, water can reach the metal under the paint and cause rust.
Paint chips usually show up on the hood, bumper, or near the wheels. Sometimes, they are so small that you only notice them when you wash your car. Other times, they are big enough to see from a distance. The size and depth of the chip will affect how you repair it.
Why Fix Chips Quickly?
- Prevents rust: Once metal is exposed, it can start to rust in days.
- Keeps your car looking new: Small chips can make your car look old or poorly maintained.
- Protects value: Paint damage lowers your car’s resale price.
Many car owners wait too long to fix chips. The longer you wait, the harder and more expensive it becomes to repair.
What You Need To Fix Car Paint Chips At Home
You don’t need a garage full of tools, but some basic items are necessary for a good repair. Here’s what you should have before starting:
- Automotive touch-up paint (matched to your car’s color code)
- Clear coat (optional but recommended)
- Primer (for deep chips that reach the metal)
- Fine-tip paintbrush or toothpick
- Sandpaper (1500-2500 grit)
- Rubbing alcohol or automotive wax and grease remover
- Microfiber cloths
- Masking tape and newspaper (to protect the area around the chip)
- Polishing compound
Most car makers sell small bottles or pens of touch-up paint. You can find your car’s paint code on a sticker in the door jamb, under the hood, or in the owner’s manual. This code ensures you get an exact color match.
Comparing Touch-up Paint Types
Here’s a quick comparison of touch-up paint types:
| Type | Best For | Ease of Use | Finish Quality |
|---|---|---|---|
| Bottle with Brush | Small to medium chips | Easy | Good |
| Paint Pen | Tiny chips | Very easy | Fair |
| Spray Can | Large areas | Hard | Best (for pros) |
For most car owners, the bottle or pen is enough for chip repair.
Step-by-step Guide To Fixing Car Paint Chips
Doing a good repair is all about patience and following each step carefully. Here’s how to do it:
1. Clean The Area
Wash the area around the chip with soap and water. Dry it with a microfiber cloth. Next, wipe the chip and surrounding paint with rubbing alcohol or a wax remover. This removes any oil, wax, or dirt. If you skip this step, the paint may not stick well.
2. Sand The Chip (if Needed)
If the chip has rough edges or rust, gently sand the area with 1500-2500 grit sandpaper. Sand only inside the chip, not the surrounding paint. This helps the new paint stick and makes the repair smooth.
3. Apply Primer (for Deep Chips)
If the chip goes through to bare metal or plastic, dab a tiny amount of primer in the chip with a fine brush or toothpick. Let it dry fully (usually 20-30 minutes). Primer helps the paint stick and prevents rust.
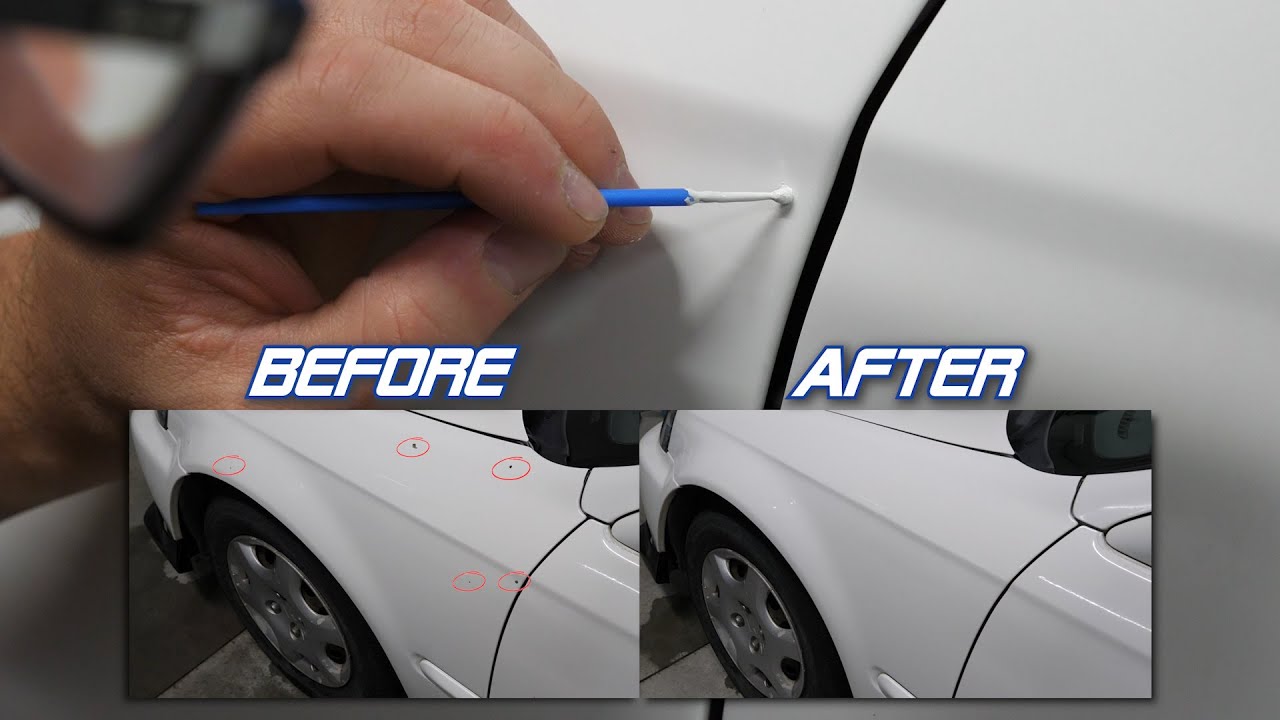
4. Apply Touch-up Paint
Shake the paint bottle well. Using a fine brush or toothpick, apply a small amount of paint inside the chip. Don’t use too much paint at once. It’s better to apply thin layers and let each one dry (about 30 minutes) before adding more.
Tips:
- If the chip is tiny, a toothpick gives better control than the brush.
- Don’t paint outside the chip; this creates a “blob.”
5. Apply Clear Coat
Once the color paint is fully dry (wait at least 1 hour), apply a thin layer of clear coat over the chip. This protects the paint and gives it shine. Let it dry completely.
6. Polish The Area
After the clear coat is dry (wait at least 24 hours), use a polishing compound and a microfiber cloth to gently polish the repaired area. This helps blend the new paint with the old paint and removes any edges.
7. Wax (optional)
A final layer of car wax protects your repair and makes the paint shine. Wait at least 2-3 days after painting before waxing.
Common Mistakes To Avoid
Even simple repairs can go wrong if you’re not careful. Here are mistakes beginners often make:
- Skipping cleaning: Paint will not stick to wax, oil, or dirt.
- Using too much paint: This creates a raised “blob” that looks worse than the chip.
- Not waiting between coats: Rushing leads to poor results.
- Ignoring rust: If you paint over rust, it will come back and spread.
- Wrong color: Always check your paint code to match your car’s color.

Credit: www.familyhandyman.com
When To Call A Professional
Home repairs are best for chips smaller than a pea. If you have large chips, deep scratches, or rust holes, it’s better to see a professional. They have special tools and can blend paint for a perfect finish. Also, if your car is new or very expensive, a pro repair helps keep its value.
How Much Does It Cost?
Fixing paint chips at home is much cheaper than a body shop. Here’s a price comparison:
| Repair Method | Typical Cost | Time Required |
|---|---|---|
| DIY (at home) | $20–$50 | 1–2 hours (plus drying time) |
| Professional Shop | $100–$300+ | 1–2 days |
If you already have some supplies, the cost will be even lower.
Extra Tips For A Better Finish
Most first-timers can make a chip look much better, but a few advanced tips can help your repair look nearly invisible:
- Work in good light: Natural daylight helps you see the chip and match the paint.
- Warm, dry weather is best: Cold or humid conditions slow drying and can ruin paint.
- Practice first: Try the paint on a piece of cardboard to get used to the brush or pen.
- Use a magnifying glass: For tiny chips, this helps you see details clearly.
How To Prevent Paint Chips
While you can’t avoid every chip, some habits reduce your risk:
- Keep a safe distance: Stay back from trucks and construction vehicles that throw rocks.
- Drive slowly on gravel roads: This minimizes debris hitting your paint.
- Install mud flaps: These block stones from the wheels.
- Apply paint protection film: This clear layer guards your car’s most vulnerable spots.
Real-world Example
Let’s look at a simple example. Imagine you have a 2018 silver Honda Civic with a small chip on the hood. You find the paint code inside the driver’s door (NH-830M). You buy a touch-up bottle for $25, a small bottle of clear coat for $10, and use sandpaper and wax you already have.
After cleaning and sanding the chip, you carefully dab in the paint. You wait for it to dry, add clear coat, and polish the area the next day. The chip is almost invisible, and you avoided a $150 body shop bill.
Paint Chip Repair Kits: Are They Worth It?
Many auto stores sell “paint chip repair kits.” These usually include paint, clear coat, sandpaper, and sometimes a cleaning solution. Kits are convenient, but they can be expensive. Always check that the kit includes the correct color for your car.
Here’s how kits compare to buying items separately:
| Option | Pros | Cons |
|---|---|---|
| Repair Kit | Convenient, all-in-one, instructions included | May not match your color exactly, more expensive |
| Buy Separately | Exact color match, cheaper if you already have supplies | Need to check compatibility, more time to gather items |
Credit: www.chipsaway.co.uk
Non-obvious Insights For A Better Repair
- Don’t shake the paint too hard. Shaking can make bubbles. Instead, roll the bottle between your hands for a minute.
- Store leftover paint in the fridge. It lasts longer in cool, dry places. Just label it clearly and keep it away from food.
Where To Learn More
For more details and advanced techniques, check out official guides from car makers or visit Popular Mechanics.
Fixing car paint chips at home is easier than you think. With the right tools and careful steps, you can make chips almost disappear and protect your car from rust. Try it once, and you may never fear small chips again.
Credit: www.youtube.com
Frequently Asked Questions
How Do I Find My Car’s Paint Code?
You can find the paint code on a sticker in the driver’s door jamb, under the hood, or in your owner’s manual. The code is usually a mix of letters and numbers.
Can I Use Nail Polish Instead Of Touch-up Paint?
It’s not recommended. Nail polish does not match the color, is not durable, and can damage your car’s finish.
How Long Should I Wait Before Washing My Car After A Repair?
Wait at least one week after repairing paint chips before washing your car. This gives the paint and clear coat time to fully cure.
Will Touch-up Paint Repair Be Visible?
If you follow the steps carefully, the repair will be much less noticeable. On metallic or pearl paints, it may still be slightly visible up close, but you can greatly improve the look.
What If The Chip Is Already Rusty?
Remove all rust with fine sandpaper before applying primer and paint. If rust is deep, or the area is soft, see a professional for repair.
Taking care of paint chips now can save you expensive repairs later. With patience and practice, you’ll get results you can be proud of.
