Regular inspection of your car’s belts and hoses is a fundamental aspect of vehicle maintenance. This proactive approach helps identify potential issues before they escalate into significant problems, ensuring your vehicle remains reliable and safe on the road. By visually checking for signs of wear, such as cracks, fraying, or swelling, and performing simple tactile tests, you can effectively monitor the health of these critical components.
- Regular inspections prevent unexpected breakdowns.
- Look for visual cues like cracks, fraying, or swelling.
- Feel hoses for firmness or softness, indicating internal damage.
- Listen for unusual noises, especially belt squeals.
- Address issues promptly to avoid more extensive repairs.
- Safety first: always inspect a cool, off engine.
Why Regular Inspection of Belts and Hoses is Crucial
Belts and hoses are vital components in your vehicle’s engine system, performing various functions from cooling the engine to powering accessories. Over time, these parts are subjected to extreme temperatures, constant friction, and chemical exposure, leading to natural wear and tear. Neglecting their condition can result in sudden failures, leaving you stranded and potentially causing severe engine damage.
A failing serpentine belt, for instance, can disable power steering, the alternator, and the air conditioning, making the vehicle difficult to control and eventually leading to a dead battery. Similarly, a ruptured radiator hose can cause rapid engine overheating, which can warp cylinder heads or crack the engine block. Regular inspections are a simple yet effective way to catch these issues early, allowing for timely replacement and preventing more extensive, inconvenient, and potentially damaging repairs.
Essential Tools and Safety Precautions for Inspection
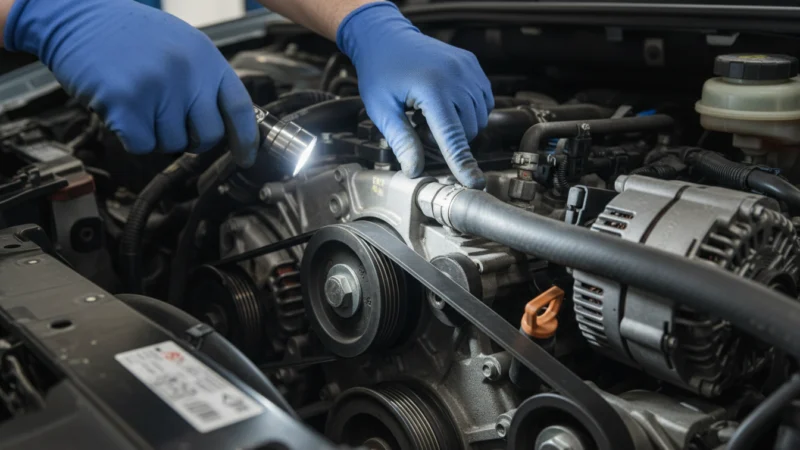
Before you begin inspecting your car’s belts and hoses, gathering the right tools and prioritizing safety are paramount. Working under the hood involves potential hazards, so always proceed with caution.
Recommended Tools:
- Flashlight:Essential for illuminating dark areas and spotting subtle signs of wear.
- Gloves:Protect your hands from grease, dirt, and sharp edges.
- Safety Glasses:Guard your eyes against debris or fluid splashes.
- Rag or Shop Towels:Useful for wiping away grime and checking for leaks.
- Pen and Paper:To note down any observations or concerns.
Safety Precautions:
- Engine Off and Cool:Always ensure the engine is completely off and has cooled down for at least an hour. Hot engine components and fluids can cause severe burns.
- Parking Brake Engaged:Set the parking brake to prevent any accidental movement of the vehicle.
- Clear Workspace:Remove any loose items from the engine bay that could interfere with your inspection or fall into moving parts if the engine were to accidentally start.
- Avoid Moving Parts:Never place your hands near belts, pulleys, or fans if there’s any chance the engine could turn over.
Understanding Your Car’s Belt System: Types and Functions
Your car relies on several belts to operate various systems. Understanding their types and functions is key to a thorough inspection.
Serpentine Belt:
Most modern vehicles use a single serpentine belt to power multiple accessories. This long, winding belt typically drives the alternator, power steering pump, air conditioning compressor, and sometimes the water pump. Its continuous operation means it’s under constant stress, making it prone to wear.
V-Belts:
Older vehicles, or some newer ones with specific designs, may use multiple V-belts. Each V-belt typically powers a single accessory, such as the alternator or power steering pump. They are named for their V-shape, which fits into corresponding grooves on pulleys.
Timing Belt (or Chain):
While crucial, the timing belt (or timing chain) is usually enclosed within the engine and is not part of a routine visual inspection for DIYers. It synchronizes the rotation of the crankshaft and camshaft, ensuring the engine’s valves open and close at the correct times. Its failure is catastrophic, but inspection and replacement are typically professional tasks.
Understanding Your Car’s Hose System: Types and Functions
Hoses are responsible for transporting various fluids throughout your vehicle. Each type serves a specific purpose and is designed to withstand different pressures and temperatures.
Radiator Hoses:
These are typically large-diameter hoses that carry coolant between the engine and the radiator. The upper hose transports hot coolant from the engine to the radiator, while the lower hose returns cooled fluid to the engine. They are critical for preventing engine overheating.
Heater Hoses:
Smaller in diameter than radiator hoses, heater hoses carry hot engine coolant to the heater core inside the cabin, providing warmth. A leak in these hoses can lead to a loss of coolant and a non-functioning heater.
Brake Hoses:
These flexible hoses connect the brake lines to the brake calipers or wheel cylinders. They transmit hydraulic pressure to activate the brakes. Due to their safety-critical role, any sign of wear or damage requires immediate professional attention.
Fuel Hoses:
Fuel hoses transport gasoline or diesel from the fuel tank to the engine. They are designed to be resistant to fuel and high pressures. Leaks in fuel hoses pose a significant fire hazard and should be addressed by a professional.
Vacuum Hoses:
Small-diameter vacuum hoses are part of various engine control systems, including emissions and brake booster systems. They carry vacuum pressure, and leaks can lead to rough idling, poor performance, or illuminated check engine lights.
How to Inspect Car Belts and Hoses
A systematic approach is best when inspecting your car’s belts and hoses. Always start with a visual check, then move on to tactile assessments. Remember to work in a well-lit area, using a flashlight to examine hard-to-reach spots.
Begin by opening the hood and locating all visible belts and hoses. Pay close attention to their entire length, not just the easily accessible sections. Look for any obvious signs of damage, discoloration, or fluid residue around connections. This initial overview helps you identify areas that require a more detailed examination.
Step-by-Step: Inspecting Your Car’s Drive Belts
Inspecting your drive belts is a straightforward process that can reveal potential problems before they lead to a breakdown.
- Locate All Belts:Identify the serpentine belt and any V-belts present in your engine bay. Trace their paths around all pulleys.
- Visual Inspection for Cracks:Carefully examine the ribbed side of the serpentine belt and the inner V-side of V-belts. Look for any signs of cracking, especially across the ribs. Even small cracks can indicate aging and reduced flexibility.
- Check for Fraying:Inspect the edges of the belts for fraying or material loss. Frayed edges suggest the belt is deteriorating and could snap soon.
- Look for Glazing:A shiny, smooth, or glazed appearance on the belt’s surface indicates that the rubber has hardened and lost its grip. This often leads to squealing noises, especially during startup or when accessories are under load.
- Assess Belt Tension:With the engine off and cool, gently press down on the longest span of the serpentine belt, midway between two pulleys. It should have about half an inch to an inch of play. Too much slack or extreme tightness can indicate a tensioner issue or an improperly installed belt. V-belts should also feel firm, with minimal deflection.
- Examine Pulleys:While inspecting the belts, quickly check the pulleys for any signs of damage, misalignment, or excessive wobble.
Detailed Guide: Checking Your Car’s Radiator and Heater Hoses
Hoses are critical for fluid transfer and require careful attention during inspection.
- Visual Scan for Leaks:Look for any signs of fluid leakage around the hose connections and along the length of the hoses. Coolant leaks often leave a colored residue (green, orange, pink, or blue) on engine components or the ground.
- Check for Swelling or Bulges:Hoses should maintain a consistent diameter. Any areas that appear swollen, bulging, or abnormally distended indicate internal damage or pressure buildup, signaling a potential rupture.
- Perform the Squeeze Test:With the engine cool, gently squeeze the radiator and heater hoses. They should feel firm yet pliable. Hoses that feel excessively hard, brittle, or spongy when squeezed are likely compromised. Hardness indicates the rubber has deteriorated, while sponginess suggests internal delamination or weakness.
- Inspect for Cracks and Abrasions:Look closely for any visible cracks, cuts, or abrasions on the outer surface of the hoses. These can be caused by rubbing against other engine components or general aging.
- Examine Hose Clamps:Ensure all hose clamps are secure and free of rust or corrosion. Loose or corroded clamps can lead to leaks. Avoid overtightening, which can damage the hose.
- Check for Discoloration:Hoses that appear discolored or unusually faded might be exposed to excessive heat or chemical degradation.
Identifying Common Belt Problems: Cracks, Fraying, and Glazing
Recognizing the specific signs of beltdegradation is key to timely replacement.
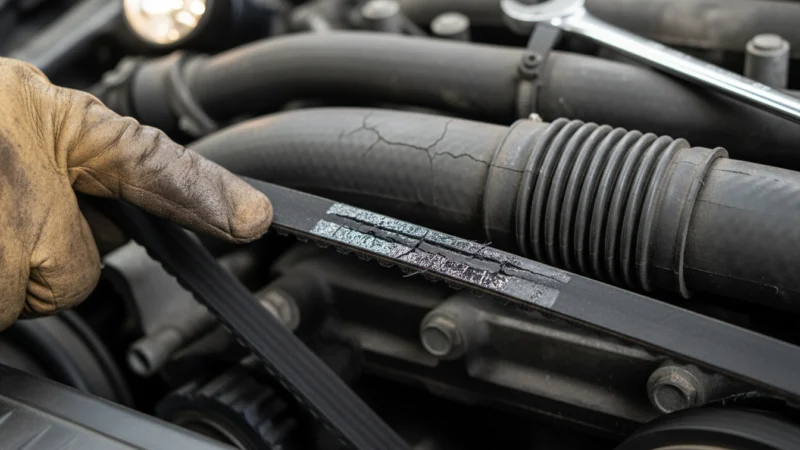
Cracks:
Cracks are one of the most common indicators of an aging belt. They typically appear on the ribbed side of the serpentine belt or the inner surface of V-belts. While minor surface cracks might not immediately signal failure, deep or numerous cracks across the ribs mean the belt’s structural integrity is compromised and it should be replaced.
Fraying:
Fraying occurs when the belt material starts to separate or unravel, usually along the edges. This indicates that the belt is breaking down and losing its cohesive structure. A frayed belt is at high risk of snapping, which can lead to immediate loss of power to critical accessories.
Glazing:
A glazed belt appears shiny and smooth, almost polished, rather than having a dull, matte finish. This happens when the rubber hardens due to heat and age, losing its ability to grip the pulleys effectively. Glazing often results in a distinct squealing noise, especially when the engine starts, accelerates, or when accessories like the power steering pump are heavily used.
Spotting Hose Issues: Swelling, Hardening, and Leaks
Hoses can fail in several ways, each with distinct visual and tactile clues.
Swelling or Bulges:
If a hose appears to have expanded in certain areas, forming a bulge, it indicates internal damage. The inner layers of the hose may have separated, allowing fluid pressure to push out the outer layer. This is a critical sign of impending failure and requires immediate attention.
Hardening or Brittleness:
Over time, the rubber in hoses can lose its flexibility and become hard or brittle. When you squeeze a hardened hose, it will feel stiff and unyielding, unlike a healthy hose which has some give. Brittle hoses are prone to cracking, especially at connection points or bends.
Soft Spots or Sponginess:
Conversely, a hose that feels unusually soft or spongy when squeezed may have internal delamination or a breakdown of its reinforcing fibers. This weakness can lead to a rupture under normal operating pressure. Soft spots are particularly concerning and should prompt replacement.
Leaks:
Any visible fluid leaking from a hose or its connection points is a clear sign of a problem. Coolant leaks are often identifiable by colored puddles or residue. Fuel leaks typically have a strong odor and are extremely dangerous. Even small, persistent leaks can lead to significant fluid loss and system failure.
Beyond Visual Checks: The Squeeze Test and Other Methods
While visual inspection is a great starting point, other methods provide a more comprehensive assessment of your belts and hoses.
The Squeeze Test for Hoses:
As mentioned, this tactile test is crucial. With the engine cool, gently squeeze the radiator and heater hoses. A healthy hose will feel firm but pliable. If it feels rock-hard, brittle, or mushy and spongy, it’s likely compromised. Pay attention to any soft spots along the length of the hose, as these are weak points.
Listening for Belt Noises:
Start the engine (briefly, if you’re just listening) and listen for any squealing, chirping, or grinding noises coming from the belt area. A persistent squeal often indicates a glazed or worn belt, or a failing tensioner or pulley bearing. These noises are usually more pronounced during cold starts or when turning the steering wheel (for power steering) or engaging the air conditioning.
Checking Belt Tension (Manual Method):
For V-belts, you can often check tension by pressing down on the longest span with your thumb. There should be about 1/2 inch of deflection. For serpentine belts, while a manual check can give a rough idea, a specialized belt tensiongauge provides a more accurate reading. However, visual inspection and listening for squeals are often sufficient for DIYers to identify a problem.
Fluid Level Checks:
Regularly checking your coolant and power steering fluid levels can indirectly indicate hose health. A consistently low coolant level, without an obvious external leak, could point to a slow, internal hose leak or a problem with the cooling system that might stress hoses.
When to Replace Your Car’s Belts and Hoses
Knowing when to replace these components is as important as knowing how to inspect them. Ignoring replacement intervals or obvious signs of wear can lead to costly consequences.
Manufacturer’s Recommendations:
Always consult your vehicle’s owner’s manual for recommended inspection and replacement intervals. These are typically based on mileage or age, such as every 60,000 to 100,000 miles for serpentine belts, or every 4-5 years for hoses, regardless of mileage.
Visible Signs of Wear:
Any of the problems identified during your inspection—deep cracks, severe fraying, glazing, significant swelling, hardening, or persistent leaks—are immediate indicators that a belt or hose needs replacement. Do not wait for a complete failure.
Age:
Even if a belt or hose looks visually acceptable, rubber components degrade over time due to exposure to heat, cold, and chemicals. After about 5-7 years, regardless of mileage, it’s generally a good practice to consider replacing critical hoses and belts as a preventative measure.
Unusual Noises:
Persistent squealing or chirping from belts, even after cleaning, is a strong sign that the belt is worn or that a tensioner is failing. Similarly, gurgling sounds from the cooling system can sometimes indicate air in the system due to a leak, potentially from a hose.
Tips for Extending the Life of Your Belts and Hoses
While wear and tear are inevitable, you can take steps to maximize the lifespan of your vehicle’s belts and hoses.
- Regular Fluid Checks:Ensure your coolant and power steering fluid levels are always at the correct mark. Low fluid levels can stress pumps and lead to increased belt friction or hose degradation.
- Maintain Proper Coolant Mix:Use the correct coolant type and mixture (antifreeze/water ratio) specified by your manufacturer. Incorrect coolant can accelerate hose deterioration.
- Address Leaks Promptly:Any fluid leak, whether oil, coolant, or power steering fluid, can contaminate belts and hoses, causing them to degrade prematurely. Fix leaks as soon as they are discovered.
- Avoid Overloading Accessories:While not always avoidable, try not to constantly push your power steering or air conditioning to their limits, as this puts extra strain on the serpentine belt.
- Keep Engine Bay Clean:Regularly clean your engine bay to remove dirt, grime, and oil residue that can break down rubber components.
- Inspect During Other Maintenance:Make belt and hose inspection a routine part of every oil change or tire rotation.
When to Seek Professional Automotive Assistance
While many belt and hose inspections can be performed by a DIY enthusiast, there are situations where professional help is essential.
- Complex Diagnostics:If you’ve inspected everything and still experience symptoms like persistent squealing, overheating, or fluid loss without an obvious cause, a professional mechanic has specialized diagnostic tools and expertise to pinpoint the issue.
- Timing Belt Replacement:As mentioned, timing belt replacement is a complex job that requires specialized tools and knowledge. Attempting this without proper training can lead to severe engine damage.
- Fluid Leaks:While you can spot a leak, identifying its exact source and performing the repair, especially for fuel or brake fluid leaks, requires professional expertise due to safety concerns and system complexity.
- Access Issues:Some belts or hoses are located in hard-to-reach areas, requiring the removal of other components. If you’re uncomfortable or lack the necessary tools for such tasks, it’s best to consult a professional.
- Uncertainty:If you’re unsure about the condition of a belt or hose, or if you’re not confident in performing a replacement, a mechanic can provide an expert opinion and safe, reliable service.
Frequently Asked Questions
How often should I inspect my car’s belts and hoses?
It is recommended to inspect your car’s belts and hoses at least twice a year, typically during routine oil changes or seasonal maintenance. Additionally, perform a quick visual check if you notice any unusual noises, smells, or fluid puddles under your vehicle.
What are the most critical signs that my car’s belts need replacing?
The most critical signs include deep cracks spanning across the belt ribs, severe fraying along the edges, a shiny or glazed appearance, and persistent squealing noises that do not go away. Any of these indicators suggest the belt’s integrity is compromised and it should be replaced promptly.
Can I inspect car belts and hoses myself, or do I need a mechanic?
You can absolutely inspect car belts and hoses yourself with basic tools and a careful approach. Visual and tactile inspections are straightforward DIY tasks. However, complex diagnostics or replacements, especially for timing belts or hard-to-reach components, are best left to a professional mechanic.
What tools do I need to inspect car belts and hoses effectively?
To effectively inspect car belts and hoses, you will need a flashlight for illumination, gloves for protection, and safety glasses. A rag or shop towel is also useful for cleaning and checking for leaks. These simple tools are sufficient for most visual and tactile checks.
What’s the difference between inspecting a serpentine belt and a V-belt?
Inspecting a serpentine belt involves checking its ribbed surface for cracks and fraying along its entire length, as it powers multiple accessories. For V-belts, which are typically older and power single accessories, you primarily check the inner V-shaped surface for cracks, glazing, and proper tension.
How do I check for leaks in my car’s hoses?
To check for leaks, visually inspect the entire length of each hose and around all connection points for any signs of fluid residue or drips. Coolant leaks often leave a colored stain, while fuel leaks usually have a distinct odor. You can also run your hand along the hose (with gloves) to feel for dampness.
Conclusion
Regular inspection of your car’s belts and hoses is a simple yet profoundly impactful aspect of vehicle maintenance. By dedicating a small amount of time to visually and tactilely assess these critical components, you can identify potential issues early, preventing unexpected breakdowns and safeguarding your engine from more severe damage. Remember to prioritize safety, use the right tools, and pay close attention to the signs of wear and tear.
Empower yourself with this knowledge to keep your vehicle running smoothly and reliably. If you ever feel uncertain about your findings or the complexity of a repair, do not hesitate to consult a trusted automotive professional for expert guidance and service.
