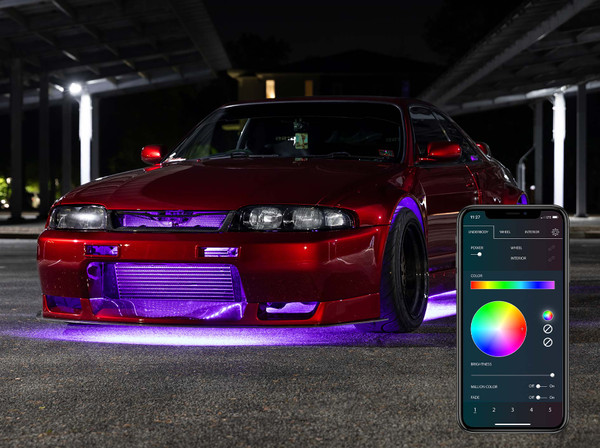
If you want to make your car stand out at night, installing an underbody LED light kit is one of the most popular ways. These lights add style, improve visibility, and even make your vehicle safer by making it easier to spot in dark parking lots. However, many car owners feel nervous about the installation process—worrying about wiring, tools, and damaging their vehicle. The good news is that with clear steps and a bit of patience, you can install underbody LED lights at home, without professional help.
This guide will walk you through everything you need to know: choosing the right kit, preparing your workspace, understanding the wiring, and every step of the installation process. You will learn not only how to install your kit, but also how to avoid common mistakes and get a lasting, professional look. Whether you want a simple glow or a color-changing show, you’ll feel confident by the end of this article.
Choosing The Right Underbody Led Light Kit
Before you start, it’s important to choose the right LED light kit for your car. Not all kits are created equal. The features, quality, and type of kit can change your experience and final results.
- Type of Lights: Underbody LED kits come in two main types: strip lights and tube lights. Strip lights are flexible and fit around corners easily, while tube lights are more rigid but often more durable.
- Control Options: Some kits let you control the colors and effects with a remote control, while others use a smartphone app. Decide which method is easier for you.
- Weatherproofing: Look for kits labeled IP67 or higher. This means the lights are waterproof and dustproof—important for driving in rain or snow.
- Length and Fit: Measure your car’s underbody before buying. Kits usually offer between 48 to 72 inches of lights for the sides and shorter sections for the front and back.
- Power Requirements: Most kits run on 12V DC, which matches your car battery. Make sure the kit is compatible.
Here’s a quick comparison to help you decide:
| Feature | Strip Lights | Tube Lights |
|---|---|---|
| Flexibility | High | Low |
| Durability | Medium | High |
| Ease of Installation | Easy | Moderate |
| Cost | Lower | Higher |
Pro tip: Avoid kits that do not mention water resistance. Cheap, unprotected LEDs can fail quickly after the first rain.
Tools And Materials Needed
Before starting, gather all tools and materials. Being prepared will make the process smoother and prevent mistakes.
- Your LED light kit (with control box, wiring, and mounting brackets)
- Drill with bits (for mounting brackets)
- Screwdriver (Phillips and flathead)
- Wire stripper/cutter
- Zip ties and mounting tape
- Electrical tape
- Cleaning cloth and rubbing alcohol (for cleaning surfaces before attaching)
- Safety glasses and gloves
- Jack and jack stands (for lifting the car safely)
- Fuse tap or add-a-circuit kit (optional, for cleaner fuse box wiring)
Preparing Your Car And Workspace
Safety and preparation are key for a good result. Start by choosing a flat, well-lit area. A garage or driveway works best. Make sure the car is turned off and the keys are removed.
- Lift the Car: Use a jack and jack stands to lift your car. Never rely on a jack alone—always use jack stands for safety.
- Clean the Underside: Dirt and grease can stop adhesive or brackets from sticking. Use a cleaning cloth and rubbing alcohol to wipe the areas where you’ll mount the lights.
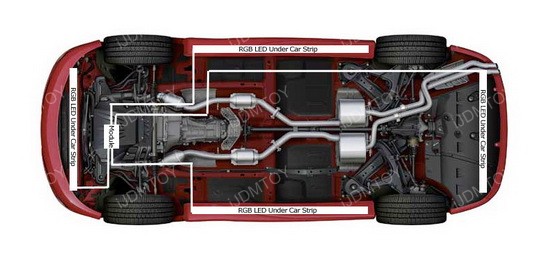
- Plan the Layout: Lay out the LED strips or tubes under the car (without attaching). Check how they fit and where the wires will run. Avoid placing lights near hot parts like the exhaust or moving parts like the suspension.
Hidden insight: Many beginners forget to check for wheel movement. If your lights are too close to the wheels, they can get damaged when turning or driving over bumps.
Step-by-step Installation Guide
Now you’re ready for the actual installation. Follow these steps carefully.
1. Mount The Led Strips Or Tubes
Start with the side lights, then move to the front and rear.
- Use the included mounting brackets or adhesive tape (if strong and weatherproof).
- Secure the lights at least 6-8 inches away from the edge to avoid direct road spray.
- Attach every 12-18 inches for stability. Use zip ties for extra support if needed.
- For tube lights, drilling small holes for brackets may be required. Make sure not to drill into important parts like the fuel tank or brake lines.
2. Route The Wires Safely
Wiring is often the trickiest part. Wires should be hidden and protected from heat and sharp edges.
- Route wires along the car’s frame rails when possible. This keeps them safe from road debris.
- Use zip ties to secure wires and prevent hanging.
- Avoid running wires near the exhaust system or any hot engine parts.
- Feed wires up through a grommet in the firewall (if connecting inside the car) or along the frame to the battery (if connecting in the engine bay).
- Seal any holes or gaps with silicone sealant to prevent leaks.
Beginner mistake: Forgetting to secure loose wires. These can catch on objects and pull the lights off.
3. Connect To Power
You have two main options: direct to the battery, or through the fuse box.
Option A: Battery Connection
- Find the positive (red) and negative (black) wires from your kit.
- Connect the positive wire to the positive battery terminal using a ring terminal.
- Connect the negative wire to a solid metal ground (like a bolt on the chassis).
- Use the in-line fuse provided with your kit. Never skip the fuse—it protects your car and kit from electrical surges.
Option B: Fuse Box Connection
- Use a fuse tap or add-a-circuit kit to connect to an accessory fuse in your fuse box.
- This method turns the lights on and off with your ignition, so you don’t accidentally drain the battery.
- Make sure to use the correct amp rating for your kit (usually 10A or less).
Data point: According to automotive safety experts, up to 20% of car electrical fires are caused by skipping fuses or making poor connections.
4. Connect The Control Box
The control box is the brain of your LED system. It lets you change colors, brightness, and effects.
- Mount the control box in a dry, accessible area, such as under the dashboard or in the engine bay (if it’s waterproof).
- Connect the wires from the LED strips/tubes to the control box, following the color codes in your instructions.
- Make sure connections are tight and secure with electrical tape or heat-shrink tubing.
5. Test Your System
Before finishing, test everything.
- Turn on the system using the remote or app.
- Check that all lights work and respond to controls.
- Try different effects, colors, and brightness levels.
- Look for any flickering or sections not lighting up—this can mean a loose connection.
Expert tip: Test your system before lowering the car off the jack stands. It’s much easier to fix any issues while you have clear access.
6. Finalize And Secure Everything
- Once you’re happy with the setup, tidy up all wires with zip ties.
- Use electrical tape to seal any exposed connections.
- Lower the car carefully, remove the jack stands, and check that nothing catches or hangs under the vehicle.

Credit: www.ledunderbody.com
Legal And Safety Considerations
Underbody lights are fun, but rules vary by location. Some colors or flashing patterns are illegal in certain states or countries because they can look like emergency vehicles.
- Check local laws before using colors like red or blue on public roads.
- Avoid using strobe or flashing patterns while driving.
- Use a kill switch or easy control to turn the lights off when needed.
Example: In California, blue and red underglow lights are banned for non-emergency vehicles. Fines can be $100 or more for violations.
Maintenance And Troubleshooting
LED underbody kits are low-maintenance, but some care keeps them working well.
- Clean the lights with a damp cloth every few weeks. Dirt can block the glow.
- Check wires regularly for wear or damage, especially after winter or off-road driving.
- If a strip stops working, check the fuse and connections first. Most problems are from loose wires or blown fuses.
If a section is not lighting up, swap it with a working section to see if the issue is the strip or the connection. This quick test saves hours of frustration.
Credit: www.ledunderbody.com
Advanced Tips For A Pro-level Look
Many car owners want their car to look unique. Here are some advanced tips:
- Sync your underbody kit with interior LED lights for a matching glow.
- Use custom mounting brackets for tricky areas.
- Hide wires inside plastic channels for a cleaner look.
- Upgrade to RGBIC lights for individual segment control and more effects.
Non-obvious insight: The angle of your LEDs matters. Pointing them slightly outward (not straight down) can spread the glow for a wider, more dramatic look.
Cost And Value Comparison
How much should you expect to spend? Here’s a simple comparison of kit types and their average costs:
| Kit Type | Average Cost (USD) | Features |
|---|---|---|
| Basic Single Color | $30-$60 | One color, simple on/off |
| Multi-Color RGB | $60-$120 | Remote/app control, color change |
| RGBIC (Segmented) | $120-$200 | Multiple effects, music sync, segments |
Value tip: Spending a little more for a weatherproof, app-controlled kit usually gives better reliability and more features.
Credit: store.ijdmtoy.com
Common Mistakes To Avoid
- Skipping Surface Cleaning: Adhesives and brackets won’t stick to a dirty surface.
- Overtightening Zip Ties: This can cut into wires and cause shorts.
- Not Using a Fuse: This is a major fire risk.
- Mounting Too Close to Hot Parts: Heat can melt or damage LEDs quickly.
- Ignoring Local Laws: Illegal lights can mean fines and forced removal.
Learning from others’ mistakes can save you money and headaches.
Frequently Asked Questions
How Long Does It Take To Install An Underbody Led Light Kit?
Most DIY installations take 2 to 4 hours if you have the right tools. It can take longer if you need to run wires through the firewall or make custom mounts.
Do Underbody Led Kits Drain The Car Battery?
If installed correctly with a fuse and switched power source, LED kits use very little power. However, leaving them on for hours while the engine is off can drain the battery.
Are Underbody Led Lights Legal Everywhere?
No. Laws vary by state and country. It’s usually illegal to use red, blue, or flashing lights on public roads. Always check your local rules before installing.
Can I Install An Led Kit Without Drilling Holes?
Yes. Many kits use adhesive tape or clips. However, brackets with screws are more secure, especially in bad weather or rough driving conditions.
Where Can I Find High-quality Underbody Led Kits?
You can find reliable kits at auto parts stores, online retailers, or official sites like ORACLE Lighting, which is known for quality and durability.
Lighting up your car’s underbody is a rewarding DIY project. With careful planning and the right tools, your car will turn heads wherever you go—while staying safe, legal, and reliable.
