Building your own portable welding cart is a smart move if you want to keep your welding tools organized and move them easily around your workshop or garage. Many welders struggle with carrying heavy machines, hoses, and accessories from one place to another.
With a custom cart, you solve these problems and get a setup that fits your exact needs. Even if you’re new to metalwork or welding, you can complete this project with basic tools and some planning. Let’s walk through every step, from planning to the final touches, so you finish with a cart that’s both sturdy and practical.
Why Build A Portable Welding Cart?
If you’re wondering why you shouldn’t just buy a ready-made cart, there are several good reasons to build one yourself:
- Customization: You can design shelves and hooks to fit your machine, gas cylinder, cables, and tools.
- Cost savings: A homemade cart is often cheaper than store-bought options of similar quality.
- Skill building: You’ll practice measuring, cutting, welding, and finishing—useful skills for future projects.
- Stronger construction: DIY carts are usually tougher than cheaper commercial models, especially if you use thick steel.
Many beginners overlook the benefit of personalizing the cart’s height, shelf spacing, or adding holders for items like grinders or clamps. Small details like these make daily welding work smoother.
Essential Materials And Tools
Before you start, gather all materials and tools. Planning ahead saves frustration and prevents mid-project shopping trips.
Materials
- Steel angle iron (1.5” x 1.5”, 1/8” thick, about 20 feet): Main frame and shelves.
- Flat steel bar (1/8” thick, 2” wide): Shelf bases.
- Mild steel sheet (16-18 gauge, 2’ x 2’): Optional, for shelf bottoms.
- Casters: Two fixed (rear), two swivel with locks (front), rated for at least 200 lbs each.
- Welding machine: For assembly.
- Bolts, nuts, and washers: For attaching wheels and accessories.
- Handle tubing (about 3 feet, 1” diameter steel): For a push/pull handle.
- Hooks, chain, or bungee cord: For securing a gas cylinder.
- Paint or primer: Rust prevention and finishing.
Tools
- Welder (MIG or stick is fine)
- Angle grinder (with cutting, grinding, and flap discs)
- Measuring tape and square
- Drill and bits (metal-rated)
- Clamps
- Permanent marker or scribe
- Wrenches
Optional Extras
- Rubber matting: For anti-slip shelves.
- Metal mesh: For lightweight shelf bases.
- Tool holders: For grinders, pliers, or electrode boxes.
Planning The Cart Design
Taking time to design your cart avoids mistakes later on. Here’s what to consider:
- Machine size: Measure your welder’s footprint. Leave 1-2 inches extra on each side for cables.
- Gas cylinder: If you use shielding gas, plan a stable spot and a way to secure the cylinder upright.
- Shelves: Decide how many you need—for the welder, consumables, and accessories.
- Cart height: 28-32 inches is comfortable for most people.
- Wheels: Larger wheels (4-6 inches) roll better over uneven surfaces.
- Handle position: Place it high enough to push or pull easily.
Here’s a sample cart size for a medium MIG welder:
| Component | Recommended Size |
|---|---|
| Main frame length | 28 inches |
| Main frame width | 16 inches |
| Total height | 30 inches |
| Shelf spacing | 10-12 inches |
| Wheel diameter | 5 inches |
Don’t forget to sketch your design with measurements before cutting steel.
Cutting And Preparing Steel
Start by marking and cutting all pieces according to your plan. Use an angle grinder with a cutting disc for straight, clean cuts. Always wear gloves and eye protection. Beginners often rush this step, but accuracy here means everything fits together later.
Pro tip: After cutting, use a flap disc to clean sharp edges and burrs. This makes handling safer and helps when welding.
Lay out all pieces on the floor to check the fit before welding anything. Clamp them in place and double-check your measurements.

Credit: www.myotherstuff.com
Assembling The Frame
Now it’s time to weld the main frame together. Begin with the base rectangle. Tack weld the four corners first—just small welds to hold them. Check for squareness by measuring diagonals; if they match, your frame is square.
Add the upright supports (for shelves and handle) next. Tack weld each one, checking for vertical alignment with a carpenter’s square. Once satisfied, complete the welds fully, moving around the frame to avoid warping from heat.
For shelf supports, weld crossbars at your chosen shelf heights. Try to keep everything level. If you’re adding a steel sheet or mesh for shelf bottoms, weld those in now.
Common mistake: Many skip double-checking alignment before full welding. If you weld out of square, the cart may wobble or the shelves won’t fit.
Wheel And Handle Installation
Wheels are essential for portability. Weld or bolt the casters securely—fixed wheels at the rear, swiveling ones at the front. Make sure the cart sits level on all four wheels before tightening bolts or finishing welds.
For the handle, weld or bolt a steel tube horizontally at the top rear of the cart. Test the height to ensure it’s comfortable for you.
Here’s a comparison of wheel types for welding carts:
| Wheel Type | Pros | Cons |
|---|---|---|
| Solid rubber | Quiet, good grip | Can flatten under heavy load |
| Pneumatic (air-filled) | Best over rough surfaces | Punctures possible, more maintenance |
| Hard plastic | Cheap, rolls easily | Noisy, can crack |
Most users find solid rubber wheels a great balance for garage and workshop floors.

Credit: 4xstore.com
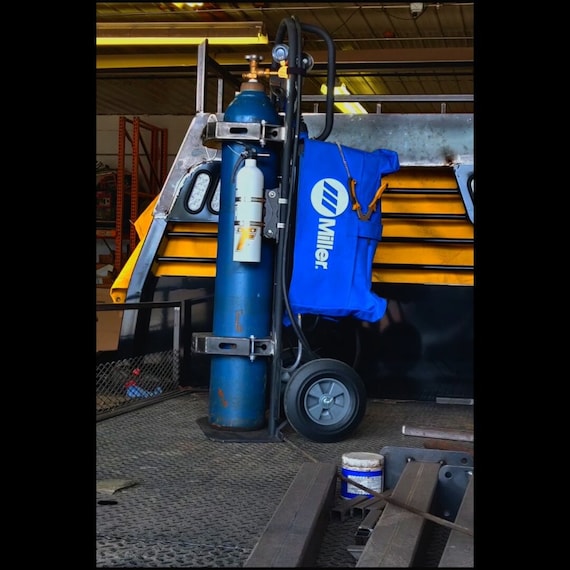
Gas Cylinder Mounting And Safety
If your welder uses shielding gas, the cylinder must be secure and upright to prevent tipping and leaks. Weld a steel “cradle” at the back of the cart—a simple L-shaped frame or ring works well. Use a chain, steel strap, or bungee cord to hold the tank in place.
Non-obvious insight: Position the cylinder so the regulator and hose are easy to reach, but protected from bumps. Many carts place the cylinder too close to the edge, risking falls. Leave at least 3-4 inches of clearance.
If you’re not using gas, this space can become a storage area for rods, wire spools, or clamps.
Shelf And Accessory Holder Ideas
The best carts keep everything you need close by. Here are practical shelf and holder options:
- Top shelf: For the welding machine. Make it the most stable and lowest shelf.
- Middle/lower shelves: For consumables (wire, rods) and tools.
- Side hooks: Weld short steel rods or buy hooks for holding cables, torches, and clamps.
- Grinder holder: A short tube or bracket on the side.
- Electrode box tray: A shallow shelf or basket near the handle.
Here’s an example layout for a three-shelf cart:
| Shelf | Main Use |
|---|---|
| Top | Welder unit |
| Middle | Consumables (wire, rods) |
| Bottom | Heavier accessories (clamps, hammers) |
Credit: www.etsy.com
Welding, Grinding, And Final Assembly
Work methodically as you weld the cart together. Move from tacking to full welds, and always check alignment after each step. If you spot warping or misalignment, heat and clamp the steel straight before proceeding.
Once welding is done, grind all joints smooth—this not only looks better but prevents cuts and snags. Vacuum or wipe the cart to remove dust and metal bits before painting.
Pro tip: Check all welds for strength. Try pushing and pulling on joints—fix any weak spots now.
Painting And Rust Protection
Bare steel rusts quickly, especially in a garage. After cleaning, spray or brush on a metal primer. Allow it to dry, then add 1-2 coats of tough paint (enamel or spray paint works well).
For best results:
- Paint in a ventilated area.
- Use light, even coats to avoid drips.
- Let each coat dry fully before adding the next.
Color is your choice, but black hides dirt and wear well. Some users paint shelves a bright color to spot dropped parts easily.
Testing And Customizing Your Cart
Now, load your welder, gas cylinder, and tools on the cart. Roll it around your workspace—test for stability, wheel movement, and handle comfort. Make sure nothing tips when you move or stop suddenly.
Add extra hooks, trays, or even a power strip if you need them. The beauty of a DIY cart is that you can keep improving it as you notice small needs in daily use.
Non-obvious insight: If you often move between rough and smooth floors, consider swapping front wheels for larger ones, or add a small ramp at doorways. This reduces vibration and protects your gear.
Safety Tips For Building And Using Your Cart
- Always wear gloves, eye, and hearing protection when cutting or grinding metal.
- Work in a well-ventilated space, especially when painting or welding.
- Double-check the weight rating of your wheels and frame—overloading can cause accidents.
- Secure gas cylinders with a chain or metal strap at all times.
- Keep the cart’s center of gravity low to avoid tipping.
A homemade welding cart, when built with care, will last for years and can be adapted as your equipment grows.
Frequently Asked Questions
How Much Does It Cost To Build A Welding Cart?
Building your own cart usually costs between $50 and $150 USD, depending on steel prices and whether you buy new or recycled materials. That’s often half the price of a good commercial cart, with better durability.
What Thickness Of Steel Should I Use For The Frame?
For most home and small shop carts, 1/8 inch (3 mm) angle iron is strong enough. If you plan to carry very heavy equipment, consider using slightly thicker steel.
Can I Use Recycled Or Scrap Metal For The Cart?
Yes! Many welders use scrap steel from old bed frames, shelves, or racks. Just make sure the metal is not rusted through and is strong enough for your needs.
Is It Safe To Move A Gas Cylinder On A Welding Cart?
It is, if you secure the cylinder with a chain or strap and keep it upright. Never move a cylinder without securing it, and always turn off the valve before transporting.
What’s The Best Way To Keep Cables Organized On The Cart?
Weld or bolt hooks or steel rods on the cart’s sides. Loop cables neatly after each use to prevent tangles and wear.
For more safety information and welding basics, you can check the Welding page on Wikipedia.
Building your own portable welding cart is rewarding and practical. You’ll end up with a tool that saves time, protects your gear, and makes every welding job easier. With these steps and tips, you’re ready to start your cart—and maybe inspire your next project, too.
