Planning a two car garage workshop layout is an exciting project, but it can also be overwhelming. Whether you’re a hobbyist, a small business owner, or someone who wants to organize their space, getting the layout right will save you time, stress, and money in the long run.
A well-designed garage workshop can boost productivity, improve safety, and make every project more enjoyable. Many people jump in without a clear plan and end up with clutter, wasted space, or tools they can’t find. This guide will walk you through the essential steps to create a workshop that works for you, with practical advice from years of hands-on experience.
Understanding Your Space
Before you buy tools or move anything, you need to understand the exact space you have. Most two car garages are about 20 feet by 20 feet, but sizes vary. Measure your garage carefully—length, width, and ceiling height. Don’t forget to check for obstacles like water heaters, windows, doors, or electrical panels.
It’s important to sketch a simple floor plan. You can use graph paper or free online tools. Mark fixed features like doors, windows, and outlets. This will help you see where you have uninterrupted wall space and which areas must stay clear for cars or walkways.
One common mistake is underestimating the space cars need. Allow at least 9 feet by 18 feet for each car, plus extra space for opening doors. If you plan to keep both cars inside, you’ll need to be creative with tool storage. If you’re using the full garage as a workshop, you have much more flexibility.
Defining Your Workshop Goals
Every workshop is unique. Ask yourself:
- What projects will I do here? (Woodworking, car repairs, metalwork, crafts?)
- What large tools or machines do I want?
- Will I need a dust collection or ventilation system?
- Do I want a dedicated workbench or several smaller stations?
Write down your primary goals. This will guide every decision, from electrical planning to tool storage. For example, a woodworking shop needs more bench space and dust collection, while a car repair shop needs floor jacks and heavy-duty lighting.
Zoning: Dividing The Space
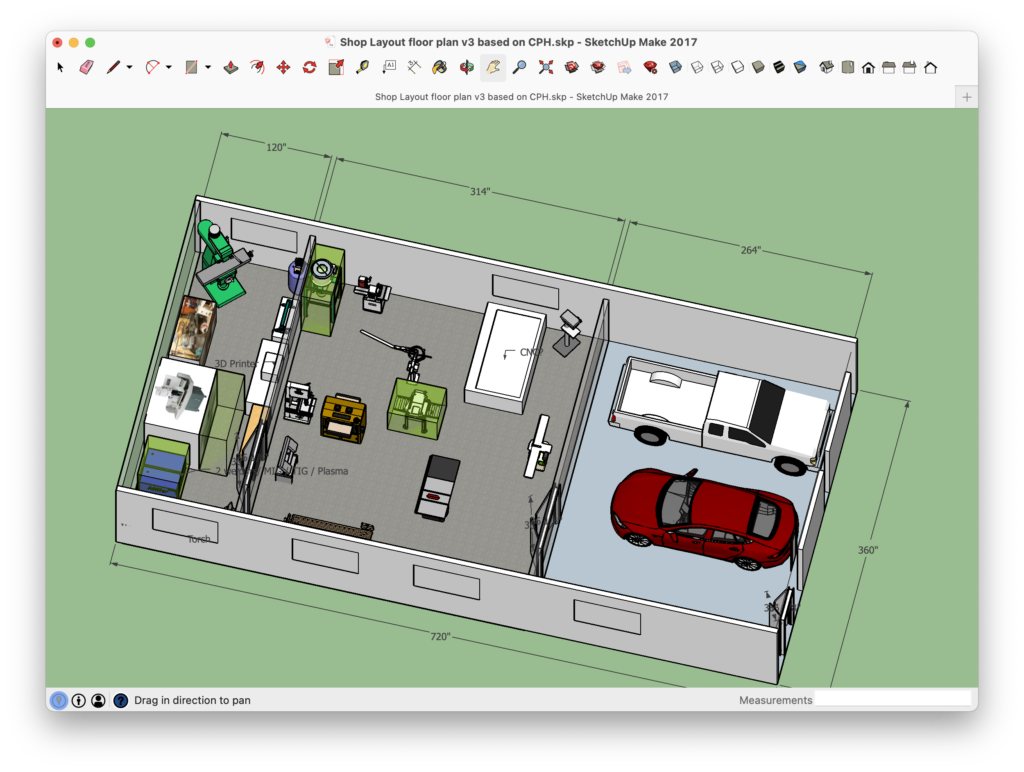
A well-planned garage workshop uses zones. Zones help you group similar activities and tools together. In a two car garage, you might have:
- Work Zone: Main workbench, tool chest, and power tools.
- Storage Zone: Shelves, cabinets, and bins for materials and supplies.
- Project Zone: Open floor space for assembly, vehicle parking, or large projects.
- Finishing/Cleaning Zone: Sink, trash, cleaning tools.
When you clearly define zones, you avoid crowding and wasted motion. For example, keep your saws near the workbench and wood storage, but away from delicate electronics or finished projects.
Choosing The Right Workbench
The workbench is the heart of most garage workshops. There are several types to consider:
- Freestanding workbench: Can be moved; ideal for flexible layouts.
- Wall-mounted workbench: Saves floor space; best for smaller garages.
- Folding workbench: Great for tight spaces or multi-use garages.
The ideal size for a main workbench is at least 24 inches deep and 48 inches wide. If you do woodworking, longer is better. Make sure the bench height matches your comfort—usually 34 to 36 inches. If you use the workbench for assembly or repair, leave at least 3 feet of clearance on three sides.
Sample Comparison Of Workbench Types
| Type | Pros | Cons | Best For |
|---|---|---|---|
| Freestanding | Flexible, sturdy | Takes space | General use |
| Wall-mounted | Saves space | Less portable | Small garages |
| Folding | Space-saving | Less sturdy | Multi-purpose spaces |

Credit: www.architecturaldesigns.com
Tool Storage Solutions
A cluttered workshop slows you down and creates safety hazards. Good storage is essential. Here are practical options:
- Wall-mounted pegboards for hand tools. Pegboards are cheap, easy to install, and let you see tools at a glance.
- Rolling tool chests for wrenches, screwdrivers, and small power tools.
- Overhead shelves for long-term storage (holiday decorations, rarely used items).
- Cabinets and drawers for hardware, finishes, and chemicals.
- Open shelves for materials like wood, metal, or paint.
One insight many beginners miss: Label every drawer and bin. Even if you think you’ll remember, clear labels save hours in the long run.
Example Of Tool Storage Breakdown
| Storage Type | Ideal For | Capacity | Accessibility |
|---|---|---|---|
| Pegboard | Hand tools | Low/medium | Very easy |
| Tool chest | Small power tools | Medium | Easy |
| Overhead shelves | Rarely used items | High | Difficult |
Power And Lighting Needs
Many garages have only one or two outlets and a single ceiling bulb. That’s not enough for a workshop. Here’s how to upgrade:
- Install more outlets along each wall, especially near the workbench and large tools.
- Use dedicated 20-amp circuits for heavy tools like table saws or compressors.
- Add task lighting above the workbench and stations. LED strips or shop lights are affordable and bright.
- Consider portable work lights for detailed projects or car repairs.
Poor lighting is a common mistake. Shadows hide hazards and make precision work harder. Place lights so they don’t cast your shadow onto the workpiece.
Credit: www.corbinstreehouse.com
Safety And Ventilation
Safety should never be an afterthought. Plan for:
- Fire extinguisher: Mount it near the entrance, not buried behind tools.
- First aid kit: Keep it stocked and easy to reach.
- Smoke and carbon monoxide detectors: Especially if you use gas tools or heaters.
- Ventilation: If you weld, spray finishes, or sand wood, install a vent fan or open windows. For serious dust or fumes, a dedicated exhaust system is worth the investment.
Also, keep walkways clear. Don’t run extension cords across the floor. Use cord reels or overhead hooks for safety.
Organizing Materials And Supplies
Materials pile up fast in a garage workshop. Here’s how to keep order:
- Vertical lumber racks for wood, pipes, or rods.
- Stackable bins for screws, nails, bolts, and small hardware.
- Clear containers for finishes, adhesives, and lubricants.
Store heavy materials low to the ground to prevent accidents. Use a color-coding system for bins to make finding items faster—red for nails, blue for screws, green for bolts, for example.
Credit: libertyhouseplans.com
Maximizing Floor Space
Many people struggle to balance workspace and car parking. The secret: go vertical. Use the walls and even the ceiling.
- Hang bicycles or ladders from ceiling hooks.
- Install wall-mounted racks for clamps, hoses, or cords.
- Use folding workbenches or rolling carts you can move when parking cars.
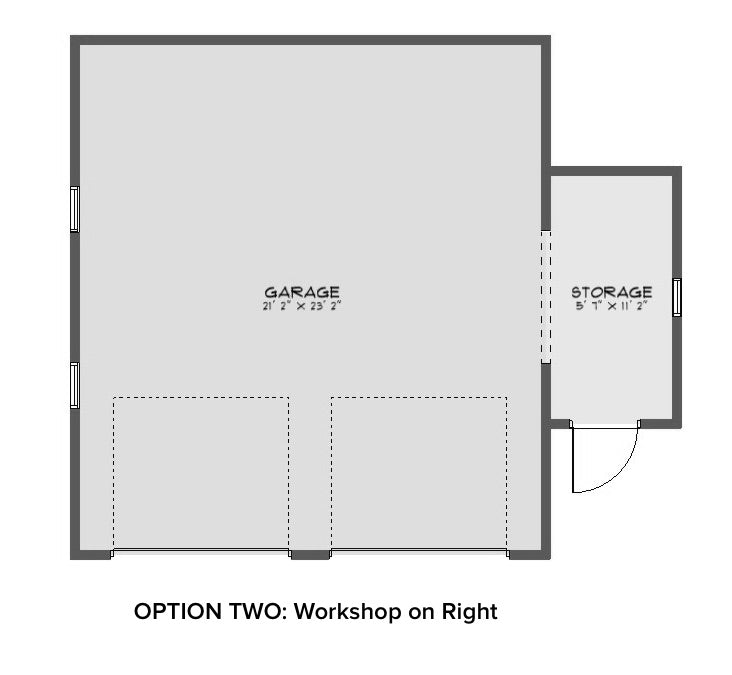
If you need to park two cars, keep the workshop area along one wall, with rolling tools that can be tucked away.
Example Layout For Dual Use
| Zone | Location | Notes |
|---|---|---|
| Workbench & Tools | Left wall | Rolling chests for flexibility |
| Materials Storage | Back wall | Shelves above car hood height |
| Car Parking | Center space | Foldable benches for extra room |
Climate Control And Comfort
Garages can be hot in summer and cold in winter. Think about:
- Insulation: Insulating the garage door and walls makes a big difference.
- Portable heaters or fans for comfort.
- Dehumidifier to protect tools from rust in damp climates.
- Anti-fatigue mats at the workbench to reduce stress on your feet and back.
Comfort is often overlooked, but it will affect how often you use your workshop.
Workflow Efficiency
Arrange your tools and stations in the order you use them. For example, if you cut wood, then sand, then assemble, keep the saw, sander, and assembly table in sequence. This reduces walking and wasted motion.
A tip many miss: leave a clear path from the entrance to each zone. This helps when carrying large items or if you need to move quickly in an emergency.
Flexibility For Future Changes
Your needs may change. Build flexibility into your layout:
- Use movable carts and shelves.
- Avoid bolting everything to the floor unless necessary.
- Keep some wall space open for future tool additions.
This prevents the frustration of having to redo your whole layout when you buy new tools.
Getting Started: Step-by-step Plan
- Measure the garage and sketch a plan.
- List your goals and must-have tools.
- Divide the space into zones based on activities.
- Choose and place your workbench.
- Add tool storage (pegboards, chests, shelves).
- Plan power and lighting upgrades.
- Organize materials and supplies.
- Set up safety and ventilation systems.
- Add comfort features (mats, fans, insulation).
- Test your workflow and adjust as needed.
Take your time with each step. It’s better to make small changes now than big ones later.
Common Mistakes To Avoid
- Overfilling the garage with tools you rarely use.
- Placing large, fixed benches in the center—this blocks car doors.
- Neglecting dust collection (wood dust can harm your health and tools).
- Ignoring power needs—running too many tools on one outlet is dangerous.
- Forgetting about security—lock valuable tools in cabinets or use a security system.
Real-world Example
Consider John, who wanted a woodworking and car repair workshop in his two car garage. He installed a 6-foot workbench along the back wall, with rolling tool chests underneath. Shelves above the bench held supplies. He kept one bay clear for his car, using folding sawhorses for projects.
By adding LED shop lights, pegboard tool racks, and a small dust collector, his workflow improved, and the space felt much bigger.
Final Tips For Success
- Start simple and add as you go—don’t buy everything at once.
- Ask for advice at your local hardware store or online forums.
- Visit other workshops if possible for ideas.
- Keep your layout flexible and adapt to your needs.
A well-planned two car garage workshop layout will pay off for years. You’ll spend more time creating and less time searching for tools or moving clutter.
Frequently Asked Questions
How Much Does It Cost To Set Up A Two Car Garage Workshop?
Costs vary widely. For basic setups with shelves, pegboards, and a simple workbench, expect to spend $500 to $1,500. Adding power, lighting, and specialty tools can raise costs to $2,000–$5,000 or more. Start with essentials and upgrade as your needs grow.
Can I Park Two Cars And Still Have A Workshop?
Yes, but it requires careful planning. Use wall-mounted and overhead storage, folding benches, and rolling carts. Keep the center area clear for parking, and focus work zones along the perimeter.
What Is The Best Lighting For A Garage Workshop?
LED shop lights are affordable, bright, and energy efficient. Place them above the workbench and main work areas. Consider adding task lights for detail work. Avoid relying on a single ceiling bulb.
How Do I Keep My Garage Workshop Safe?
Install a fire extinguisher, keep a first aid kit, add smoke detectors, and ensure good ventilation. Store flammable materials in approved cabinets. Keep walkways clear and avoid overloading electrical outlets.
Where Can I Find More Garage Workshop Layout Ideas?
Many home improvement stores and online sites share layouts and tips. For inspiration and real-world examples, check out Family Handyman’s garage workshop ideas.
Designing your two car garage workshop layout is a project worth doing right. With thoughtful planning, you’ll have a space that’s efficient, safe, and enjoyable to use for any project that comes your way.
