Replacing a lower ball joint on a car may sound complicated, but with the right steps and some patience, it’s a job many car owners can handle themselves. The lower ball joint is a critical part of your car’s suspension system.
It connects the control arm to the steering knuckle, allowing your wheels to move up and down and turn smoothly. If your ball joint fails, it can make your car unsafe to drive. This article will guide you through every part of the process, from diagnosing a bad ball joint to finishing the replacement and testing your work.
You’ll learn practical tips, see common mistakes to avoid, and get clear instructions for each stage.
Understanding The Lower Ball Joint
A lower ball joint acts like a pivot point between your car’s suspension and wheels. It lets the wheel move up and down as you drive over bumps and also turn left or right when you steer. Over time, ball joints wear out due to road impacts, dirt, and lack of lubrication. When this happens, you may notice:
- Clunking noises, especially when going over bumps or turning
- Uneven tire wear
- Loose or wandering steering
- Vibration in the steering wheel
Driving with a worn ball joint can lead to loss of control or even the wheel coming loose. That’s why it’s important to replace a failing ball joint as soon as possible.
Tools And Materials Needed
Before starting, gather all the tools and materials you’ll need. Having everything ready makes the job smoother and safer. Here’s what you’ll typically need:
- Jack and jack stands
- Lug wrench or impact wrench
- Wrenches and socket set (metric or standard, depending on your car)
- Ball joint separator (pickle fork) or ball joint press
- Hammer
- Needle-nose pliers
- Pry bar
- Torque wrench
- New lower ball joint (make sure it fits your car’s make and model)
- Grease gun (if required)
- Rubber gloves and eye protection
Some cars require special tools for pressing the ball joint in or out. Check your vehicle’s manual or online forums to see if this applies to your model.
Safety Precautions
Working on your car’s suspension involves lifting the vehicle and using force. Always:
- Park on a flat, solid surface and engage the parking brake
- Wear eye protection and gloves
- Use jack stands—never trust only the jack to hold the car
- Keep tools organized to avoid tripping or accidents
Taking these precautions seriously can prevent injuries or damage to your car.
Diagnosing A Bad Lower Ball Joint
Not every noise or vibration means the ball joint is bad. Before you start, confirm the problem:
- Visual inspection: Look for torn rubber boots, leaking grease, or a ball joint that appears loose or out of place.
- Physical test: With the car lifted and wheel off the ground, grasp the tire at the top and bottom. Wiggle it—if you feel movement or hear clicking, the ball joint may be worn.
- Pry bar test: Insert a pry bar between the control arm and steering knuckle. Gently pry and watch for excessive movement at the ball joint.
If you’re unsure, a mechanic can confirm the diagnosis. Don’t guess—replacing the wrong part wastes time and money.
Step-by-step Guide To Replacing A Lower Ball Joint
Replacing a ball joint is a methodical process. Take your time and follow each step carefully.
1. Prepare The Car
- Park on a level surface and set the parking brake.
- Loosen the lug nuts of the wheel where you’ll be working.
- Lift the car with a jack and secure it with jack stands.
- Remove the wheel and set it aside.
2. Remove Brake Components
- Take off the brake caliper using the appropriate wrench. Hang it with a wire—do not let it dangle by the brake hose.
- Remove the brake rotor. Sometimes it may need a light tap with a rubber mallet if stuck.
3. Access The Ball Joint
- Find the lower ball joint, usually attached to the lower control arm and the steering knuckle.
- If your car has a cotter pin, remove it from the ball joint stud with pliers.
- Use a wrench to remove the ball joint nut.
4. Separate The Ball Joint
This step can be tricky. The ball joint can be stuck due to rust and pressure.
- Use a pickle fork (ball joint separator) and hammer to separate the joint from the steering knuckle. Insert the fork and tap it until the joint pops free.
- Some vehicles may need a ball joint press instead. Follow your vehicle’s repair manual if unsure.
5. Remove The Old Ball Joint
How you remove the ball joint depends on its design:
- If it’s bolted-on, remove the bolts with a wrench.
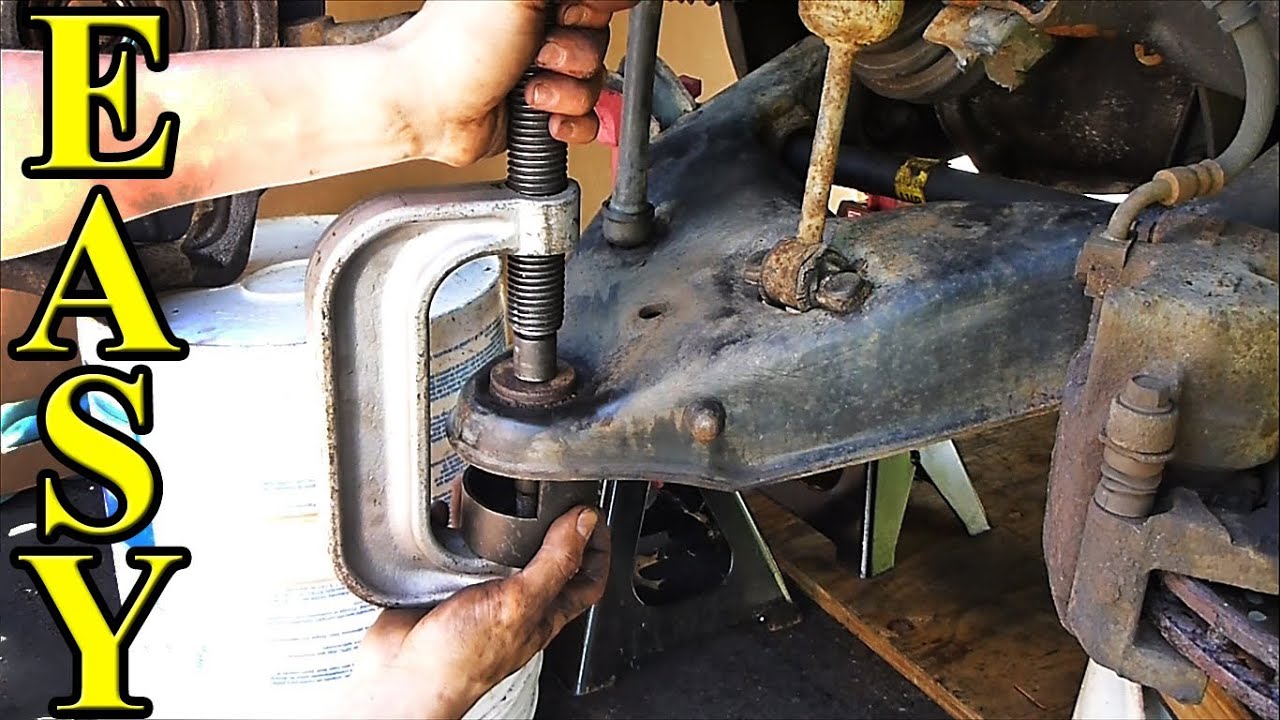
- If it’s pressed-in, use a ball joint press to press it out of the control arm.
Here’s a quick comparison of bolted vs pressed ball joints:
| Type | Removal Method | Common Models |
|---|---|---|
| Bolted-on | Unbolt with wrench | Trucks, older cars |
| Pressed-in | Use press tool | Most modern sedans |
6. Install The New Ball Joint
- Clean the mounting area on the control arm.
- If the new joint is pressed-in, use the ball joint press to install it. Make sure it’s fully seated.
- If it’s bolted-on, tighten bolts to the specified torque.
- Insert the ball joint stud into the steering knuckle.
- Install the ball joint nut. Tighten to the manufacturer’s torque spec.
- Insert a new cotter pin if required.
Tip: Some ball joints come pre-greased and sealed. If yours has a grease fitting, use a grease gun to add lubricant after installation.
7. Reassemble Suspension And Brakes
- Reinstall the brake rotor and caliper.
- Double-check that all bolts and nuts are tight and secure.
- Put the wheel back on and hand-tighten the lug nuts.
8. Lower The Car And Final Checks
- Carefully remove the jack stands and lower the car to the ground.
- Tighten the lug nuts in a star pattern to the recommended torque.
After the replacement, it’s a good idea to get a wheel alignment. Changing suspension parts can affect your alignment, causing uneven tire wear or handling problems if not corrected.
Common Mistakes To Avoid
Many people make errors when replacing ball joints. Here are some you can avoid:
- Not using jack stands: Relying only on a jack is dangerous.
- Mixing up left and right parts: Some ball joints are side-specific.
- Not torquing bolts: Over-tightening or under-tightening can cause failure.
- Skipping alignment: This leads to steering and tire problems.
- Forgetting the cotter pin: This small part prevents the nut from loosening.

Credit: www.reddit.com
Non-obvious Tips For Diy Success
- Mark bolt positions: Before removing bolts, mark their positions with a paint pen. This helps maintain alignment and proper fit.
- Check other suspension parts: While you’re under the car, inspect tie rods, control arm bushings, and sway bar links for wear. Replacing multiple parts at once saves time and future effort.
- Use anti-seize compound: Apply anti-seize to bolts during reassembly to make future work easier, especially in rust-prone areas.
Signs Of A Job Well Done
After replacing the lower ball joint and reassembling everything, take your car for a careful test drive:
- Listen for any odd noises—popping, clunking, or squeaking
- Feel the steering wheel for smooth, direct response
- Check if the car tracks straight without pulling to one side
If you notice problems, stop and double-check your work. Sometimes, a loose nut or missed step can cause issues.
Credit: www.youtube.com
When To Call A Professional
While many DIYers can replace a ball joint, some situations call for help:
- Severe rust or seized parts that won’t come loose
- Unusual ball joint designs needing special tools
- Lack of confidence or experience with suspension work
A professional mechanic can ensure the job is done safely. Labor costs can range from $150 to $400, depending on your location and car type.
Here’s a comparison of DIY vs professional replacement:
| Aspect | DIY Replacement | Professional Mechanic |
|---|---|---|
| Cost | $50–$150 (parts & tools) | $200–$600 (parts & labor) |
| Time | 2–4 hours | 1–2 hours |
| Skill Needed | Intermediate | Expert |
| Tools | Bought/rented | All provided |
Real-world Example
Let’s say you own a Honda Civic with 120,000 miles. You notice clunking when turning and uneven tire wear. After inspection, you confirm a worn lower ball joint. You gather your tools, buy a replacement part for $45, and spend an afternoon following the steps above. After reassembly, the noise is gone, steering feels solid, and you avoid a costly breakdown.
Practical Advice For Lasting Results
- Always buy quality ball joints from trusted brands. Cheap parts may fail early.
- Regularly inspect your suspension after driving in rough conditions or at every oil change.
- Keep a record of your repair, including mileage and part number, for future reference.
If you want more technical details or part specifications, the Wikipedia Ball Joint page is a useful resource.
Frequently Asked Questions
How Do I Know If My Lower Ball Joint Is Bad?
Look for clunking noises, uneven tire wear, or loose steering. You can also lift the car and check for movement in the wheel or ball joint itself.
Can I Drive With A Worn Lower Ball Joint?
It’s risky. A bad ball joint can break, causing loss of control or even a wheel detaching. It’s best to replace it as soon as possible.
How Long Does It Take To Replace A Lower Ball Joint?
For most cars, expect 2–4 hours if doing it yourself. Professionals may finish in 1–2 hours if no bolts are seized or parts stuck.
Do I Need A Wheel Alignment After Replacing A Ball Joint?
Yes. Replacing a ball joint can affect your wheel alignment. An alignment ensures even tire wear and safe handling.
Can I Replace A Ball Joint Without Special Tools?
Some older cars have bolted-on ball joints that only require basic tools. Most modern vehicles need a ball joint press or separator tool for safe removal and installation.
Replacing a lower ball joint is a challenging but rewarding task. It can save you money, teach valuable skills, and keep your car running safely. With care, patience, and the right steps, you can handle this job and enjoy smoother, safer driving for miles to come.
Credit: www.reddit.com
