Replacing a car TPMS sensor may seem challenging, but with the right tools and clear steps, you can do it yourself and save money on mechanic fees. Many car owners face TPMS (Tire Pressure Monitoring System) alerts but don’t realize it’s possible to fix a faulty sensor at home. This guide will walk you through every step, from understanding what a TPMS sensor does to detailed instructions for replacing it yourself. You’ll also learn how to avoid mistakes and what to expect, so you feel confident before starting.
Understanding Tpms Sensors
The TPMS sensor is a small device inside each tire that monitors air pressure. When pressure drops too low or goes too high, your car’s dashboard shows a warning light. Most modern cars (since 2007 in the US and 2014 in the EU) require TPMS by law. These sensors help prevent flat tires, blowouts, and unsafe driving conditions.
There are two types:
- Direct TPMS: Each wheel has a physical sensor inside.
- Indirect TPMS: Uses ABS wheel speed sensors and software to detect low pressure (no sensor inside the tire).
This guide focuses on replacing direct TPMS sensors, which are the most common.
Signs Your Tpms Sensor Needs Replacing
Not every TPMS warning means you need a new sensor. Here are clear signs the sensor itself is faulty:
- TPMS warning light stays on after checking and adjusting tire pressures.
- Your car’s diagnostic tool shows a TPMS sensor error code.
- Batteries inside the sensor (usually last 5–10 years) are dead and cannot be replaced separately.
- The sensor shows erratic readings or drops signal often.
If your tires are fine but the light is still on, you likely need a sensor replacement.
Credit: www.instructables.com
Tools And Materials You Need
Gather these items before you start:
- Replacement TPMS sensor (specific to your car’s year, make, and model)
- Tire changing tools (jack, wrench, socket set)
- Valve core tool
- Tire bead breaker (manual or automatic)
- Torque wrench
- TPMS programming tool (sometimes called a relearn tool)
- Tire pressure gauge
- Safety gloves and glasses
- Air compressor (optional but helpful)
Some auto parts stores can program sensors for you if you don’t have a programming tool.
How To Buy The Right Tpms Sensor
Not all sensors are universal. Here’s how to get the correct one:
- Check your owner’s manual for the exact sensor model or part number.
- Use your car’s VIN (Vehicle Identification Number) on the parts store website or app.
- Ask the store if the sensor is pre-programmed or if you’ll need to program it yourself.
- Compare prices. Aftermarket sensors may cost less, but OEM (original equipment manufacturer) sensors are guaranteed to fit.
| Sensor Type | Pros | Cons | Average Price (USD) |
|---|---|---|---|
| OEM Sensor | Exact fit, reliable | More expensive | 50–120 |
| Aftermarket Sensor | Cheaper, widely available | May need programming | 25–70 |
| Universal Sensor | Works with many cars | Programming usually required | 30–80 |
Non-obvious tip: Many cars use the same sensor type for all four wheels, but some luxury or European cars have unique sensors for each wheel position. Always double-check.

Credit: www.youtube.com
Preparing Your Work Area
A clean, flat surface is safest. Park your car, turn off the engine, and put on the parking brake. Gather all tools within reach. If possible, do the work indoors to avoid dust and wind. Wear safety gloves and glasses—removing tires and working with air pressure can be dangerous.
Extra insight: If you’ve never removed a tire from a rim before, practice on a spare or watch detailed video guides. Tire beads can be stubborn.
Step-by-step: How To Replace A Tpms Sensor
Follow these steps closely for a smooth, safe process.
1. Remove The Tire
- Loosen the lug nuts slightly while the car is still on the ground.
- Lift the car with a jack and secure with jack stands.
- Remove the lug nuts and pull the wheel off.
2. Deflate The Tire
- Remove the valve cap.
- Use a valve core tool to unscrew and remove the valve core.
- Let all air escape (you’ll hear a hiss).
3. Break The Tire Bead
- Place the tire on a bead breaker or use a manual bead breaker tool.
- Press down until the bead separates from the rim (can take some force).
- Only break the bead on the side with the TPMS sensor (usually the valve stem side).
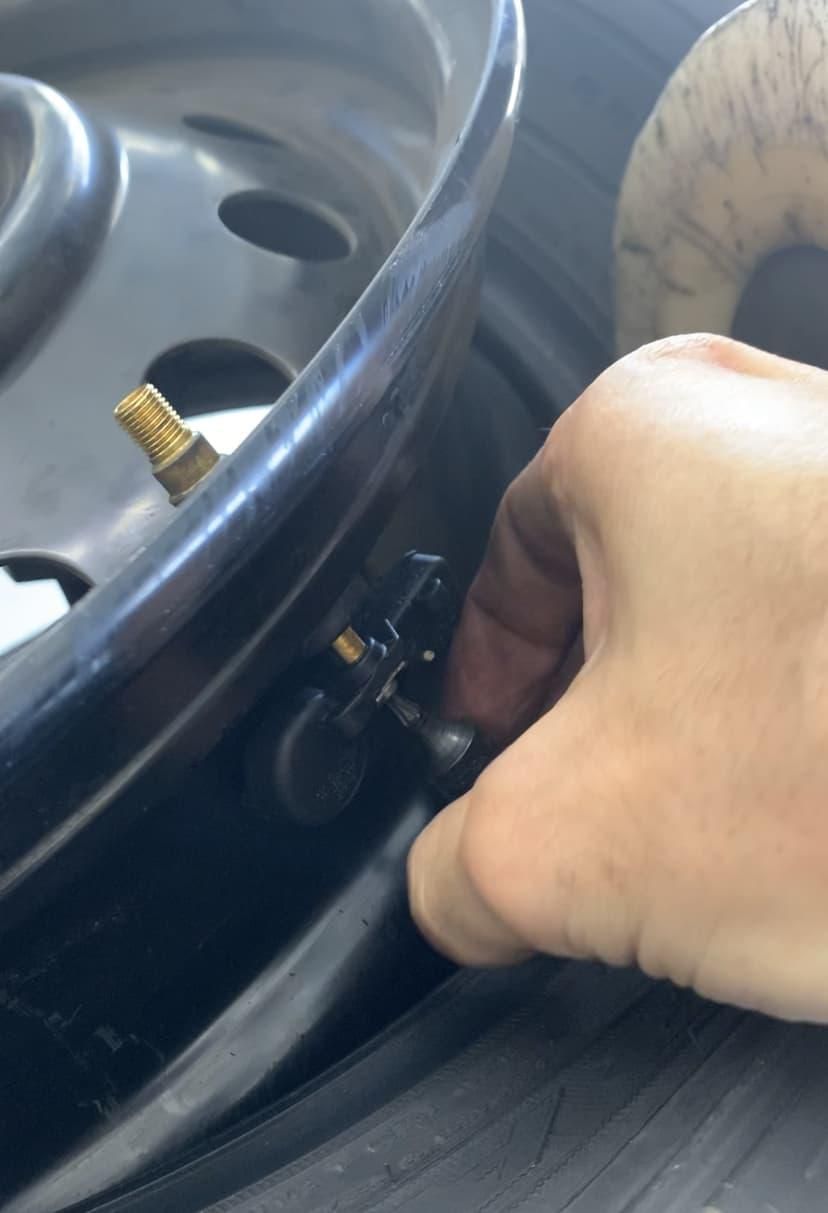
4. Access The Tpms Sensor
- Push the tire down to expose the valve stem.
- Locate the TPMS sensor—it’s attached to or built into the valve stem.
5. Remove The Old Sensor
- Use a socket wrench to remove the nut holding the sensor to the rim.
- Carefully pull out the sensor from the inside.
- If the sensor is stuck, gently wiggle or tap it—do not force.
Expert tip: Some sensors have a clip or extra fastener. Don’t lose any small parts.
6. Install The New Sensor
- Insert the new sensor into the valve stem hole from the inside of the rim.
- Secure with the supplied nut. Tighten to the manufacturer’s torque spec (usually 4–7 Nm).
- Double-check for proper alignment and fit.
7. Re-seat The Tire Bead
- Lubricate the bead and rim edge with tire lube (or soapy water).
- Use a bead seater or carefully press the tire back onto the rim.
8. Inflate The Tire
- Reinstall the valve core with the tool.
- Inflate the tire to the correct pressure (check your door jamb sticker for numbers).
- Check for leaks by spraying soapy water around the valve stem—bubbles mean a leak.
9. Reinstall The Tire
- Place the wheel back on the car.
- Hand-tighten the lug nuts.
- Lower the car, then fully tighten the lug nuts in a star pattern with a torque wrench.
10. Program Or Relearn The Tpms Sensor
Most cars need to be told about the new sensor:
- Turn the car to the “on” position without starting the engine.
- Use the TPMS programming tool as directed by the sensor or car maker.
- Some cars relearn automatically after driving for 10–20 minutes at 15 mph or higher.
- If the warning light stays on, repeat the process or check for errors.
Hidden detail: Some cars need all four sensors replaced at once to clear errors, but most allow single-sensor replacement.

Credit: www.autozone.com
Common Mistakes To Avoid
Many DIYers make avoidable errors that can cost time or money:
- Mixing up sensors: If you replace more than one, label them by wheel position.
- Over-tightening the sensor nut: This can crack the sensor or damage the rim.
- Skipping the relearn process: The warning light won’t go off until you complete this step.
- Using the wrong sensor: Even a small difference in frequency or protocol will cause failure.
- Damaging the tire bead: Forcing the tire off can create leaks or weak spots.
How Long Does It Take?
- For first-timers: About 1–2 hours per sensor.
- With practice or the right tools: 30–45 minutes.
- Programming adds 10–15 minutes.
Pro tip: If you’re replacing tires, it’s efficient to replace sensors at the same time.
When To Ask A Professional
Some situations are better left to a mechanic:
- If you don’t have access to a bead breaker or programming tool.
- If your wheels are high-value alloys or have special finishes.
- If the sensor is deeply corroded or broken.
Some tire shops will install your sensor for a small fee if you bring your own parts.
Benefits Of Diy Tpms Sensor Replacement
- Cost savings: Shops may charge $100–$200 per sensor including labor.
- Immediate results: No need to wait for an appointment.
- Satisfaction: Learn more about your car and gain new skills.
Costs Breakdown
Here’s what you can expect to spend:
| Item | DIY Cost (USD) | Shop Cost (USD) |
|---|---|---|
| TPMS Sensor (per tire) | 25–120 | 50–150 |
| Programming Tool | 50–100 (reusable) | Included |
| Labor (per tire) | 0 | 50–100 |
| Total (1 tire) | 75–220 | 100–250 |
Note: Costs vary by vehicle and region.
How To Extend Tpms Sensor Life
- Check tire pressure monthly—low pressure can stress sensors.
- Avoid harsh chemicals when cleaning wheels.
- Replace valve caps to keep dirt and moisture out.
- Have sensors checked every time you change tires.
Insight: Sensors usually last 5–10 years but fail faster in very hot or cold climates.
What To Do After Replacement
- Drive for 10–20 minutes to allow the car to recognize the new sensor.
- Watch the dashboard for the TPMS warning light to turn off.
- Recheck tire pressure after a few days.
If you still see warnings, a diagnostic scan tool can help find the issue.
Where To Learn More
If you want more details or need help with a specific car, check the manufacturer’s website or use resources like Tire Rack for up-to-date TPMS info.
Frequently Asked Questions
How Do I Know Which Tpms Sensor Is Bad?
Many cars show a sensor location on the dashboard or in the owner’s manual. If not, a mechanic or a TPMS diagnostic tool can identify the faulty sensor by reading sensor IDs and battery status.
Can I Reuse An Old Tpms Sensor When Changing Tires?
If the sensor is working and the battery is good, yes. But if it’s more than 5 years old, it’s smart to replace it. Removing and reinstalling a sensor can sometimes damage it.
Do I Need To Program A New Tpms Sensor?
Most new sensors need to be programmed or “relearned” to your car. Some universal sensors require a special tool. Others come pre-programmed. Check before buying.
What Happens If I Don’t Replace A Faulty Tpms Sensor?
You’ll keep seeing a warning light and won’t get alerts for low tire pressure. This is risky and may be illegal in some places, especially for yearly inspections.
Is It Safe To Drive With The Tpms Warning Light On?
It’s safe only if you’ve checked and confirmed tire pressures are correct. But you won’t be alerted to future issues, so fix the sensor as soon as possible.
Replacing a TPMS sensor yourself is a practical way to keep your car safe and avoid expensive shop visits. With the right tools and careful steps, anyone can do it. Always check your car’s manual, buy the correct sensor, and don’t rush the process. The feeling of solving a modern car problem on your own is worth the effort.
