Sealing your garage floor before applying epoxy can make a big difference in how long the floor lasts and how good it looks. Many homeowners rush to put epoxy on concrete, but ignore the importance of sealing. If you want a strong, durable, and beautiful finish, you need to know the right way to prepare and seal your garage floor.
This guide walks you through every step, explains common problems, and gives you expert tips to avoid costly mistakes.
Why Sealing Matters Before Epoxy
Many people believe epoxy coating alone is enough for a garage floor. But concrete is porous—it absorbs water, oil, and chemicals. If you apply epoxy on unsealed or poorly prepared concrete, moisture and contaminants can cause the coating to bubble, peel, or fail early.
Sealing acts as a barrier. It blocks moisture, prevents stains, and helps the epoxy bond better. In areas with high humidity or old garage floors, skipping this step can mean your floor peels in a year or less. Think of sealing as insurance for your garage floor investment.
Step 1: Inspect And Test Your Concrete
Before starting, check the floor’s condition. Look for cracks, stains, or damp areas. These problems must be fixed before sealing. To test for moisture, tape a plastic sheet (about 2×2 feet) on the floor and leave it for 24 hours. If you see condensation under the plastic, your concrete is damp. You must solve moisture issues first—sealing damp concrete traps water and ruins the epoxy.
Common Issues To Look For
- Efflorescence: White powder on the surface, a sign of moisture moving up through the slab.
- Oil stains: Dark spots that can block the sealer and epoxy from sticking.
- Cracks: Even small cracks can let in water and cause bigger problems later.

Credit: xtremepolishingsystems.com
Step 2: Clean The Surface Thoroughly
A clean floor is key for the sealer to stick. Start by sweeping and vacuuming all dust, dirt, and debris. For old garages, you may need to scrub away years of grime.
How To Deep Clean
- Degrease: Use a concrete degreaser to remove oil and grease spots. Scrub with a stiff brush and rinse well.
- Remove Paint or Old Coatings: Use a floor grinder or chemical stripper if needed.
- Wash: Power wash or mop with a strong concrete cleaner.
- Dry Completely: Let the floor dry for at least 24–48 hours. Moisture left in the concrete can ruin the next steps.
Non-obvious tip: Even a little dust can stop the sealer from bonding. After cleaning, wipe the surface with a damp microfiber cloth for best results.
Step 3: Repair Cracks And Holes
Now, fix any damage. Small cracks or pits will show through epoxy and may get worse. Use a concrete patch or epoxy filler. Follow the manufacturer’s directions for mixing and curing times. Sand the patched areas smooth once dry.
Repair Products Comparison
Here’s a quick comparison of common repair products:
| Product Type | Best For | Curing Time | Notes |
|---|---|---|---|
| Hydraulic Cement | Active leaks, large cracks | 15-30 mins | Expands as it sets |
| Epoxy Patch | Small cracks, holes | 4-6 hours | Strongest bond |
| Concrete Caulk | Hairline cracks | 2-4 hours | Flexible, easy to apply |
Extra insight: Don’t overfill cracks. Apply in thin layers to avoid uneven spots.
Credit: xtremepolishingsystems.com
Step 4: Etch Or Grind The Surface
Epoxy and sealers need a slightly rough surface to bond well. Smooth concrete, especially if it’s new or machine-troweled, is too slick.
Etching Vs. Grinding
- Etching uses a mild acid (like muriatic acid) to open up the pores.
- Grinding uses a concrete grinder to roughen the surface.
Here’s a simple comparison:
| Method | Pros | Cons |
|---|---|---|
| Etching | Cheap, easy for DIY | Can be messy, needs good rinsing |
| Grinding | Best bond, removes old coatings | More expensive, noisy, creates dust |
If you’re sealing before epoxy, grinding is best for old or stained floors, while etching is usually enough for clean, new concrete.
Step 5: Neutralize And Dry
If you used acid etching, the surface is now acidic. You must neutralize it with a solution of baking soda and water, then rinse well. This step is often skipped by beginners, but it’s critical. Any leftover acid can weaken the sealer and epoxy.
After rinsing, let the floor dry completely—usually 24–48 hours. Use a fan or dehumidifier if your garage is humid.
Non-obvious tip: Check dryness by taping a clear plastic sheet to the floor overnight. Any fog under the plastic means it’s not dry enough.
Step 6: Choose The Right Sealer
There are many types of concrete sealers. The best choice depends on your floor, climate, and the epoxy you’ll use.
Main Types Of Concrete Sealers
- Penetrating Sealers: Soak into the concrete, block water and salts, but leave the surface unchanged. Good for damp climates.
- Acrylic Sealers: Form a thin film, dry fast, easy to apply, but wear out faster.
- Epoxy Sealers: Thick, strong, but usually used as the main coating, not as a base.
- Polyurethane Sealers: Very durable, but often slippery and expensive.
For most garage floors, a penetrating sealer (like silane/siloxane) is ideal before epoxy. It blocks moisture without creating a slippery layer.
Sealer Performance Table
| Sealer Type | Moisture Blocking | Ease of Application | Durability |
|---|---|---|---|
| Penetrating | Excellent | Easy | 10+ years |
| Acrylic | Good | Very Easy | 2-5 years |
| Epoxy | Excellent | Moderate | 10+ years |
| Polyurethane | Good | Moderate | 10+ years |
Important: Avoid sealers that leave a thick, glossy film if you plan to epoxy—the epoxy may not bond well.
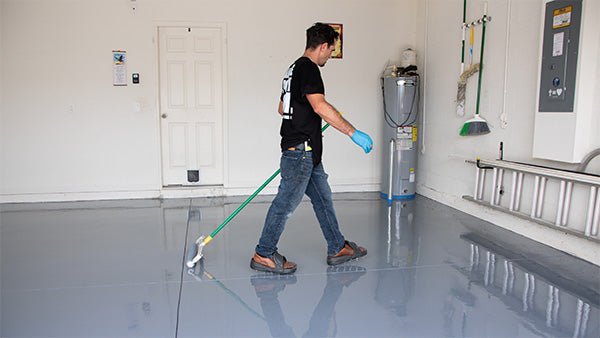
Step 7: Apply The Sealer
Read the manufacturer’s instructions carefully. Most sealers are applied with a roller or sprayer. Work in small sections to avoid missing spots.
Application Tips
- Wear protective gear: Gloves, goggles, and a mask.
- Ventilate well: Open doors and windows.
- Overlap strokes: Ensure even coverage.
- Don’t puddle: Too much sealer can make the surface sticky or uneven.
Allow the sealer to dry fully—usually 1–2 days. The floor should look unchanged if you used a penetrating sealer.
Beginner mistake: Applying sealer to a wet or dirty floor. Always check dryness and cleanliness before starting.
Step 8: Test The Surface
Before moving to epoxy, test a small area. Drop a little water on the sealed surface. If it beads up, the sealer is working. If the water soaks in, apply another sealer coat as directed.
Step 9: Prepare For Epoxy Application
After sealing and drying, sweep and vacuum the floor again. Even small dust or grit can cause defects in the epoxy finish.
Non-obvious insight: Wait the full recommended time after sealing before applying epoxy—usually 2–7 days. Rushing this step can cause the epoxy to bubble or peel.
Common Mistakes To Avoid
- Skipping moisture testing: Even new concrete can hold water.
- Not repairing cracks fully: Small damage gets worse under epoxy.
- Over- or under-applying sealer: Too thick or too thin both cause problems.
- Using the wrong sealer: Some sealers block epoxy from bonding.
- Ignoring manufacturer’s directions: Always follow the product’s instructions.
Key Benefits Of Sealing Before Epoxy
- Longer-lasting epoxy coating
- Better resistance to moisture and chemicals
- No unsightly bubbles or peeling
- Easier cleaning and maintenance
- More professional, attractive finish
Sealing is an extra step, but it’s worth the effort. Many professional installers say that 80% of coating failures come from poor preparation—not bad epoxy.
Real-world Example
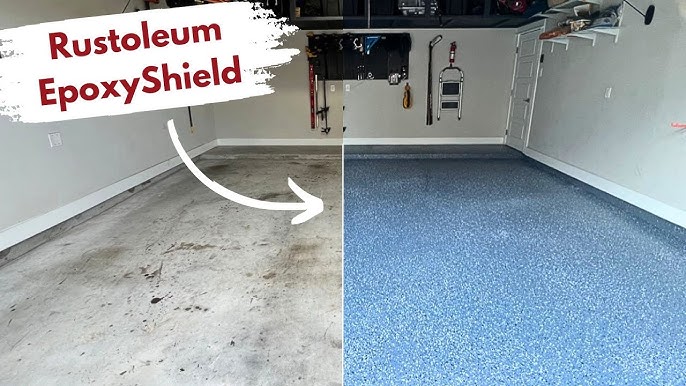
A homeowner in Florida sealed his garage floor before epoxy. After three years, his floor still looked new, even with humid weather and heavy car use. His neighbor skipped sealing, and within a year, the epoxy began to peel and show stains.
Extra Tips For The Best Results
- Choose dry, mild weather for the project—avoid rainy days.
- Take time on repairs; they show under the final coating.
- If in doubt about your concrete’s condition, ask a local pro for advice.
- For more information on concrete sealers, see the American Concrete Institute.
Credit: www.youtube.com
Frequently Asked Questions
How Long Should I Wait After Sealing Before Applying Epoxy?
Most sealers need at least 24–72 hours to fully cure. For best results, wait as long as the manufacturer recommends—sometimes up to 7 days. Test by placing a drop of water on the floor; it should bead up, not soak in.
Can I Use Any Sealer Before Epoxy?
No. Some sealers, like thick acrylics, can prevent epoxy from sticking. Always use a penetrating sealer that allows vapor to escape. Check your epoxy brand’s recommendations.
What If My Concrete Is Always Damp?
You must solve the moisture problem first. Sealing damp concrete traps water and can cause epoxy failure. Improve drainage around your garage, use a vapor barrier, or consult a professional for help.
How Do I Know If My Floor Is Ready For Epoxy?
The surface should be clean, dry, and free of dust or grease. Test with a water drop—if it beads, the sealer is working. The concrete should also feel slightly rough, not glossy or sticky.
Do I Need To Seal A Brand-new Garage Floor?
Even new concrete can benefit from sealing, especially if you live in a wet climate. Wait at least 28 days after pouring new concrete before sealing, so the slab cures fully.
Taking the time to seal your garage floor before epoxy is the secret to a strong, beautiful, and long-lasting finish. Careful preparation pays off in years of easy maintenance and a garage you’ll be proud to show.
