Testing a car battery with a multimeter involves setting the device to DC voltage, then connecting the red probe to the positive terminal and the black probe to the negative terminal. A fully charged, healthy battery at rest should display approximately 12.6 volts. Readings below 12.4 volts often indicate a need for charging or potential replacement.
how to test car battery with multimeteris a common question for users. In this guide, we’ll cover practical causes, fixes, and what to do next.
- Regular battery testing prevents unexpected breakdowns.
- A multimeter measures DC voltage to assess battery health.
- Safety precautions are essential when working with car batteries.
- Interpreting voltage readings helps determine if a battery needs charging or replacement.
- Testing the charging system and checking for parasitic drains are also crucial for battery longevity.
Why Regular Car Battery Testing is Crucial
Regular testing of your car battery is a proactive measure that can save you from inconvenient breakdowns and unexpected repair expenses. A car battery, like any other component, degrades over time. Its ability to hold a charge and deliver sufficient power diminishes with age and use.
Ignoring battery health can lead to a sudden failure, leaving you stranded. Routine checks allow you to monitor its condition, identify potential issues early, and take corrective action before a minor problem escalates into a major one. This practice is especially important in extreme weather conditions, which can significantly impact battery performance.
Understanding Car Battery Basics and Voltage
A car battery is a lead-acid battery designed to provide a burst of electrical current to start the engine and power the vehicle’s electrical systems when the engine is off. Most modern car batteries are 12-volt batteries, meaning they consist of six cells, each producing approximately 2.1 volts when fully charged.
The voltage reading is a primary indicator of a battery’s state of charge and overall health. A fully charged 12-volt battery should measure around 12.6 to 12.8 volts when at rest. As the charge depletes, the voltage drops. Understanding these basic voltage ranges is fundamental to accurately interpreting multimeter readings.
Essential Tools for Testing Your Car Battery
Before you begin the testing process, gathering the right toolsensures efficiency and safety. The primary tool you will need is a multimeter, but a few other items are also highly recommended.
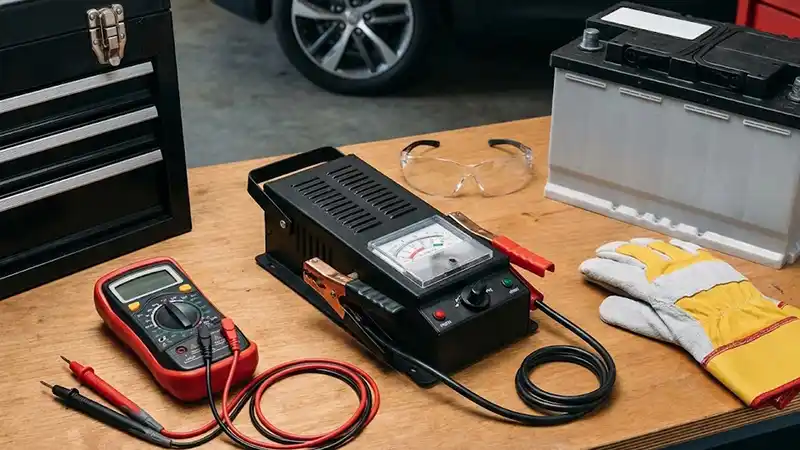
The Multimeter
A multimeter is a versatile electronic measuring instrument that combines several measurement functions in one unit. For car battery testing, you will primarily use its DC voltage (VDC) setting. Both digital and analog multimeters can be used, though digital models often provide more precise readings and are easier to interpret.
Additional Recommended Tools
- Safety Glasses:To protect your eyes from potential battery acid splashes or sparks.
- Gloves:To protect your hands from battery acid and grime.
- Wire Brush or Battery Terminal Cleaner:For cleaning corroded battery terminals, which can affect readings.
- Wrench or Socket Set:To disconnect battery terminals if necessary for cleaning or more advanced testing.
- Battery Charger:If your battery tests low, you will need a charger to restore its charge.
Safety First: Precautions Before You Begin
Working with car batteries involves electrical currents and corrosive chemicals, making safety paramount. Always prioritize these precautions to prevent injury or damage to your vehicle.
- Wear Protective Gear:Always put on safety glasses and gloves before touching the battery.
- Work in a Well-Ventilated Area:Batteries can emit hydrogen gas, which is flammable. Ensure good airflow to disperse any gases.
- Avoid Metal Contact:Do not allow metal tools to touch both battery terminals simultaneously, as this can cause a short circuit, sparks, and potential explosion.
- Turn Off the Engine and Accessories:Ensure the vehicle’s engine is off, and all lights, radio, and other accessories are turned off before testing.
- Identify Terminals:Clearly identify the positive (+) and negative (-) terminals. The positive terminal is usually larger and marked with a plus sign, while the negative is smaller and marked with a minus sign.
- Clean Terminals:If terminals are corroded, clean them thoroughly with a wire brush before testing to ensure accurate readings.
How to Test a Car Battery with a Multimeter
Testing your car battery with a multimeter is a straightforward process that provides valuable insight into its condition. Follow these steps carefully for accurate results.
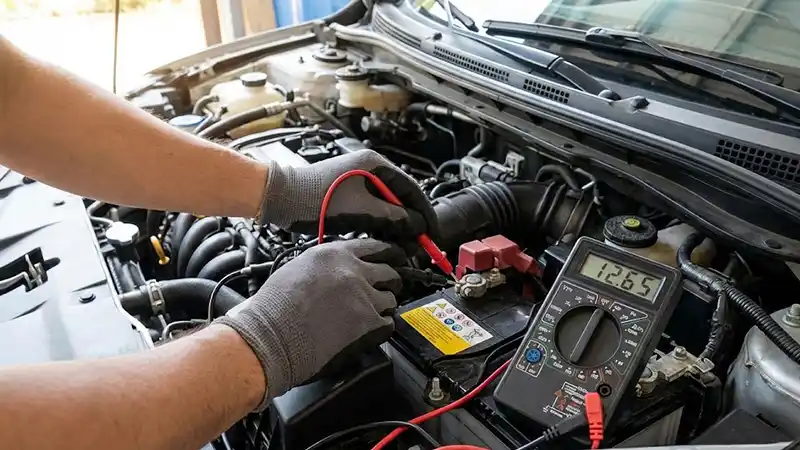
- Prepare Your Multimeter:Turn on your multimeter. Set the dial to the DC voltage setting. This is often indicated by a ‘V’ with a straight line and three dots above it, or simply ‘VDC’. Choose a range that can read up to 20 volts (e.g., ’20V’ or ‘DCV 20’).
- Connect the Probes:Insert the red probe into the ‘VΩmA’ or ‘V’ jack and the black probe into the ‘COM’ (common) jack on your multimeter.
- Connect to Battery Terminals:Carefully touch the red (positive) probe to the positive (+) terminal of the car battery. Then, touch the black (negative) probe to the negative (-) terminal of the car battery. Ensure good contact with the metal terminals, avoiding any corrosion.
- Read the Voltage:Observe the reading on your multimeter’s display. This is your battery’s resting voltage.
- Record the Reading:Note down the voltage displayed. This reading is crucial for determining the battery’s state of charge.
- Remove Probes:Once you have your reading, carefully remove the probes from the battery terminals, starting with the negative (black) probe first to minimize any risk of accidental shorting.
Interpreting Your Multimeter Readings: What the Numbers Mean
Understanding what your multimeter readings signify is key to assessing your battery’s health. The voltage displayed provides a snapshot of its current state of charge.
- 12.6 Volts or Higher:The battery is fully charged and in good condition.
- 12.4 to 12.6 Volts:The battery is still in good condition but may not be at 100% charge. It might benefit from a top-off charge.
- 12.0 to 12.4 Volts:The battery is partially discharged. It needs charging. If it consistently reads in this range after charging, it might be weakening.
- Below 12.0 Volts:The battery is significantly discharged and likely needs immediate charging. If it drops to this level quickly after charging or fails to hold a charge, it is likely at the end of its lifespan and requires replacement.
These readings are for a battery at rest, meaning the engine has been off for at least a few hours, ideally overnight, to allow the surface charge to dissipate.
Beyond Voltage: Testing Your Car’s Charging System
A healthy battery is only part of the equation; a properly functioning charging system is equally vital. The alternator is responsible for recharging the battery while the engine runs and powering the vehicle’s electrical components. If your battery consistently drains, the issue might not be the battery itself but a failing alternator.
How to Test the Charging System
- Start the Engine:With the multimeter still connected to the battery terminals (red to positive, black to negative), start your car’s engine.
- Observe Voltage with Engine Running:The multimeter should now display a higher voltage, typically between 13.8 and 14.8 volts. This indicates the alternator is actively charging the battery.
- Turn on Accessories:Turn on various electrical accessories like headlights, radio, and air conditioning. The voltage should remain within the 13.8-14.8 volt range. A significant drop below this range, especially below 13.0 volts, suggests a weak or failing alternator.
- Turn Off Engine:Once testing is complete, turn off the engine and disconnect the multimeter.
If the voltage remains low with the engine running, or if it drops significantly when accessories are engaged, it’s a strong indicator that your alternator may be failing and requires inspection by a professional.
Identifying Parasitic Drains on Your Battery
Sometimes, a battery drains even when the car is off and the charging system is working correctly. This can be due to a parasitic drain, where an electrical component continues to draw power when it shouldn’t. Identifying and fixing these drains is crucial for battery longevity.
How to Check for Parasitic Drains
- Ensure Car is Off:Turn off the engine, remove the key, and ensure all doors are closed and all accessories are off. Wait at least 15-30 minutes for all modules to power down.
- Disconnect Negative Terminal:Carefully disconnect the negative (-) battery cable from the battery terminal.
- Set Multimeter to Amps:Set your multimeter to measure DC Amperes (A) in a higher range first (e.g., 10A or 20A), then switch to a lower mA range if needed.
- Connect Multimeter in Series:Connect the red probe to the disconnected negative battery cable. Connect the black probe to the negative (-) battery terminal. The multimeter is now completing the circuit.
- Read the Amperage:Observe the reading. A normal parasitic draw is typically between 20-50 milliamps (0.02-0.05 amps). Anything significantly higher indicates a drain.
- Isolate the Drain:If you detect a high draw, start pulling fuses one by one from the fuse box while watching the multimeter. When the amperage drops significantly, you’ve found the circuit with the drain.
Identifying the specific circuit allows you to pinpoint the faulty component, such as a faulty interior light switch, a stuck relay, or an aftermarket accessory. This process can be time-consuming but is effective in diagnosing persistent battery drain issues.
When to Consider a Car Battery Replacement
Even with diligent testing and maintenance, car batteries have a finite lifespan. Several indicators suggest it’s time to consider a replacement.
- Age:Most car batteries last between 3 to 5 years. If yours is approaching or exceeding this age, it’s wise to start monitoring it more closely.
- Slow Cranking:If your engine cranks slowly or struggles to start, especially in cold weather, it’s a classic sign of a weakening battery.
- Dim Lights/Electrical Issues:Dim headlights, flickering dashboard lights, or other electrical component malfunctions when the engine is off can indicate a low battery charge.
- Frequent Jumps:If you find yourself needing to jump-start your car frequently, the battery is likely no longer holding a sufficient charge.
- Swollen Battery Case:A swollen or bulging battery case can indicate internal damage, often due to overcharging or extreme heat, and is a clear sign for immediate replacement.
- Corrosion:Excessive corrosion around the battery terminals, even after cleaning, can sometimes indicate a leaking battery or an internal issue.
- Low Voltage Readings:Consistently low voltage readings (below 12.0 volts) even after a full charge, or a rapid drop in voltage during a load test, are strong indicators that the battery needs to be replaced.
Extending Your Car Battery’s Lifespan
While battery replacement is inevitable, several practices can help extend its useful life and ensure reliable performance.
- Regular Driving:Short trips prevent the alternator from fully recharging the battery. Take longer drives regularly to ensure the battery gets a complete charge.
- Keep Terminals Clean:Regularly inspect and clean battery terminals to prevent corrosion, which can impede current flow.
- Secure the Battery:Ensure the battery is securely mounted in its tray. Vibrations can cause internal damage and shorten its lifespan.
- Limit Accessory Use When Engine is Off:Avoid using the radio, lights, or other accessories for extended periods when the engine is not running.
- Check Electrolyte Levels (if applicable):For non-sealed batteries, periodically check the electrolyte levels and top up with distilled water if necessary.
- Use a Battery Tender for Storage:If you store your vehicle for extended periods, use a trickle charger or battery tender to maintain its charge.
- Avoid Extreme Temperatures:Park your car in a garage or shaded area during extreme hot or cold weather to protect the battery from temperature extremes.
Frequently Asked Questions
What is a healthy voltage reading when you test a car battery with a multimeter?
A healthy car battery, when fully charged and at rest (engine off for several hours), should display a voltage reading of approximately 12.6 to 12.8 volts on a multimeter. Readings slightly below this, such as 12.4 volts, indicate a good but not fully charged battery.
Can I test a car battery with a multimeter while it’s still connected in the car?
Yes, you can test a car battery’s resting voltage and charging system voltage with a multimeter while it’s still connected in the car. For resting voltage, ensure the engine is off and all accessories are off. For charging system tests, the engine needs to be running.
How accurate is using a multimeter to test car battery health?
Using a multimeter provides a good indication of a car battery’s state of charge and can help diagnose charging system issues. While it’s highly accurate for voltage readings, it doesn’t directly measure the battery’s cranking amps or its ability to hold a load, which are also crucial for overall health assessment.
What should I do if my multimeter shows a low voltage when testing my car battery?
If your multimeter shows a low voltage (below 12.4 volts), the first step is to fully charge the battery using a car battery charger. After charging, let the battery rest for a few hours and retest it. If it still reads low or quickly drops voltage, it likely needs replacement.
How often should I test my car battery with a multimeter?
It is generally recommended to test your car battery with a multimeter at least twice a year, ideally before the onset of extreme summer heat and winter cold. More frequent testing is advisable if your battery is older than three years or if you notice any starting issues.
What’s the difference between testing a car battery’s resting voltage and its cranking voltage?
Resting voltage is the battery’s voltage when the engine is off and has been off for a while, indicating its state of charge. Cranking voltage, measured while the engine is actively starting, shows how much voltage the battery can maintain under load, which is a better indicator of its overall health and ability to deliver power.
Conclusion
Testing your car battery with a multimeter is a simple yet powerful DIY skill that empowers you to monitor your vehicle’s health and prevent unexpected breakdowns. By understanding how to accurately take readings, interpret the results, and identify potential issues with your charging system or parasitic drains, you can significantly extend your battery’s lifespan. Regular checks, combined with proper maintenance, ensure reliable starts and consistentelectrical performance. If you encounter persistent low voltage or other concerns, consulting a trusted automotive professional can provide further diagnosis and solutions.
Related Guides: How to Clean Car Battery Terminals DIY, How to Prevent Battery Corrosion DIY, How to Jump Start a Car Safely, Jump Starting with Cables Step by Step, Why Car Battery Keeps Dying Overnight.
Also Read: How to Install Memory Saver for Battery Change, How to Check Alternator at Home, How to Fix Loose Battery Connection DIY.
