
Replacing a car’s radiator cap might seem like a small task, but it’s more important than most drivers realize. This simple part controls the pressure in your radiator, helps prevent overheating, and keeps the cooling system working efficiently. If the radiator cap is faulty or not replaced properly, your engine could overheat, leak coolant, or even suffer damage.
Many car owners underestimate the role of this cap until trouble starts. Learning how to replace it the right way is a smart step toward reliable car maintenance.
Before blaming the cap for a cooling problem, see our guides to checking the coolant level safely and recognizing possible low-coolant symptoms.
Why The Radiator Cap Matters
The radiator cap is not just a lid. It’s a pressure-release valve that holds coolant in the radiator at a certain pressure, usually between 13 to 16 psi (pounds per square inch). This pressure raises the coolant’s boiling point and helps the engine run at a safe temperature. When pressure gets too high, the cap opens slightly, letting extra coolant flow into the overflow tank. If the cap fails, the cooling system cannot work as designed.
A worn or weak cap can let air into the system, or allow coolant to escape. Both can cause engine overheating, poor heater performance, and even engine damage. That’s why replacing a radiator cap is more than a cosmetic fix—it’s essential for engine health.
Signs You Need To Replace The Radiator Cap
Many drivers miss the warning signs of a failing cap. Here are some clear signals:
- Coolant leaks near the radiator or under your car.
- Overheating engine, even when coolant levels seem fine.
- Collapsed radiator hoses, which happen if the vacuum valve fails.
- Low coolant warning light that keeps coming on.
- Bubbling or gurgling sounds from the radiator.
- White streaks or crust around the radiator cap or neck.
- Steam or coolant smell from under the hood.
If you notice any of these, check the cap first. It’s much cheaper and easier than replacing a radiator or head gasket.
Types Of Radiator Caps
Not all radiator caps are the same. Choosing the right one matters for safety and fit. Here’s a look at the main types:
| Type | Pressure Range | Common Use |
|---|---|---|
| Standard Cap | 13-16 psi | Most cars and light trucks |
| High-Pressure Cap | 18-21 psi | Performance vehicles |
| Recovery Cap | 13-16 psi | Systems with overflow tanks |
| Non-Recovery Cap | 7-13 psi | Older vehicles, no overflow tank |
Non-obvious insight: Even if two caps look identical, using the wrong pressure rating can cause leaks or overheating. Always match the new cap’s pressure rating to the old one or the car manual.
Tools And Materials Needed
Replacing a radiator cap doesn’t require special tools, but having the right things ready makes the job easier:
- New radiator cap (with the correct pressure rating and fit)
- Gloves (to protect your hands from heat and coolant)
- Rag or towel
- Coolant (if you need to top up)
- Owner’s manual (for reference)
If your car has a pressurized coolant reservoir instead of a radiator cap, the steps may differ. Always check your car’s setup first.
Credit: www.youtube.com
Safety First: Key Precautions
Opening the radiator when the engine is hot is dangerous. Hot coolant can spray out under pressure and cause burns. Follow these rules:
- Wait until the engine is cold. Never open the cap after driving or when the temperature gauge is above normal.
- Use a rag to cover the cap when opening, in case there is pressure left.
- Wear gloves to avoid contact with hot surfaces or coolant.
Non-obvious insight: Some cars keep pressure in the cooling system for hours after shutting off. If in doubt, wait longer or gently press the upper radiator hose (with gloves) to check for pressure.
How To Replace A Car Radiator Cap: Step-by-step
Follow these steps for a safe and effective replacement.
1. Let The Engine Cool Completely
Always let the car sit for at least 30–60 minutes after running. The radiator, hoses, and coolant will be hot and under pressure right after use. Open the hood to speed cooling.
2. Locate The Radiator Cap
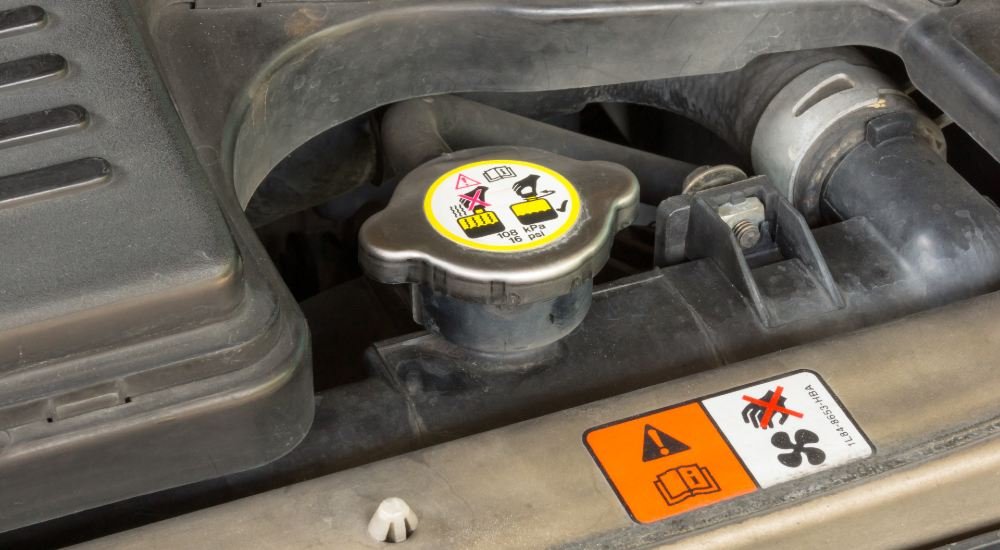
The cap is usually on the top of the radiator at the front of the engine bay. In some cars, the cap may be on a remote coolant reservoir, not directly on the radiator. If you’re unsure, check your owner’s manual or look for a round, metal cap with warning labels.
3. Clean The Area Around The Cap
Wipe off dirt, dust, and old coolant from the area around the cap. This prevents debris from falling into the radiator when you remove the cap. Use a clean rag.
4. Remove The Old Radiator Cap
Place a thick rag or towel over the cap. Press down firmly and turn the cap counterclockwise. You may feel some resistance—this is normal. Most caps have two stops: the first turn lets out any remaining pressure, the second turn releases the cap. If you hear hissing, wait until it stops before removing the cap.
5. Inspect The Radiator Neck And Cap
Check the radiator neck for cracks, rust, or debris. Look at the old cap—if the rubber seal is cracked or the spring is weak, replacement was needed. If you see white residue, it may mean coolant has been leaking.
6. Match The New Cap
Compare the new cap with the old one. Check:
- Pressure rating (in psi or kPa)
- Size and shape of the cap
- Length of the spring and the rubber seal
The new cap must match exactly. If not, don’t use it—return it and get the right one.
7. Install The New Radiator Cap
Line up the new cap with the radiator neck. Press down firmly and turn clockwise until it’s tight. Make sure it is fully seated. You should feel it “lock” in place.
8. Top Up Coolant (if Needed)
Check the coolant level in the radiator and the overflow tank. If it’s low, add the recommended type of coolant (see your manual). Don’t overfill.
9. Run The Engine And Check For Leaks
Start the car and let it idle for a few minutes. Watch the temperature gauge and look for any leaks around the cap or radiator. If you see coolant leaking, turn off the engine and check the cap’s fit.
10. Recheck After Driving
After your next drive, when the engine is cool again, recheck the cap and coolant level. Sometimes air bubbles can cause the level to drop after the first drive. Top up as needed.
Credit: natrad.com.au
Common Mistakes To Avoid
Even simple jobs can go wrong if you’re not careful. Here are mistakes many beginners make:
- Opening the cap when hot: This is dangerous and can cause burns.
- Using the wrong pressure cap: Too much or too little pressure can both damage your engine.
- Not cleaning the radiator neck: Dirt can prevent a good seal and cause leaks.
- Not checking for leaks after replacement: Small leaks can become big problems fast.
- Forgetting to top up coolant: Air in the system or low coolant can cause overheating.
A little extra care can save a lot of trouble later.
Comparing Radiator Cap Features
When shopping for a replacement, consider these features:
| Feature | Why It Matters |
|---|---|
| Pressure Rating | Must match your car’s system to avoid leaks or overheating |
| Material Quality | Metal caps last longer than plastic; better for hot climates |
| Seal Design | A good rubber seal prevents air and coolant leaks |
| Easy-Grip Top | Makes removal and installation safer and easier |
| Brand Reputation | Known brands are more reliable, especially for newer cars |

Credit: www.spazioinsitu.it
How Long Does A Radiator Cap Last?
Most radiator caps last 4–6 years under normal driving. However, harsh conditions (like extreme heat, cold, or stop-and-go traffic) can wear them out faster. If you do a lot of city driving or tow heavy loads, check the cap every year.
If you see signs of coolant leaks, overheating, or white residue, replace the cap right away—even if it’s not old. The cost is low, usually $10–$25, compared to engine repairs.
Real-world Example
Imagine you’re driving in summer, and the temperature gauge starts climbing. You see coolant under your car but can’t find a leak in the hoses. After replacing the radiator cap, the temperature stays normal and the leak stops. This shows how a small, cheap part can prevent big problems.
Radiator Cap Replacement: Diy Vs. Mechanic
Some drivers prefer to let a professional do all car maintenance. But replacing a radiator cap is a simple job most people can do themselves in 10–15 minutes. A mechanic may charge $30–$50 for the service, plus parts. If you’re comfortable opening the hood and following safety steps, DIY replacement is easy and saves money.
However, if you see major leaks, cracked hoses, or the engine keeps overheating after replacement, have a mechanic check for deeper problems.
Environmental Impact
Leaking coolant is not just bad for your car. It’s harmful to pets, wildlife, and the environment. Even a few drops of ethylene glycol (the main ingredient in most coolants) can be deadly to animals. Replacing a faulty cap and cleaning up any spills helps protect the environment. Always dispose of old coolant at a recycling center.
Where To Buy A Radiator Cap
You can find radiator caps at:
- Auto parts stores (like AutoZone, Advance Auto Parts)
- Dealerships (for exact-fit parts)
- Online retailers (Amazon, RockAuto, etc.)
Bring your old cap for comparison or check your car’s year, make, and model before buying.
Sample Cost Comparison
To give a clearer idea of costs, here’s a quick comparison:
| Source | Price Range | Notes |
|---|---|---|
| Auto Parts Store | $10–$20 | Immediate purchase, staff can help |
| Dealership | $18–$30 | Exact fit, often higher price |
| Online Retailer | $7–$25 | Wide selection, shipping time needed |
Trusted Resources
For more details about cooling systems and car maintenance, check the Wikipedia cooling system page.
Frequently Asked Questions
How Often Should I Replace My Radiator Cap?
Most experts suggest every 4–6 years, but check it yearly for signs of wear or leaks. Replace it sooner if you see problems.
Can I Drive With A Bad Radiator Cap?
It’s not safe. A faulty cap can cause overheating, coolant loss, and engine damage. Replace it as soon as you notice trouble.
How Do I Know The Right Pressure For My Radiator Cap?
Check your owner’s manual or look on the old cap. The pressure rating is usually marked in psi or kPa. Always match the number exactly.
Is It Ok To Use A Universal Radiator Cap?
Only if it matches the pressure rating and fits tightly. Universal caps can sometimes leak if not the exact size for your radiator.
What Happens If I Over-tighten The Radiator Cap?
Over-tightening can damage the cap or radiator neck, causing leaks. Turn the cap until it’s snug and locked, but do not force it.
A properly working radiator cap keeps your engine cool and your car running reliably. Spending a few minutes to replace it right can save you money and trouble down the road. If you follow these steps, you’ll keep your cooling system in top shape and avoid common beginner mistakes.