Replacing your car’s shocks is one of those jobs that looks simple in videos, but many people find out too late that it’s harder than it seems. A smooth ride and safe handling depend on shocks working well. But if you make mistakes during installation, you can end up with noise, bad handling, or even dangerous driving conditions.
Even experienced DIYers sometimes overlook important steps. Let’s look at the most common mistakes when replacing car shocks, how to avoid them, and some practical examples you won’t find in basic guides.
Why Replacing Shocks Matters
Shocks are not just for comfort—they keep your tires touching the road. If you install them wrong, you might feel bouncing, hear clunks, or lose control during sudden stops. Bad shocks also make other parts wear out faster. Knowing the mistakes people make can save you time, money, and trouble.
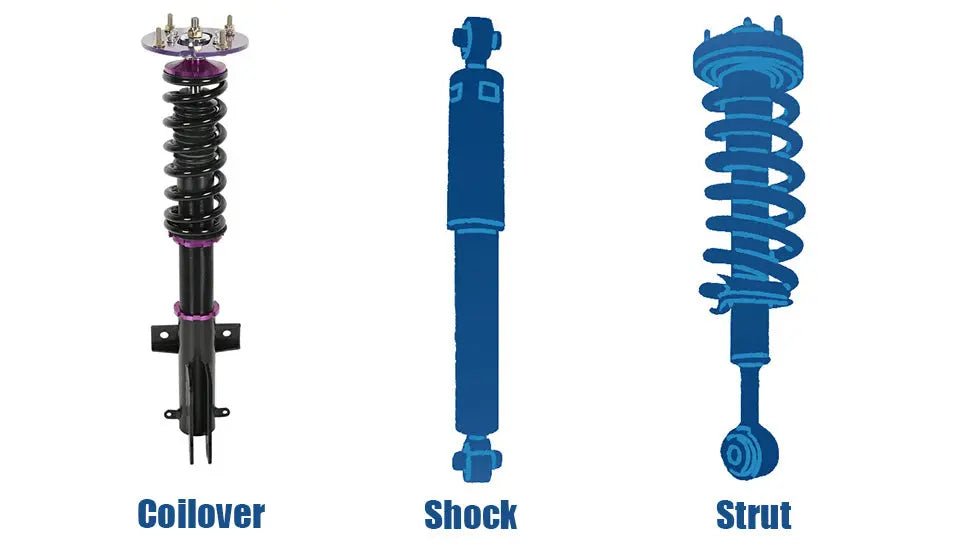
Choosing The Wrong Replacement Shocks
People often think all shocks are the same. They are not. Each car model uses shocks with specific sizes, mounting types, and damping rates. Using the wrong type can cause:
- Poor ride quality (too stiff or too soft)
- Handling problems (body roll, nose-diving)
- Fitment issues (shocks too long or short)
Always check your car’s make, model, year, and suspension type before buying. For example, some cars need gas-charged shocks, while others use oil-filled types. Mixing these can change how your car handles, sometimes dangerously. Don’t just trust the parts store—double-check with your owner’s manual or a trusted online database.
Not Checking Or Replacing Other Worn Parts
Shocks rarely wear out alone. The rubber bushings, mounts, and boots often break down first. If you only change the shock itself but ignore these, you might soon hear creaks or feel vibrations.
Common Parts To Inspect And Possibly Replace:
- Shock mounts (top and bottom)
- Bump stops
- Dust boots
- Control arm bushings
If you see cracks, rust, or missing pieces, replace them with the shocks. This prevents early failure and keeps the ride quiet.
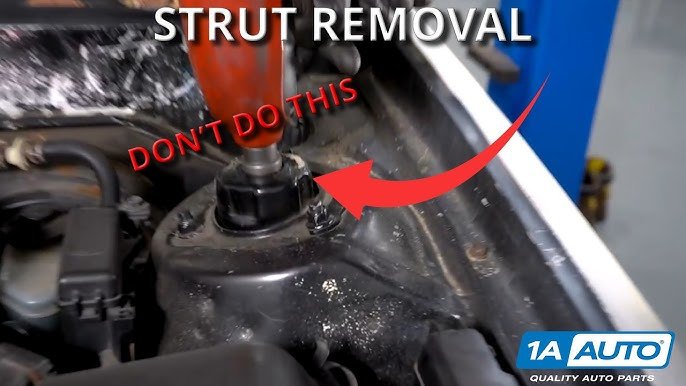
Skipping Safety Steps
Working on suspension can be dangerous if you’re not careful. Shocks are under tension, and removing them wrong can cause injury.
Always:
- Use proper jack stands, never just a hydraulic jack.
- Wear gloves and safety glasses.
- If working with coil-over shocks, use a spring compressor—never try to loosen the top nut while the spring is under load.
Many injuries happen because people skip these basics. Take your time and check each support before starting.
Failing To Loosen Bolts Correctly
Most shock bolts get rusty and tight over time. Forcing them off with power tools can snap the bolts or strip threads, leading to expensive repairs.
Tips for safe removal:
- Spray rust penetrant (like WD-40) hours before starting.
- Use hand tools to gently break bolts loose.
- Support the suspension arm with a jack to relieve pressure.
If a bolt feels stuck, stop and soak it again. Rushing often leads to more damage.
Not Aligning Shocks Properly
New shocks have to sit in the correct position before you tighten everything. If you torque bolts with the suspension hanging, the bushings will twist when you lower the car. This causes premature wear and squeaks.
Correct method:
- Loosely install all bolts.
- Lower the car so the wheels touch the ground.
- Only then, tighten all bolts to the manufacturer’s torque spec.
This step is easy to forget but makes a big difference in shock life.
Ignoring Torque Specifications
Many people simply “make it tight” by feel. But over-tightening can crush bushings, while loose bolts can rattle or fall out.
Always use a torque wrench and follow the specs in your car’s manual. Typical shock mounting bolts are torqued between 50–100 Nm (37–74 ft-lb), but check your model.
Here’s a quick comparison of torque specs for different car types:
| Car Type | Front Shock Torque (Nm) | Rear Shock Torque (Nm) |
|---|---|---|
| Sedan | 60–75 | 50–65 |
| SUV | 80–100 | 70–90 |
| Pickup Truck | 90–110 | 80–100 |
Mixing Old And New Shocks
It’s tempting to replace just one shock if only one is leaking. But shocks should always be replaced in pairs (both fronts or both rears). Mixing old and new shocks causes uneven damping, which leads to:
- Pulling to one side
- Unbalanced handling
- Premature wear of tires and suspension parts
A good rule: if one shock is bad, the other is not far behind.
Not Test-driving And Rechecking After Installation
After installing new shocks, you need to test-drive the car on different surfaces and listen for noises. Even professionals sometimes miss a loose bolt or misaligned part.
After a short drive:
- Park on level ground.
- Check all mounting bolts for tightness.
- Look for leaks or damaged boots.
- Test the ride height and handling.
This quick check can prevent future problems.
Using The Wrong Tools
Shock replacement needs a few special tools. Using incorrect tools can strip bolts or damage parts.
Essential tools include:
- Torque wrench
- Spring compressor (for coil-overs)
- Breaker bar
- Penetrating oil
- Jack stands
A spring compressor is a must for safety. Never try to compress a spring by hand or with random objects.
Not Cleaning Mounting Surfaces
When you remove the old shock, the mounting surfaces often have rust, dirt, or old rubber stuck on them. If you don’t clean these areas, the new shock may not sit flat, leading to noise and uneven wear.
Use a wire brush or sandpaper to clean all mounting points before installing the new shock.
Overlooking Wheel Alignment
Replacing shocks can change your car’s alignment, especially if you disturb other suspension parts. Even a small alignment problem can cause uneven tire wear and poor handling.
After any shock replacement, have the alignment checked and adjusted if needed. This is especially important for front shocks (struts), which often set the angle of the wheels.
Here’s a simple comparison of alignment effects:
| Component Replaced | Alignment Needed? | Effect of Skipping Alignment |
|---|---|---|
| Rear Shocks | Sometimes | Minor tire wear |
| Front Shocks/Struts | Usually | Poor handling, uneven tires |
| Control Arms | Always | Major tire wear, unsafe driving |
Credit: flasharkracing.com
Not Comparing Old And New Parts Before Installation
Before you install the new shocks, always compare them with the old ones side by side. Look for differences in length, mounting style, and hardware.
Check for:
- Overall length
- Bolt hole size and location
- Threaded parts
- Bushing shape
If something doesn’t match, stop and check your parts order. Installing the wrong part can damage your car.
Reusing Old Hardware
Some people reuse old nuts, bolts, or washers to save money. But these parts often get stretched or weakened. Always use the new hardware that comes with your shock kit. If none is included, buy new ones of the same grade.
Worn hardware can loosen over time, making your new shocks noisy or unsafe.
Credit: www.youtube.com
Not Following The Manufacturer’s Instructions
Each shock model might have special steps, such as bleeding air out of the shock, preloading the bushing, or even installing spacers. Skipping the instructions can shorten the life of your shocks or even void the warranty.
For example, some shocks need to be primed by compressing and extending them a few times before installation. This step helps them work smoothly from the start.
Forgetting To Check For Leaks
After the job, check for oil leaks around the shock body. A leaking shock is defective and should be replaced under warranty. Sometimes, a small leak is missed during installation and gets worse over time.
Check after the first few drives. If you see oily residue, contact the seller or manufacturer.
Not Considering Upgrade Options
Many car owners just buy the cheapest replacement. But sometimes, upgrading to performance shocks can improve handling, especially if you tow, carry heavy loads, or drive on rough roads.
Upgraded shocks cost more but often last longer and provide better control. Think about your driving style and needs before you buy.
Two Insights Most Beginners Miss
- Priming New Shocks: Many beginners do not know that some shocks (especially hydraulic ones) need to be primed before installation. Skipping this step can make your ride rough for the first few hundred miles or even damage the shock.
- Ride Height Changes: Replacing old, sagging shocks can raise your car’s ride height slightly. This can affect how your car looks and handles for a few days. If your car looks uneven, recheck installation and alignment.

Credit: www.billslockandkey.org
When To Seek Professional Help
If you hear strange noises, feel unsafe, or have trouble with stuck bolts, don’t hesitate to call a professional. Some cars have complex suspension systems that need special tools or alignment equipment.
DIY shock replacement is rewarding, but only if you do it safely and correctly.
For more technical details about shock absorbers, you can visit Wikipedia.
Frequently Asked Questions
How Do I Know If My Car Needs New Shocks?
Common signs include a bouncy ride, poor handling, longer stopping distances, and seeing oil leaks on the shock body. If your car feels unstable over bumps, it’s time to check the shocks.
Can I Replace Just One Shock At A Time?
It’s best to replace shocks in pairs (both fronts or both rears) to keep handling balanced. Replacing only one can cause uneven ride and extra wear on other parts.
Do I Need An Alignment After Changing Shocks?
If you replaced front shocks or struts, get a wheel alignment. Rear shocks usually don’t require it unless other suspension parts were disturbed.
What Tools Are Required For Shock Replacement?
Basic tools include socket wrenches, a breaker bar, jack stands, and a torque wrench. If your car uses coil-over shocks, you’ll also need a spring compressor for safety.
What Happens If I Don’t Torque Bolts Correctly?
Loose bolts can make the shock rattle or fall out. Over-tightening can crush bushings. Always use a torque wrench and follow your car’s specifications.
Replacing shocks isn’t just about swapping parts. Attention to detail, using the right tools, and following proper steps make the difference between a quiet, safe ride and a noisy, rough one. Take your time, double-check each stage, and you’ll enjoy better handling and a more comfortable drive.
