Building a garage tool pegboard wall can transform your messy workspace into a clean, organized, and efficient area. Many people struggle to find their tools when they need them. Searching for a lost wrench or hammer wastes time and energy, especially if you use your garage for car repair, DIY projects, or even gardening.
A pegboard wall is a simple but powerful solution. It makes your tools visible, accessible, and easy to store. Even if you have never built anything before, this is a project you can complete in a weekend with basic skills and tools.
You might think pegboards are only for professionals or big workshops. The truth is, anyone can benefit from a pegboard. They come in many sizes and types, fit almost any wall, and can hold everything from screwdrivers to power tools.
In this guide, you’ll learn how to plan, build, and use a garage tool pegboard wall that fits your needs and budget. You will also discover smart tips that most beginners miss—like how to prevent sagging and how to arrange tools for the fastest access.
By the end, your garage will be safer, neater, and much more enjoyable to use.
Why Build A Tool Pegboard Wall?
A pegboard wall is more than just a storage solution. It changes how you work and improves your garage in many ways:
- Easy organization: Every tool has its place, so you spend less time searching.
- Customizable: You can move hooks and shelves to fit new tools or change your setup.
- Space-saving: Vertical storage frees up floor and shelf space.
- Quick inventory: You can see at a glance what’s missing or needs replacing.
- Safety: No more stepping on sharp tools or tripping over clutter.
According to a 2022 survey by the National Association of Home Builders, over 60% of homeowners said organized storage is the most important feature in a garage. Pegboards are a top choice for achieving this.
Choosing The Right Pegboard
Not all pegboards are the same. The best type for your garage depends on your tools, wall space, and budget. Consider these main options:
| Pegboard Type | Material | Pros | Cons |
|---|---|---|---|
| Masonite/Hardboard | Compressed wood fibers | Affordable, easy to cut, widely available | Weaker, can sag with heavy tools, not moisture-proof |
| Metal | Steel or aluminum | Strong, durable, holds heavy tools, resists moisture | Expensive, harder to cut, heavier |
| Plastic | Polypropylene or PVC | Lightweight, resists moisture, easy to clean | Less strong than metal, may not fit all hooks |
Most home garages use hardboard pegboard because it’s cheap and easy to find. If you plan to hang heavy tools or live in a humid area, consider metal or plastic boards.
Planning Your Pegboard Wall
Before you buy anything, take time to plan. Good planning helps you get the most from your pegboard and avoid common mistakes.
Measure Your Wall Space
- Use a tape measure to find the width and height of the area you want to cover.
- Leave at least a few inches around outlets, switches, or windows.
- Most pegboards come in 2×4 feet panels, but you can combine panels for larger walls.
List Your Tools
- Lay out your tools on the floor or a table.
- Group them by type: Screwdrivers, pliers, wrenches, power tools, etc.
- Think about which tools you use most often and want within easy reach.
Sketch Your Layout
- Draw a simple map of your wall and tool groups.
- Plan to put frequently used tools at eye or arm level.
- Reserve lower or higher spots for less-used or heavy items.
Plan For Accessories
Pegboards are not just about hooks. There are many pegboard accessories:
- Bins: For nails, screws, and small parts.
- Shelves: For drills, boxes, or larger items.
- Tool holders: For pliers, hammers, or screwdrivers.
- Brackets: For hanging power tools or cords.
Investing in a few accessories makes your wall more useful and tidy.
What You’ll Need: Tools And Materials
Here is a list of basic tools and materials for a standard pegboard installation:
- Pegboard panels (choose size and material)
- Wooden furring strips (1×2 inch, for mounting)
- Screws (2-inch wood screws)
- Wall anchors (if installing on drywall)
- Drill and drill bits
- Level
- Tape measure
- Stud finder (optional but helpful)
- Saw (if you need to cut pegboard or furring strips)
- Pencil
- Pegboard hooks and accessories
If your wall is concrete or brick, you’ll need masonry anchors and a masonry drill bit.
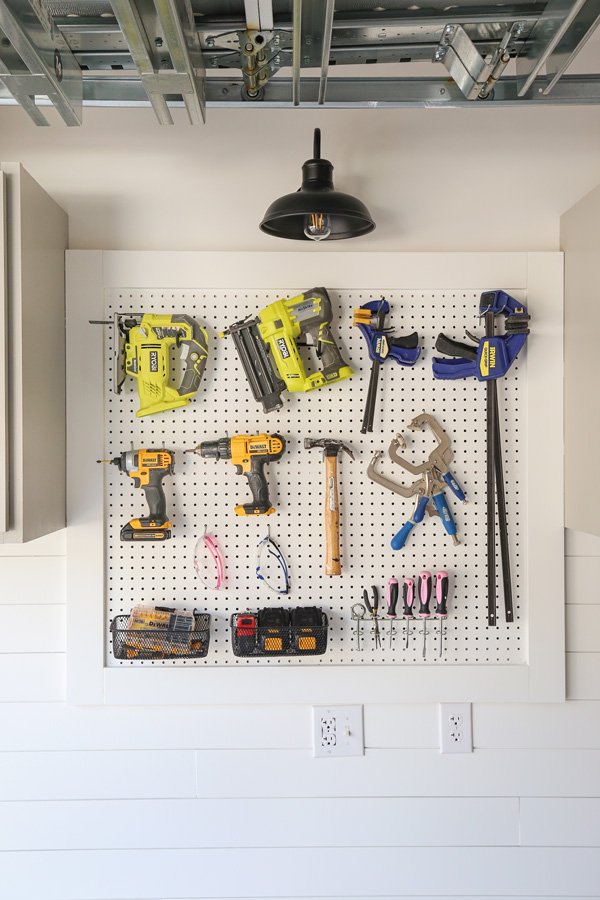
Credit: angelamariemade.com
Step-by-step Guide To Building Your Pegboard Wall
Let’s break down the process so you can follow each step confidently.
1. Prepare The Wall
Clear the area and remove any obstacles. If your wall is dirty or dusty, clean it with a broom or damp cloth. This helps the furring strips and pegboard stick properly.
2. Locate Wall Studs
Use a stud finder to locate the wooden studs behind your drywall. Mark them with a pencil. Attaching to studs gives your pegboard strength, especially for heavy tools.
If you cannot find studs, use strong wall anchors to secure the furring strips.
3. Install Furring Strips
Pegboard needs a gap behind it so hooks can pass through. Furring strips create this space.
- Cut furring strips to match the width and height of your pegboard panels.
- Attach horizontal strips at the top and bottom edges of your planned pegboard area. For large panels, add a middle strip for extra support.
- Hold each strip level and screw it into the wall studs (or use wall anchors).
- For a stronger build, add vertical strips behind where the pegboard seams will meet.
A common beginner mistake is skipping furring strips, making the pegboard sit flat on the wall. This makes it impossible to use most hooks.
4. Cut And Position The Pegboard Panels
If your panels need trimming, use a saw to cut them to size. Wear safety goggles and work slowly for clean edges.
Hold the pegboard up to the wall to check the fit. Mark any spots for outlets or switches and cut holes with a jigsaw.
5. Attach The Pegboard
With the help of a friend (or temporary supports), hold the pegboard panel against the furring strips. Drive screws through the pegboard and into the strips every 12-16 inches around the edges and at seams.
Do not overtighten—just enough to hold the board snugly. Overdriving screws can crack hardboard pegboard.
6. Add Hooks And Accessories
Once the panels are secure, start adding hooks, bins, and shelves. Arrange tools loosely at first and adjust as you find the best layout.
A pro tip: Place a magnetic tool holder on your board for quick access to metal tools you use constantly.
Arranging And Hanging Your Tools
How you arrange your tools can make a big difference in your workflow. Here are smart strategies:
- Keep common tools central: Place screwdrivers, pliers, and hammers at eye level.
- Group by function: Put all measuring tools together, all cutting tools together, etc.
- Hang heavy tools on studs: For very heavy items, make sure the hook is near a stud or use special heavy-duty hooks.
- Outline your tools: Use a marker to trace around each tool on the pegboard. This helps you remember exactly where each item belongs—and spot missing tools fast.
- Leave space for new tools: Don’t overfill. You’ll probably add new tools over time.

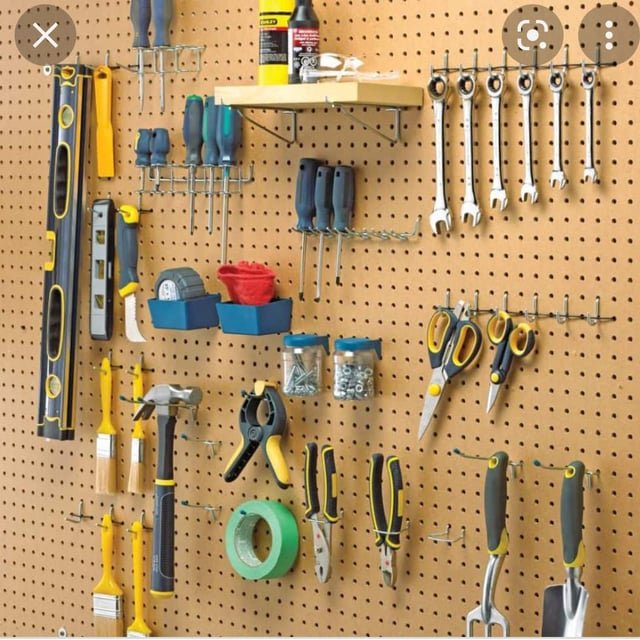
Credit: www.reddit.com
Maintenance And Upgrades
Your pegboard wall is not a set-and-forget solution. To keep it working for you:
- Reorganize as you buy new tools or change projects.
- Wipe down the board every few months to remove dust.
- Check for loose screws or hooks and tighten if needed.
- Replace any worn-out or bent accessories.
If you outgrow your board, you can easily add more panels next to the original.
Real-world Example: Transforming A Cluttered Garage
Let’s look at a real example. Mark, a homeowner in Ohio, had a garage so packed that he could not find his drill or level when he needed them. He followed the steps above, using 4×8 feet of hardboard pegboard and $30 worth of furring strips and screws.
After a weekend of work, he had every hand tool and accessory visible and within reach.
He reports saving about 15 minutes per project because he no longer hunts for lost tools. He also noticed fewer accidents, as there are no more sharp tools on the floor or loose nails in drawers. Mark’s story shows how even a simple pegboard wall can make your garage safer and more efficient.
Cost And Time Comparison
How does a pegboard wall compare to other garage storage systems? See the table below:
| Storage Option | Average Cost (USD) | DIY Difficulty | Setup Time |
|---|---|---|---|
| Pegboard Wall | $40–$100 | Easy | 2–4 hours |
| Wall Cabinets | $200–$500 | Medium | 4–8 hours |
| Slatwall System | $150–$300 | Medium | 3–5 hours |
| Freestanding Shelves | $50–$200 | Easy | 1–2 hours |
Pegboard is one of the most affordable and fastest options for tool storage, especially if you already have some tools for installation.
Common Mistakes To Avoid
Even simple projects have pitfalls. Avoid these errors:
- Using too few screws: This can cause sagging or falling panels.
- Overloading weak boards: Don’t hang very heavy items on hardboard pegboard; use metal for those.
- Skipping furring strips: Your hooks will not fit without space behind the board.
- Ignoring wall type: Drywall, masonry, and wood walls need different anchors and screws.
- Not planning for growth: Leave empty spaces for future tools.
Credit: www.reddit.com
Two Advanced Tips Most People Miss
- Double up panels for strength: If you need to hang extra-heavy tools, mount two pegboards back-to-back with longer screws. This gives you double strength while keeping the same look.
- Combine storage types: Attach a small shelf or magnetic strip directly to your pegboard for quick access to drill bits, screws, or metal rulers. Mixing accessories increases efficiency.
When To Call A Pro
Most people can install a pegboard wall with basic DIY skills. If your wall is concrete, brick, or covered in pipes or wiring, you might want professional help. Also, if you’re planning a very large wall or want a custom-built look, a carpenter can help you get a perfect result.
If you want more inspiration, check out this guide from Family Handyman for extra ideas and examples.
Frequently Asked Questions
What Size Pegboard Holes Should I Get For Garage Tools?
Most garage tools work best with 1/4-inch holes. These fit standard hooks and accessories and are strong enough for most hand tools. Some light-duty boards use 1/8-inch holes, but they are less durable.
How Much Weight Can A Pegboard Hold?
It depends on the material and mounting. Hardboard pegboard on furring strips can hold about 50 pounds per square foot with proper installation. Metal pegboards can hold much more, even up to 100 pounds per square foot.
Can I Hang Power Tools On A Pegboard?
Yes, but use heavy-duty hooks or brackets. For large drills or saws, metal pegboard or extra support is best. For safety, always check that the hook or bracket is rated for the tool’s weight.
How Do I Keep Pegboard Hooks From Falling Out?
To keep hooks secure, use locking pegboard hooks or small plastic clips that snap into holes. Some people use hot glue or rubber bands, but dedicated locking hooks are more reliable and reusable.
Is Pegboard Waterproof?
Standard hardboard pegboard is not waterproof. It can swell or warp if it gets wet. For damp garages, choose plastic or metal pegboard. You can also paint hardboard with waterproof paint, but this is only a partial solution.
A garage tool pegboard wall is a smart investment in both time and money. With a few tools, careful planning, and these tips, you can create a space that’s organized, safe, and ready for any project.
