Installing a car light bar on your roof might sound like a big job, but with the right steps and tools, it’s a project many car owners can handle. Whether you want better visibility for off-road driving, camping, or just love the look, a roof-mounted light bar can make a real difference.
But it’s important to do it right—the wrong installation can lead to leaks, wind noise, or even electrical problems. This guide will walk you through the process from start to finish, with clear tips that help you avoid common mistakes and get the best results.
Understanding Car Light Bars
A car light bar is a long strip of LED or halogen lights, often used to improve nighttime visibility. They’re popular for trucks, SUVs, and off-road vehicles. Most roof light bars range from 20 to 50 inches, but you’ll find both shorter and longer options. Choosing the right size depends on your car type, what you need the light for, and your local laws.
LED light bars are the most common because they use less power and last longer. They come in different beam patterns—spot, flood, and combo. Spot beams focus light far ahead, while flood beams spread light wide. Combo gives you both. For roof mounting, combo beams are often best because they balance distance and coverage.
Choosing The Right Light Bar And Mount
Before buying, measure your car roof to see what size fits well. Check your vehicle’s manual for weight limits and roof rack compatibility. Not all light bars fit all cars—double-check the mounting bracket design. Some mount directly to the roof, while others need a roof rack or gutter mounts.
When comparing light bar options, look at:
| Feature | LED Light Bar | Halogen Light Bar |
|---|---|---|
| Brightness | Up to 50,000 lumens | Up to 2,000 lumens |
| Power Draw | Low | High |
| Lifespan | 30,000-50,000 hours | 2,000 hours |
| Cost | Higher initial, lower over time | Lower initial, higher over time |
Don’t forget to check if the light bar is waterproof (look for IP67 or IP68 rating), especially if you drive in rain or snow. Also, confirm the warranty and customer support in case something fails.
Gathering Tools And Materials
You’ll need some basic tools and parts before starting. Here’s a list to help you prepare:
- Light bar kit (with brackets, wiring, and hardware)
- Drill with metal/wood bits (if needed)
- Screwdrivers (Phillips and flat)
- Socket set or wrench
- Measuring tape and pencil
- Wire stripper and crimper
- Electrical tape and heat shrink tubing
- Silicone sealant (for waterproofing holes)
- Fuses and relay (usually included in kit)
- Zip ties or cable clips
Extra tip: If you want a clean look, buy a wireless switch kit or a pre-made wiring harness. It saves time and reduces wiring mistakes.
Planning The Installation
Think about where you’ll run the wires before drilling or mounting anything. The best route is often through the windshield edge, under the weather stripping, and down the A-pillar into the engine bay. Avoid sharp corners or moving parts.
Here’s a simple comparison of wiring routes:
| Wiring Route | Difficulty | Weather Protection | Visibility |
|---|---|---|---|
| Under Weather Stripping | Easy | Good | Hidden |
| Through Door Frame | Medium | Average | Mostly Hidden |
| Drilled Roof Entry | Hard | Best (if sealed well) | Hidden |
If you drill through the roof, always use silicone sealant to prevent leaks. For most DIYers, under the weather stripping is easiest and safest.
Credit: www.led-colight.com
Step-by-step Installation Guide
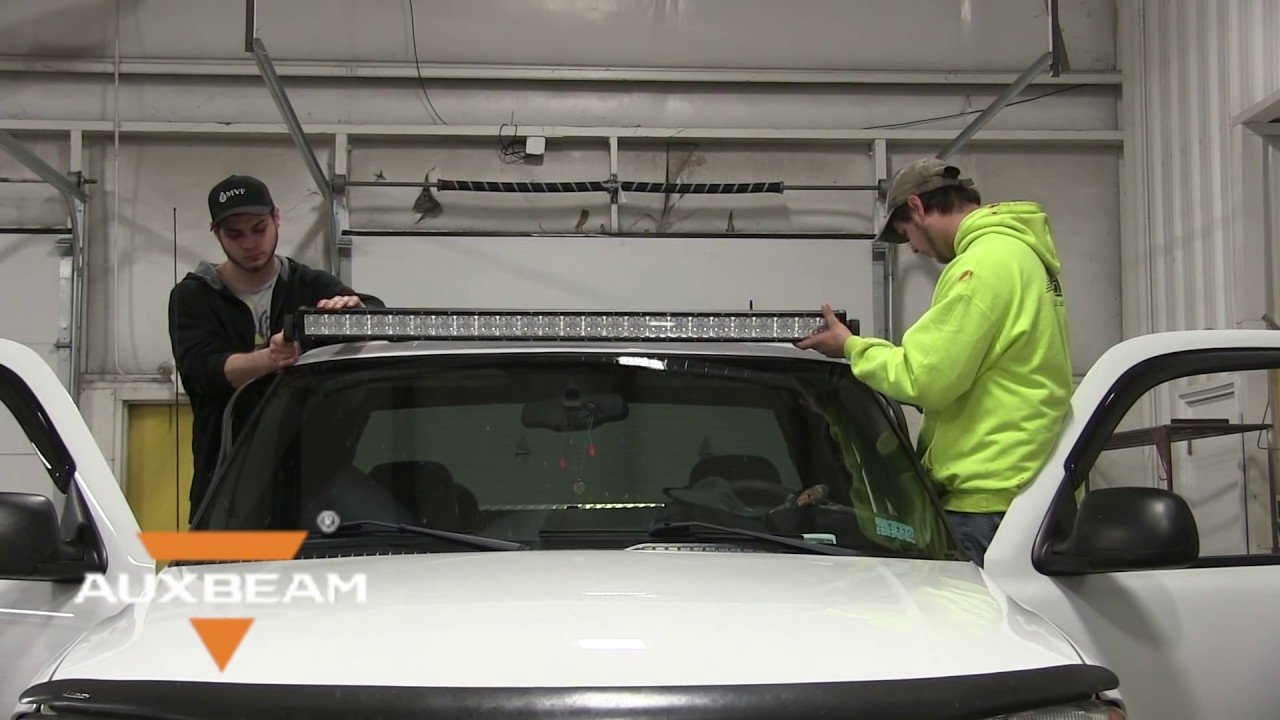
Step 1: Measure And Mark The Mounting Points
Place the light bar on your roof where you want it. Use a measuring tape to center it. Mark the mounting hole positions with a pencil. Make sure the bar is level from side to side.
Check for roof support beams. Avoid drilling into thin sheet metal or airbag zones. If using a roof rack, use the pre-drilled holes or included clamps.
Step 2: Attach Mounting Brackets
If your car has a roof rack, attach the brackets to it first. Tighten them just enough so you can adjust the light bar’s position. If you’re drilling into the roof, double-check the marks, then drill the holes. Use the correct size bit for the bolts.
Add a bit of silicone sealant around each hole before installing bolts. This keeps water out. If you’re not sure about drilling, ask a professional or search for “no-drill” mounting kits.
Step 3: Secure The Light Bar
Set the light bar onto the brackets. Use the included bolts and washers. Tighten everything, but don’t over-tighten—this can damage the roof or bracket. Adjust the angle of the light bar so it points where you want: usually, a slight downward angle works best for road use.
Check from inside the car to make sure nothing blocks the view or sunroof function.
Step 4: Route The Wiring
Choose your wiring path. For most people, tucking the wire under the windshield weather stripping and down the A-pillar is best. Use zip ties or cable clips to keep the wire secure and hidden.
If you must drill a hole for wiring, use a rubber grommet and sealant to stop leaks. Feed the wire into the engine bay, away from hot or moving parts.
Step 5: Connect To Power
Most light bars use a relay and fuse for safety. Connect the red wire (positive) to the battery’s positive terminal. The black wire (ground) goes to a clean, bare metal spot on the car body.
Mount the relay near the battery, away from heat or water. Install the switch inside the car—usually on the dash or near the steering wheel. Run the switch wire through a firewall grommet if possible.
Don’t forget to add the fuse! This protects your car’s electrical system in case of a short.
Step 6: Test The Light Bar
Before finishing, turn on the switch and check the light bar. Make sure it works, and all connections are solid. If it flickers or won’t turn on, check the fuse, relay, and battery connections.
Adjust the light bar’s angle as needed. Tighten all bolts one last time.
Step 7: Final Touches
Neatly bundle any extra wire with zip ties. Use electrical tape or heat shrink tubing on all connections for weather protection. Clean any fingerprints or dirt off the light bar.
If you drilled holes, check for leaks after the next rain. Reseal if needed.
Common Mistakes And How To Avoid Them
Many beginners miss these details:
- Not sealing drilled holes: This leads to leaks and rust. Always use silicone sealant.
- Loose wiring: Wires that move can wear out and short. Secure with zip ties.
- Wrong beam angle: Too high and you blind other drivers; too low and the light is wasted. Test at night and adjust.
- Skipping the relay or fuse: This can damage your battery or even start a fire.
- Ignoring local laws: Some places ban roof light bars on public roads. Check before you drive.
Credit: gorecon.com
Safety And Legal Tips
Installing a roof light bar changes your car’s look and function. Here are key points to remember:
- Check local laws. Some countries or states require covers on light bars or limit brightness.
- Don’t use the light bar on public roads unless legal—it’s usually for off-road use.
- Secure wires and parts to avoid rattles or distractions.
- Tell your insurance company about the modification if needed.
Maintenance For Long Life
A roof light bar is exposed to sun, rain, and dust. Keep it working well by:
- Cleaning the lens every few weeks with a soft cloth.
- Checking bolts for tightness after rough roads.
- Inspecting wires for damage or wear.
- Replacing the lens or bulbs if they get cloudy or dim.
With care, a good LED light bar can last over five years without trouble.
Real-world Example
Let’s look at a real installation. John, a pickup truck owner, installed a 42-inch LED combo beam bar on his roof for camping trips. He used his roof rack and avoided drilling by choosing clamp-style brackets. He ran the wire under the weather stripping, down the A-pillar, and through a rubber grommet into the engine bay.
He spent about 2 hours on the full job and had no leaks or wind noise. His tip: “Don’t rush measuring and marking. One small mistake can mean redrilling holes or crooked lights.”
Comparing Diy Vs Professional Installation
Here’s a quick comparison to help you decide if you should do it yourself or hire an expert:
| Factor | DIY | Professional |
|---|---|---|
| Cost | $0-$100 (tools only) | $150-$500 |
| Time | 2-4 hours | 1-2 hours |
| Quality | Good if careful | Expert finish |
| Warranty | Product only | Product + labor |
DIY is cheaper and gives you pride, but hire a pro if you’re not confident with wiring or drilling.
Credit: www.youtube.com
Non-obvious Insights For Beginners
- Wind noise can be reduced by using a light bar with a curved design or adding a rubber wind deflector strip. Many people skip this and regret the extra noise at highway speed.
- Check your battery before installing. A weak or old battery may not handle the extra power draw, even with LEDs. Consider upgrading if your car struggles to start after installation.
If you want more details on light bar types and vehicle regulations, visit the Automotive Lighting Wikipedia page.
A well-installed car light bar on your roof can give you safer night drives and a tough, modern look. Take your time, plan carefully, and enjoy the results.
Frequently Asked Questions
Is It Legal To Use A Roof Light Bar On Public Roads?
Laws vary by country and state. In many places, roof light bars must be covered on public roads and only used off-road. Check your local laws before using one on the street.
Can I Install A Light Bar Without Drilling Holes In My Car?
Yes, many light bars can be mounted using roof racks or clamp-on brackets. No-drill kits are available for most vehicles. Drilling is only needed if your car has no mounting points.
What Size Light Bar Should I Choose For My Car?
Measure your roof and check for roof rack space. Most SUVs and trucks use light bars between 30 and 50 inches. Make sure the bar doesn’t block your view or stick out past the car’s sides.
Do I Need A Relay And Fuse For My Light Bar?
Yes, always use a relay and fuse. They protect your car’s electrical system and prevent fires or battery drain. Most kits include them, but double-check before buying.
How Do I Stop Water Leaks After Installing A Roof Light Bar?
Seal all drilled holes with automotive silicone sealant. Check for leaks after installation, especially after heavy rain. Reseal or tighten bolts if you find any water inside.
With the right approach, your car’s new roof light bar will be safe, legal, and ready for any adventure.
