Removing a car door panel might sound tricky, but with the right steps, almost anyone can do it. Whether you want to fix a window, upgrade speakers, or repair a lock, learning how to remove a car door panel is a useful skill.
Many car owners avoid this task, thinking it’s only for professionals, but most vehicles follow similar principles. With a bit of patience, the right tools, and detailed guidance, you can remove your car door panel safely and without damage.
This guide will walk you through the process step by step. It covers everything you need, from tools and preparation to removing the panel and reinstalling it correctly. Along the way, you’ll find tips to avoid common mistakes, plus answers to frequent questions.
Let’s begin your journey to becoming more confident with car repairs.
Why Remove A Car Door Panel?
There are several reasons why you might need to take off your car door panel. Sometimes, you’ll need to reach the inside of the door to fix a problem or to upgrade a part. Here are the most common situations:
- Fixing a window regulator or motor: If your power window stops working, the mechanism may be jammed or broken.
- Upgrading speakers: Many car owners want to improve their sound system.
- Repairing locks or handles: Door locks and handles can wear out or break.
- Fixing wiring issues: Problems with door lights or controls often require access inside the panel.
- Removing dents: Some bodywork repairs need panel removal for better access.
Understanding your goal helps you prepare for the job and avoid extra work.
Tools And Materials Needed
Before you start, gather the right tools and materials. Using proper tools prevents damage and makes the process smoother. Here’s a list of what you’ll typically need:
- Screwdrivers (Phillips and flathead)
- Trim removal tools (plastic prying tools)
- Socket set (metric or standard, depending on your car)
- Needle-nose pliers
- Panel clip remover
- Small container for screws and clips
- Flashlight
- Gloves (optional but helpful)
Not all cars require every tool, but having these on hand covers most situations. If you don’t have plastic trim tools, use a flathead screwdriver wrapped in tape to avoid scratching surfaces.
Credit: www.youtube.com
Preparation: Safety And Setup
Before removing the panel, take these steps to ensure safety and keep parts organized:
- Turn off the ignition and remove the key. For extra safety, disconnect the car battery, especially if your door has airbags or electronic controls.
- Open the window fully if possible. This gives you more access and prevents glass damage.
- Clear the work area. Park in a well-lit, flat spot with enough room to open the door wide.
- Organize your workspace. Lay out tools and keep a small container ready for screws and clips.
- Take photos as you go. Use your phone to take pictures of each step. This helps you remember where parts go during reinstallation.
Step-by-step Guide: How To Remove A Car Door Panel
Every car is a little different, but these general steps work for most vehicles.
1. Locate And Remove Screws
Most door panels are held by screws hidden in smart places. Common spots include:
- Inside or behind the door handle
- Under armrests
- Along the bottom edge of the panel
- Behind plastic covers or trim pieces
Carefully look for plastic caps hiding screws. Use a flathead screwdriver or trim tool to pop these off. Remove all visible screws and place them in your container.
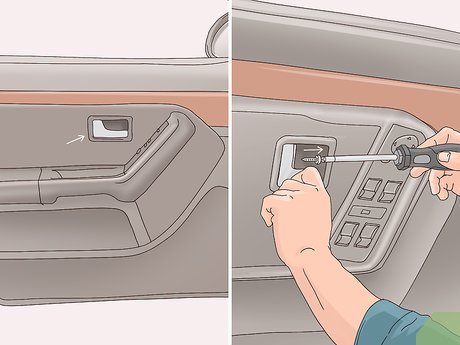
2. Remove Window And Lock Controls
Most cars have electronic controls on the door. These need to be disconnected before pulling off the panel.
- Gently pry up the control panel using a plastic trim tool.
- Unplug the wiring harnesses by pressing the release tabs.
Some controls are attached to the panel and will come off together, but it’s safer to remove them first if possible.
3. Pry Off The Door Panel
Once screws and controls are out, the panel is usually held by plastic clips. These clips snap into holes in the door frame.
- Start at the bottom corner of the panel.
- Slide a trim removal tool between the panel and door.
- Gently lever to pop the first clip free.
- Move along the edge, releasing each clip one by one.
Avoid using too much force; if you meet strong resistance, check for missed screws.
4. Lift The Panel Up And Off
After all clips are free, lift the panel upward. Most panels hook over the top edge of the door.
- Hold the panel firmly and pull up to unhook it.
- Watch for any remaining wires or cables attached to the back.
- Disconnect any links for the door handle or lock by unclipping or unhooking them.
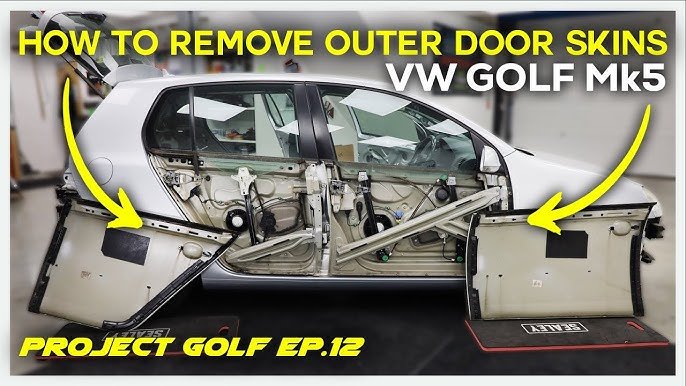
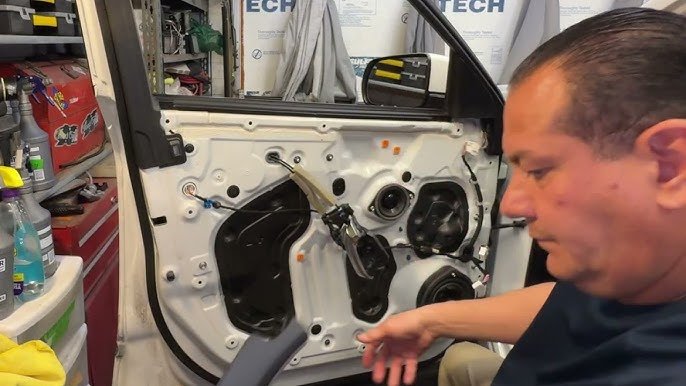
5. Set Aside The Panel And Inspect
Carefully place the panel on a soft surface to avoid scratches. Now you can access the inside of the door for your repair or upgrade.
6. Reinstalling The Panel
When your work inside the door is finished, reverse the steps to reinstall the panel:
- Reconnect any cables or wires.
- Line up the top edge and lower the panel into place.
- Press clips into their holes along the edge.
- Replace all screws and trim covers.
- Reinstall the controls and test all functions before finishing.
What To Watch Out For: Common Mistakes
Even careful DIYers can make mistakes when removing a door panel. Here are some of the most common errors and how to avoid them:
- Forgetting hidden screws: Missing a screw can break the panel or clips. Double-check all locations before prying.
- Using metal tools on trim: Metal tools can scratch or dent surfaces. Always use plastic tools or wrap metal ones in tape.
- Forcing the panel: If something feels stuck, stop and look for missed fasteners.
- Losing screws and clips: Panels use different screws and clips. Keep them organized to make reassembly easier.
- Damaging wiring: Be gentle when unplugging connectors. Pull on the plug, not the wires.
Differences Between Car Models
Not every car is the same. Some have more screws, while others use different clip types. Luxury models may have extra wiring for seat controls or airbags.
Here’s a quick comparison of panel fasteners in popular car brands:
| Brand | Typical Screw Locations | Clip Type |
|---|---|---|
| Toyota | Door handle, armrest, bottom edge | Plastic push-in |
| Honda | Armrest, behind trim, near speaker | Plastic Christmas tree |
| Ford | Handle, perimeter, under cover | Metal and plastic mix |
| BMW | Behind airbag badge, under trim | Snap-fit, sometimes metal |
Check your owner’s manual or online guides for model-specific details before starting. Many car forums offer step-by-step photos for popular models.
Credit: www.wikihow.com
Tips For A Clean, Damage-free Job
A few extra steps can help you avoid damage and get professional-looking results:
- Use a magnetic tray for metal screws. This keeps them from rolling away.
- Label parts if they look similar. Masking tape works well for this.
- Work slowly. Take your time, especially on your first try.
- Protect door paint by placing a soft towel between the panel and the door frame.
- Check clips before reusing. Old clips can break or not hold tightly. Replacements are cheap and easy to find.
When To Call A Professional
While most car door panels can be removed at home, some situations are best left to experts:
- Side airbags: If your door has airbags, there’s a risk of accidental deployment.
- Luxury cars: High-end vehicles may hide fasteners in hard-to-reach areas or use special tools.
- Rusty or damaged panels: If parts feel stuck or you see rust, forcing them can cause expensive damage.
If you’re unsure, consult a mechanic or check a trusted online source like WikiHow for extra guidance.
Example: Removing A Panel From A 2015 Honda Civic
Let’s look at a real-world example to show how these steps work.
- Remove the screw inside the door handle using a Phillips screwdriver.
- Pop off the trim piece behind the handle with a plastic tool.
- Remove two screws under the armrest.
- Disconnect the window switch panel by prying it up and unplugging the harness.
- Release the clips along the bottom and sides with a trim tool.
- Lift the panel up and disconnect the door latch cable.
This sequence matches most modern Hondas and shows how the process can be broken down into simple actions.
Cost And Time Estimates
How long does it take to remove a car door panel? For a beginner, expect about 30 to 60 minutes. Experienced DIYers can do it in 15–20 minutes.
As for cost, if you already have the basic tools, your main expense may be replacement clips (usually $5–$15 for a pack). Professional shops may charge $50–$100 for simple panel removal, not including repairs.
Here’s a quick breakdown:
| Expense | DIY Cost | Professional Shop |
|---|---|---|
| Tools | $20–$30 (one-time) | Included |
| Replacement clips | $5–$15 | $10–$25 |
| Labor | Free (your time) | $50–$100 |
Credit: www.youtube.com
Two Non-obvious Insights
Many beginners overlook these key points:
- Photograph every step. Even if you think you’ll remember, photos save time and frustration during reassembly.
- Test all electrical functions before final assembly. Plug in window switches, locks, and speakers while the panel is off to make sure everything works. Fixing a missed connection after reassembly means repeating the whole process.
Frequently Asked Questions
How Do I Know If My Car Has Side Airbags In The Door?
Look for a small “Airbag” badge or label on the door panel. If you see this, your door has side airbags. Removing panels with airbags is riskier and should be handled with caution or by a professional.
Do I Need Special Tools To Remove A Door Panel?
Most panels can be removed with basic hand tools: screwdrivers, trim tools, and pliers. Some luxury cars may require special fasteners or tools, so check your manual or research your specific model.
Can I Reuse Old Clips When Reinstalling The Panel?
You can often reuse them if they are not broken or bent. However, old clips may lose their grip or break during removal. It’s a good idea to buy a pack of replacement clips before starting.
What Should I Do If A Plastic Clip Breaks?
Broken clips are common. Remove the remains from the door and replace them with new ones. Universal clips are sold at auto parts stores and online. Make sure they match the size and style of your originals.
Will Removing The Door Panel Void My Warranty?
Usually, removing the door panel does not void a car warranty, but damaging wiring or airbags might. Check your warranty terms and be careful not to harm any electrical systems.
Taking off a car door panel is a skill that can save you money and help you understand your vehicle better. With careful steps, the right tools, and a patient approach, you’ll find it’s an achievable project. Always take your time, stay organized, and don’t be afraid to ask for help if you need it.
Happy repairing!
