Repairing a crack in your car’s plastic bumper at home might seem difficult. But with the right tools, clear steps, and a bit of patience, you can restore your bumper’s look and strength without spending hundreds at a repair shop.
Fixing a cracked bumper not only improves your car’s appearance—it also prevents further damage and saves money. Many people think only professionals can handle this job, but most home repairs are possible with common materials and careful work.
Let’s walk through the full process, from understanding the damage to finishing touches. You’ll learn which tools you need, step-by-step repair instructions, how to avoid common mistakes, and useful tips for long-lasting results.
Understanding Car Plastic Bumper Cracks
Plastic bumpers often crack due to minor accidents, parking misjudgments, or road debris. Most modern bumpers are made from thermoplastic materials, which are flexible but can break under stress. Cracks usually range from hairline splits to larger breaks, sometimes with small pieces missing.
Some cracks are just cosmetic, but others can weaken the bumper. Ignoring a crack can lead to water getting inside, causing rust or further breakage. Repairing it quickly keeps your bumper strong and maintains your car’s value.
Types Of Cracks
- Surface cracks: Small splits, usually not deep.
- Deep cracks: Go through the plastic, sometimes with gaps.
- Edge cracks: Near the corners or mounting points, often caused by impacts.
If the crack is longer than 6 inches or the bumper is deformed, consider professional help. But for most small to medium cracks, home repair is practical.
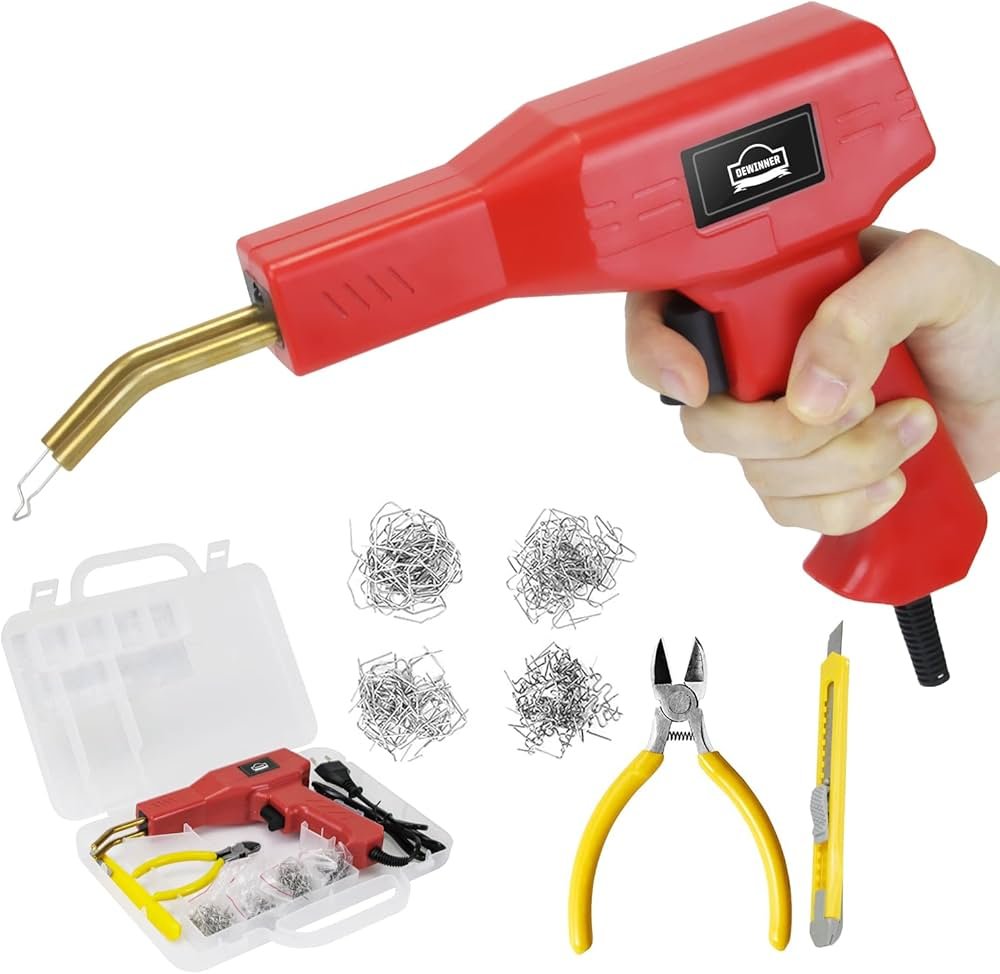
Essential Tools And Materials
Before starting, gather these items. Having everything ready makes the repair smoother and safer.
- Safety gear: Gloves, safety glasses, mask.
- Sandpaper: 80-grit (rough), 180-grit (medium), 400-grit (fine).
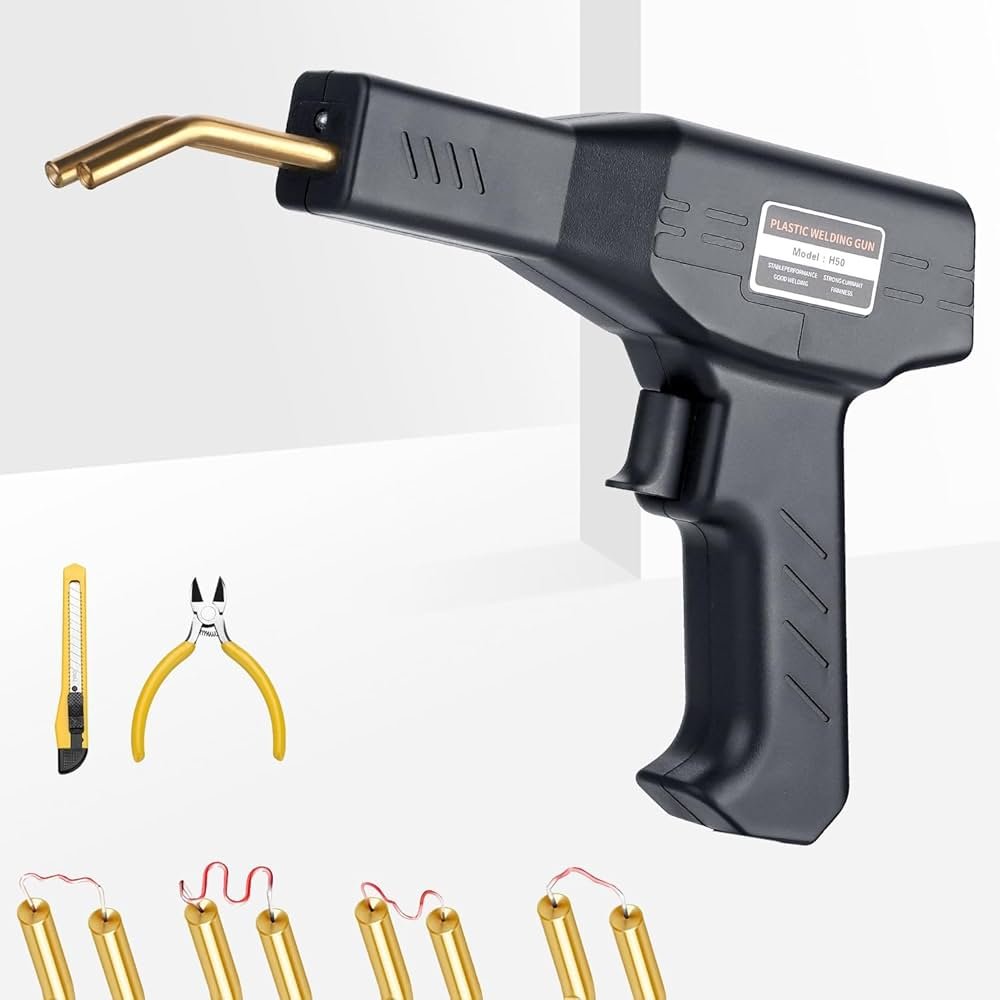
- Plastic repair kit: Includes two-part epoxy or plastic welding rods.
- Utility knife: For cutting loose plastic.
- Drill with small bit: To stop crack spreading.
- Body filler: For smoothing the repair.
- Putty knife or applicator: Spreads filler evenly.
- Automotive primer and paint: Matches your car color.
- Masking tape and newspaper: Protects nearby surfaces.
- Plastic cleaner or rubbing alcohol: Removes grease.
- Hair dryer or heat gun: Helps shape plastic if needed.
You can find most items at auto parts shops or hardware stores. Make sure your repair kit is for automotive plastics.
Typical Cost Comparison
Here’s a quick comparison of costs for home repair vs. professional service:
| Repair Type | Average Cost | Time Needed |
|---|---|---|
| DIY Home Repair | $30 – $80 | 3–5 hours |
| Professional Shop | $150 – $600 | 1–2 days |
DIY repairs are much cheaper, but require patience and attention to detail.
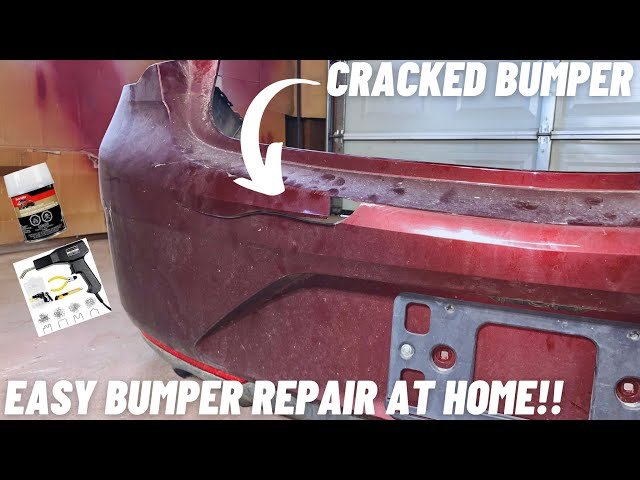
Credit: www.youtube.com
Step-by-step Guide To Repairing A Plastic Bumper Crack
Follow these clear steps to fix your bumper crack properly. Don’t rush—taking your time leads to better results.
1. Clean The Area
Use plastic cleaner or rubbing alcohol to remove dirt, grease, and wax. If you skip this, the repair materials may not stick well. Wipe with a clean cloth and let it dry completely.
2. Stop The Crack From Spreading
Take a drill with a small bit (about 1/8 inch) and carefully drill a hole at each end of the crack. This stops the crack from growing. Beginners often miss this step, but it’s critical for durability.
3. Prepare The Surface
Sand the area around the crack with 80-grit sandpaper. Sand about 2–3 inches around the crack to roughen the surface. This helps the filler and repair material bond. If there are loose pieces, carefully trim them with a utility knife.
4. Align The Crack
If the crack edges are uneven, gently use a heat gun or hair dryer to soften the plastic. Press the edges together so they align smoothly. Don’t overheat—just enough to make the plastic flexible.
5. Apply Plastic Repair Material
There are two main ways: epoxy filler or plastic welding.
Epoxy Filler Method
Mix the two-part epoxy according to instructions. Use a putty knife to push epoxy into the crack and spread it over the area. Smooth it out and let it dry as directed (usually 30 minutes to 1 hour).
Plastic Welding Method
If you have a plastic welding kit, melt the plastic rod along the crack, bonding the edges. This method is stronger, but requires skill and practice.
| Repair Method | Strength | Difficulty |
|---|---|---|
| Epoxy Filler | Medium | Easy |
| Plastic Welding | High | Medium |
Choose the method you feel comfortable with. For most home repairs, epoxy is easier.
6. Sand The Repair
Once the repair material is fully dry, sand the area with 180-grit sandpaper, then finish with 400-grit for a smooth surface. Wipe away dust with a damp cloth.
7. Apply Body Filler
If the repaired area isn’t perfectly flat, use body filler. Mix and apply a thin layer with a putty knife. Let it dry (about 20–30 minutes), then sand smooth. Repeat if needed for a seamless finish.
8. Prime And Paint
Cover nearby areas with masking tape and newspaper. Spray a thin layer of automotive primer over the repair. Let it dry (10–15 minutes), then lightly sand with 400-grit. Next, spray color-matched paint in several thin coats, allowing drying between each. Finish with a clear coat for extra shine and protection.
9. Final Inspection And Clean Up
Remove masking tape and inspect the area. The repair should be nearly invisible. Clean up tools and dispose of any waste safely.
Common Mistakes And How To Avoid Them
Many beginners make simple errors that affect the repair quality. Here’s what to watch out for:
- Skipping surface cleaning: Always clean the area—grease prevents bonding.
- Not drilling crack ends: Failing this step lets cracks spread after repair.
- Rushing drying times: Let epoxy and filler fully harden before sanding or painting.
- Overheating plastic: Use heat carefully—too much can warp the bumper.
- Too thick paint coats: Apply paint in thin layers to avoid drips and uneven color.
- Using wrong materials: Only use repair kits for automotive plastics.
If you follow each step and avoid these mistakes, your repair will last longer and look professional.
Credit: www.amazon.ae
Practical Tips For Best Results
- Check your paint code (usually found in your car’s door frame or manual) for a perfect color match.
- Work in a well-ventilated area to avoid fumes.
- Use gloves to protect your hands from chemicals.
- If the crack is near a mounting point, reinforce the repair with extra epoxy or a small backing piece.
- For deep cracks, apply repair material on both sides for extra strength.
- Keep pets and children away during the repair process.
Many people overlook the importance of sanding between each layer. This step helps the repair blend seamlessly with the rest of the bumper.
Example: Real-world Success
A 2018 study showed that DIY bumper repairs reduced repair costs by up to 80% and increased satisfaction among owners. People found that careful work and following instructions led to results nearly as good as professional shops.
For detailed guides on plastic welding and repair, you can refer to the Wikipedia page on plastic welding.
When To Seek Professional Help
While home repairs work for most cracks, there are times when expert help is needed:
- The crack is longer than 6 inches.
- The bumper is deformed or missing large pieces.
- The crack is near sensors, lights, or complex shapes.
- The repair fails after two attempts.
Professionals have advanced tools and can color-match perfectly, especially for luxury cars. For safety, don’t try to repair major damage yourself.
Credit: www.amazon.ae
Comparing Repair Methods
A quick comparison of the main home repair options:
| Method | Tools Needed | Average Time | Best For |
|---|---|---|---|
| Epoxy Filler | Epoxy, sandpaper, putty knife | 3–4 hours | Small cracks |
| Plastic Welding | Welding kit, sandpaper | 4–5 hours | Deep cracks |
| Body Filler | Filler, sandpaper | 1 hour | Surface smoothing |
Choose the method based on the crack type, your tools, and your skill level.
Frequently Asked Questions
How Long Does A Diy Bumper Repair Last?
If done correctly, a home repair can last several years. Using quality materials and following each step ensures the crack doesn’t return.
Can I Repair Any Plastic Bumper Crack At Home?
Most small to medium cracks are repairable. For large cracks or deep damage near important components, it’s best to get professional help.
Is Plastic Welding Better Than Epoxy Filler?
Plastic welding is stronger and more durable, but requires special tools and practice. Epoxy filler is easier for beginners and works well for small cracks.
How Do I Match The Paint Color?
Find your car’s paint code (often inside the driver’s door). Buy color-matched spray paint from an auto parts store. Test on a hidden area first.
Will The Repair Be Visible?
If you sand and paint carefully, the repair should be nearly invisible. For best results, follow all steps and use thin layers of paint.
Repairing a car’s plastic bumper crack at home is possible for most people. By understanding the process, using the right tools, and avoiding common mistakes, you can restore your bumper’s look and strength. Home repairs save money and build confidence.
With patience and attention to detail, your car will look as good as new.
