
Replacing your car’s AC evaporator at home is a challenging but rewarding project. Most people think AC repairs are only for professionals, but with the right tools, clear steps, and patience, you can handle this task yourself. Doing this can save you hundreds of dollars in labor costs.
However, it’s important to understand the process, safety measures, and what to expect before you begin. This guide will walk you through everything you need to know about how to replace a car AC evaporator at home, including what tools you need, how to remove the old part, install the new one, and how to avoid common mistakes.
Understanding The Ac Evaporator
The AC evaporator is a crucial part of your car’s air conditioning system. It’s located inside the dashboard, usually deep behind panels and components. Its job is to absorb heat from the air and cool it before it blows into your cabin. When the evaporator fails, you may notice weak or warm airflow, a musty smell, or even leaking refrigerant inside your car.
Why Would You Replace The Evaporator?
- Loss of cooling: The most common reason is the AC no longer blows cold air.
- Refrigerant leaks: A leaking evaporator can cause refrigerant to escape, making the system ineffective.
- Strange smells: Mold or bacteria can build up if moisture collects inside a damaged evaporator.
Replacing this part is complex because of its location, but it is possible for a careful DIY enthusiast.
Tools And Materials You Will Need
Having the right tools and materials will make this job much easier. Here’s what you’ll need:
- Socket set (metric and standard)
- Screwdrivers (Phillips and flat-head)
- Wrenches (open-end and box-end)
- Trim removal tools
- Plastic containers (for screws and small parts)
- AC manifold gauge set
- Vacuum pump
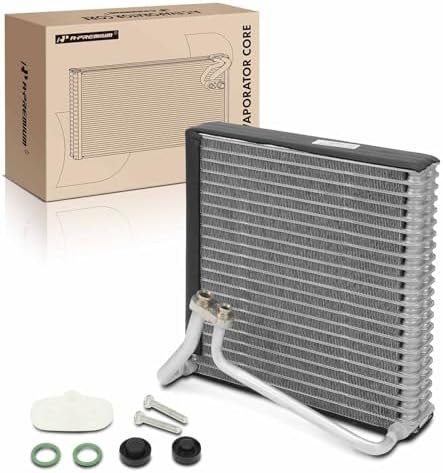
- Replacement evaporator core
- O-rings and seals (specific to your vehicle)
- Refrigerant (type recommended by your car’s manufacturer)
- Safety glasses and gloves
- Shop rags and towels
- Service manual for your vehicle (crucial for model-specific steps)
Pro tip: Take photos during disassembly so you remember where everything goes when you put it back together.
Credit: www.eyewear-kairos.com
Preparation And Safety Steps
Before you touch anything, make sure to follow these important safety steps:
- Disconnect the battery: Always remove the negative cable to prevent electrical shorts.
- Recover refrigerant: AC systems are under pressure and refrigerant is hazardous. Use a recovery machine or have a professional evacuate the system.
- Work in a well-ventilated area: Some old refrigerants are dangerous if inhaled.
- Label wires and connectors: This helps avoid confusion during reassembly.
Beginner mistake: Skipping refrigerant recovery can be both illegal and dangerous. Always handle refrigerant properly.
Step-by-step: Removing The Old Evaporator
Now let’s get into the main process. Removing the old evaporator is the hardest part.
1. Access The Dashboard
Most evaporators are buried deep in the dash. Here’s how to start:
- Remove the glove box and lower dash panels.
- Take out any center console pieces in the way.
- Disconnect all cables, electrical connectors, and ducts attached to the dashboard.
- Remove dashboard mounting bolts and gently pull the dash away (sometimes it must come out completely).
Non-obvious insight: Take your time with dash clips and connectors. Forcing anything can break fragile plastic parts.
2. Locate And Disconnect The Hvac Box
- The HVAC box holds the evaporator, heater core, and blower motor.
- Remove the bolts and screws holding the box in place.
- Carefully separate the box from the firewall.
3. Disconnect Refrigerant Lines
- Under the hood, locate the two lines going into the firewall.
- Use two wrenches to loosen the fittings—be gentle to avoid bending pipes.
- Remove the O-rings and set them aside for matching.
4. Remove The Hvac Box And Open It
- With the box on your workbench, remove screws and tabs to open it up.
- You’ll see the evaporator core inside.
- Note the position of any foam seals or insulation.
5. Remove The Old Evaporator
- Carefully lift out the old evaporator.
- Clean the inside of the HVAC box with a rag.
- Check for signs of mold, debris, or corrosion.
Installing The New Evaporator
Now you’re ready to put in the new part. This is the time to be extra careful, as a mistake here can lead to leaks or system failure.
1. Prepare The New Evaporator
- Compare the new part with the old one to ensure it’s the same size and shape.
- Install any foam strips or seals from the old unit onto the new one.
- Lubricate new O-rings with a small amount of refrigerant oil.
2. Place The Evaporator In The Hvac Box
- Carefully lower the new evaporator into place.
- Make sure all seals fit snugly to prevent air leaks.
- Reassemble the HVAC box, checking for gaps or pinched seals.
3. Reinstall The Hvac Box
- Place the box back inside the car.
- Align it with the mounting holes and the firewall.
- Tighten all bolts and screws evenly.
- Reconnect any wiring or ducts removed earlier.
4. Reconnect Refrigerant Lines
- Attach the lines to the new evaporator.
- Use new O-rings.
- Tighten fittings carefully—too loose will leak, too tight can damage threads.
5. Reinstall The Dashboard
- Place the dashboard back into position.
- Reconnect all cables, wires, and bolts.
- Double-check each connector before securing panels.
Vacuum, Recharge, And Test The System
Once everything is back together, you need to vacuum and recharge the AC system. This step is essential for proper cooling and to protect your new evaporator.
Using A Vacuum Pump
- Connect your AC manifold gauge set to the service ports.
- Attach the vacuum pump to the low-side port.
- Run the pump for 30–45 minutes to remove all air and moisture.
Recharging With Refrigerant
- Add refrigerant as specified in your car’s service manual.
- Watch the gauge readings and fill to the recommended pressure.
Testing The System
- Reconnect the battery.
- Start the engine and turn on the AC to max.
- Check for cold air from the vents.
- Listen for any unusual sounds or leaks.
Non-obvious insight: If the AC doesn’t get cold after recharging, check for a blown fuse or a disconnected pressure switch.
Common Mistakes To Avoid
- Skipping refrigerant recovery: This can damage the environment and your health.
- Forgetting to label connectors: Leads to confusion and possible electrical problems.
- Not replacing O-rings: Old seals can cause leaks in your new system.
- Rushing dash removal: You can crack plastic parts that are expensive to replace.
- Not checking for leaks: Always inspect connections before reassembling the dash.
How Long Does It Take?
Replacing a car AC evaporator at home is not a quick job. For most cars, expect it to take 6–10 hours. Some vehicles are more complex and may require more time.
Here’s a rough breakdown:
| Task | Estimated Time |
|---|---|
| Dashboard Removal | 2–3 hours |
| Evaporator Removal & Replacement | 2–3 hours |
| Reassembly & Testing | 2–4 hours |
Tip: Take breaks and don’t rush. Working slowly prevents mistakes.
Credit: murs-a-dessins.ch
Cost Comparison: Diy Vs. Professional Repair
Let’s see how much you can save by doing it yourself:
| Expense | DIY Cost (USD) | Professional Cost (USD) |
|---|---|---|
| Evaporator Part | $50–$200 | $50–$200 |
| Labor | Free (your time) | $600–$1,200 |
| Refrigerant & Supplies | $50–$100 | $100–$150 |
| Total | $100–$300 | $750–$1,550 |
Non-obvious insight: The biggest savings is on labor. If you already have some tools, your costs will be even lower.
When To Get Professional Help
While this job is possible for a skilled DIYer, sometimes it’s best to get help if:
- You don’t have the right tools (especially for refrigerant recovery and recharging)
- You’re not comfortable removing the dashboard
- You lack a safe workspace
- The AC system uses modern refrigerants that require special handling
If you’re unsure, ask an experienced mechanic for advice or watch video guides specific to your car model.
Practical Tips For A Smooth Repair
- Organize screws and clips: Use labeled bags or containers.
- Take step-by-step photos: Helps during reassembly.
- Replace cabin air filter: It’s easy to do while the dash is apart.
- Check for other issues: Look at the heater core, blower motor, and blend doors while the HVAC box is out.
Extra tip: Some vehicle forums have model-specific guides and photos. Search for your car’s make and model plus “evaporator replacement.”
Frequently Asked Questions
How Do I Know If My Car’s Evaporator Is Bad?
Common signs include weak or warm AC airflow, a musty smell, visible water on the floor, and refrigerant leaks inside the car. If recharging the system doesn’t fix the problem, the evaporator could be the cause.
Can I Replace A Car Ac Evaporator Without Removing The Dashboard?
In most cars, dashboard removal is required. Some trucks or vans have easier access, but for most passenger vehicles, the evaporator is deep behind panels. Check your car’s service manual for details.
What Tools Are Essential For This Job?
You need a socket set, screwdrivers, wrenches, trim tools, AC gauges, a vacuum pump, and safety gear. A service manual for your specific car is also very helpful.
Do I Need To Recharge The Ac System After Replacing The Evaporator?
Yes, the AC system must be vacuumed and recharged with the correct type and amount of refrigerant. This is essential for the system to work and to avoid damage.
Where Can I Find More Information About Ac Repair And Refrigerants?
For more technical details and safe handling of refrigerants, visit the Automobile Air Conditioning page on Wikipedia.
Replacing your car’s AC evaporator at home takes time and patience, but it’s very possible with the right tools and a careful approach. You’ll gain valuable experience, save money, and enjoy cool air on your next drive.
Credit: homeguide.com