Replacing a car’s front wheel hub assembly can seem challenging, but with the right approach, even beginners can complete this repair safely and correctly. Whether your car is making humming noises, the steering feels loose, or the ABS light is on, a bad front wheel hub assembly is often the cause. Learning how to replace this part can save you money and help you understand your vehicle better.
This guide will walk you step-by-step through the process, explain the tools needed, highlight important tips, and warn about common mistakes. If you are new to car repairs, don’t worry—clear instructions and practical advice will help you succeed.
What Is A Front Wheel Hub Assembly?
The front wheel hub assembly is a key part of your car’s suspension and steering system. It connects the wheel to the car and allows it to spin smoothly. This assembly contains the wheel bearings, which help reduce friction, and often an ABS sensor for the anti-lock braking system.
If the assembly fails, you might hear grinding or humming noises, feel vibration, or notice the ABS light on your dashboard. Driving with a damaged hub can be dangerous, so quick replacement is important.
Signs Your Front Wheel Hub Assembly Needs Replacement
Recognizing a bad hub assembly early can prevent further damage. Here are the most common signs:
- Grinding or humming noise from the wheel area, especially when turning.
- Vibration in the steering wheel, which gets worse with speed.
- Loose or wobbly wheel when the car is lifted.
- ABS light appears on the dashboard.
- Uneven tire wear or pulling to one side.
If you notice any of these symptoms, inspect the hub assembly as soon as possible.
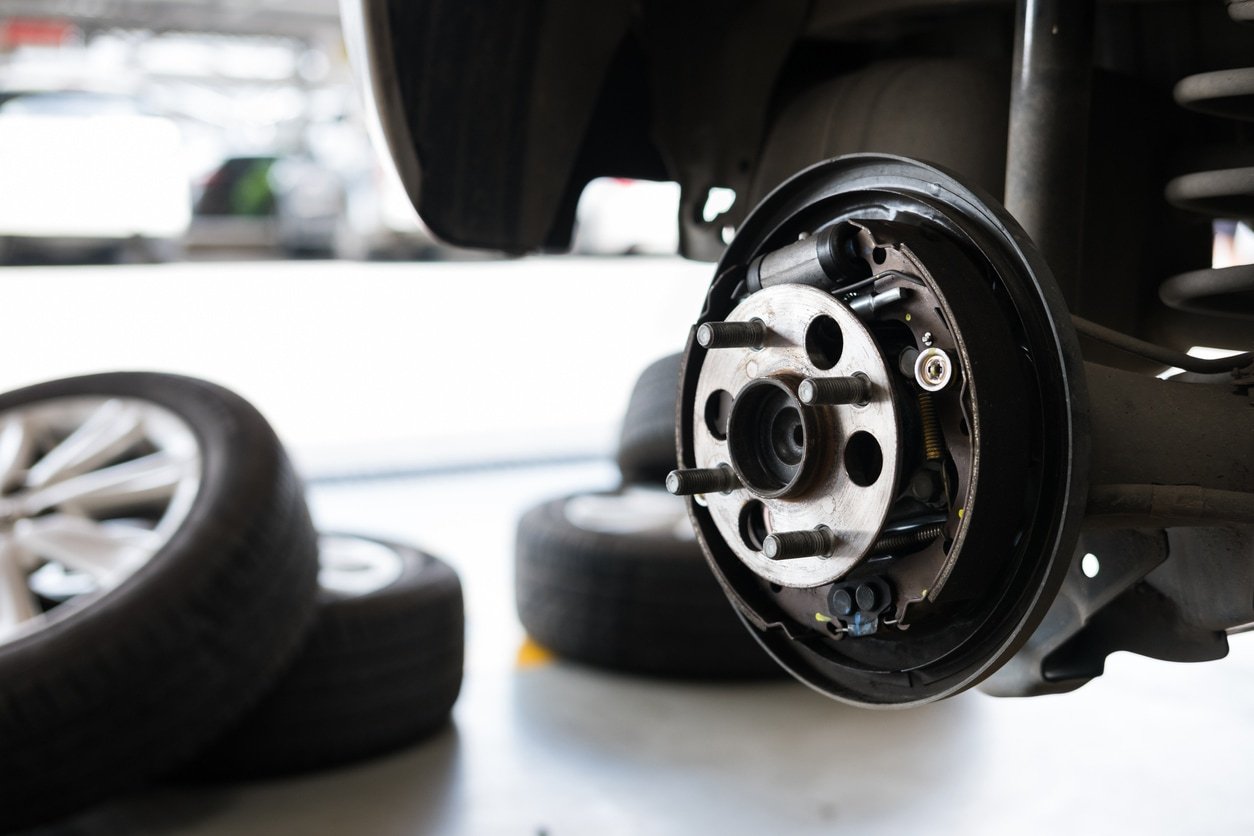
Credit: www.autozone.com
Tools And Parts Needed
Before you start, gather all the necessary tools and parts. Missing tools can slow you down or make the job impossible. Below is a comparison of essential and optional tools for this repair:
| Tool/Part | Essential | Optional |
|---|---|---|
| Jack & Jack Stands | Yes | No |
| Socket Set (Metric & SAE) | Yes | No |
| Breaker Bar | Yes | No |
| Torque Wrench | Yes | No |
| Hammer or Rubber Mallet | No | Yes |
| Pry Bar | No | Yes |
| Replacement Hub Assembly | Yes | No |
| Wheel Chocks | Yes | No |
| Penetrating Oil | No | Yes |
| ABS Sensor (if needed) | No | Yes |
| Gloves/Safety Glasses | No | Yes |
Having the right tools makes the job safer and smoother. Penetrating oil is especially helpful if bolts are rusted or stuck.
Safety First: Important Precautions
Before starting the repair, remember these safety steps:
- Park on a flat surface and engage the parking brake.
- Use wheel chocks to prevent the car from rolling.
- Always use jack stands—never work under a car supported only by a jack.
- Wear gloves and safety glasses to protect your hands and eyes.
Even experienced mechanics can get hurt if safety is ignored. Take your time and double-check each step.
Step-by-step Guide: Replacing A Front Wheel Hub Assembly
Here is a detailed walkthrough for replacing a typical front wheel hub assembly. Your car may have unique features, so check the repair manual for your specific model.
1. Loosen The Lug Nuts
Before lifting the car, use a breaker bar to loosen the wheel’s lug nuts. Do not remove them yet—just break them free so you can remove the wheel easily once the car is up.
2. Raise And Secure The Vehicle
Use a jack to lift the front of the car. Place jack stands under the frame to support the car securely. Lower the car onto the stands and double-check stability before working underneath.
3. Remove The Wheel
Now, take off the loosened lug nuts and remove the wheel. Set the wheel and nuts aside in a safe place.
4. Access The Hub Assembly
You may need to remove the brake caliper and rotor to reach the hub. Here’s how:
- Remove the brake caliper bolts with a socket wrench.
- Slide the caliper off the rotor and hang it with a wire or rope—do not let it dangle by the brake hose.
- Remove the brake rotor. If it’s stuck, tap it gently with a rubber mallet.
5. Disconnect The Abs Sensor (if Equipped)
Most modern cars have an ABS sensor connected to the hub. Disconnect the sensor wiring carefully. Pull the connector apart—do not yank the wires.
6. Remove The Hub Assembly Bolts
Find the bolts on the back of the hub assembly (usually three or four). Spray them with penetrating oil if they are rusty. Use a socket wrench and breaker bar to remove these bolts. Some may be very tight.
7. Remove The Old Hub Assembly
Once the bolts are out, the hub should come free. If it’s stuck due to rust, tap it gently with a hammer. Do not hit too hard, as you can damage surrounding parts. If it won’t move, use a pry bar carefully.
8. Clean The Hub Mounting Surface
Before installing the new hub, clean the mounting area with a wire brush. Remove any rust or dirt. This step helps the new hub sit flat and prevents vibration.
9. Install The New Hub Assembly
Align the new hub with the bolt holes and slide it into place. Insert the bolts and tighten them by hand first. Then, use a torque wrench to tighten each bolt to the manufacturer’s recommended specification. This ensures the hub is secure and safe.
10. Reconnect The Abs Sensor
Plug the ABS sensor wire back in. Make sure the connection is secure and the wire will not rub against any moving parts.
11. Reinstall The Brake Rotor And Caliper
Slide the brake rotor back onto the hub. Reinstall the brake caliper and tighten the bolts. If you removed any brake pads, check their alignment before tightening.
12. Mount The Wheel And Lower The Car
Put the wheel back on and hand-tighten the lug nuts. Remove the jack stands and lower the car to the ground. Tighten the lug nuts with a torque wrench in a star pattern.
13. Double-check And Test Drive
Check all bolts and connections. Make sure no parts are left behind. Start the car and do a short test drive. Listen for noises and check for warning lights.
Common Mistakes To Avoid
Even careful mechanics can make errors. Here are some mistakes to watch out for:
- Skipping torque specs: Always use a torque wrench. Overtightening or undertightening bolts can cause damage or make your repair unsafe.
- Forgetting to clean the mounting area: Rust or debris can make the new hub fit poorly, causing vibration or early failure.
- Ignoring ABS sensor wiring: Pinched or loose wires can trigger warning lights or cause ABS problems.
- Not supporting the brake caliper: Hanging the caliper by the hose can damage your brake system.
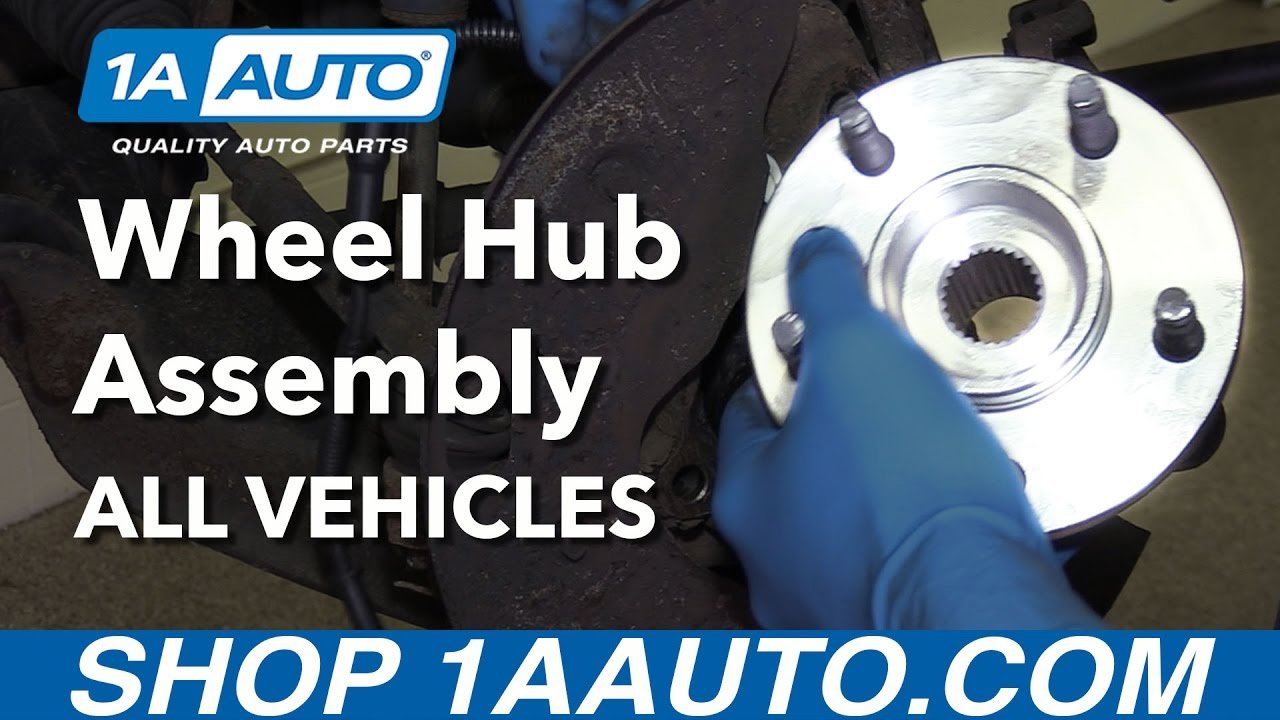
Credit: www.youtube.com
Choosing The Right Replacement Hub
Not all hub assemblies are the same. Here are some key factors to consider:
| Feature | OEM (Original Equipment) | Aftermarket |
|---|---|---|
| Fit & Compatibility | Guaranteed | May vary |
| Price | Higher | Lower |
| Warranty | Usually included | Depends on brand |
| Quality | Consistent | Mixed—research needed |
If possible, use an OEM hub assembly for best fit and reliability. Aftermarket options can save money but check reviews and quality ratings first.
Non-obvious Insights For A Smooth Repair
Many beginners miss these helpful tips:
- Heat can help with stuck hubs. If a hub won’t come loose, carefully apply heat with a heat gun (not an open flame) to break rust bonds.
- Check for worn suspension parts. When the hub is off, inspect ball joints, tie rods, and bushings for wear. Replacing worn parts now saves time later.
- Test the ABS sensor before reassembly. If the ABS sensor was giving a warning light, check its resistance with a multimeter before reinstalling.
- Keep extra gloves on hand. This job gets messy, especially if old grease leaks out of the hub.
How Long Does The Job Take?
For most people, replacing a front wheel hub assembly takes 1.5 to 3 hours per side. If bolts are rusted or parts are stuck, it may take longer. Experienced mechanics can often complete both sides in less than two hours.
When To Call A Professional
While this repair is doable for most with basic tools, there are times when calling a mechanic is best:
- Bolts are seized or broken
- You do not have jack stands or a torque wrench
- The repair feels overwhelming or unsafe
- The hub is integrated with other suspension parts
If you are unsure, ask a mechanic for advice or a price quote. Some shops will let you supply your own parts to save money.
For more about wheel hub assemblies and related safety, visit the Wikipedia Wheel Hub Assembly page.
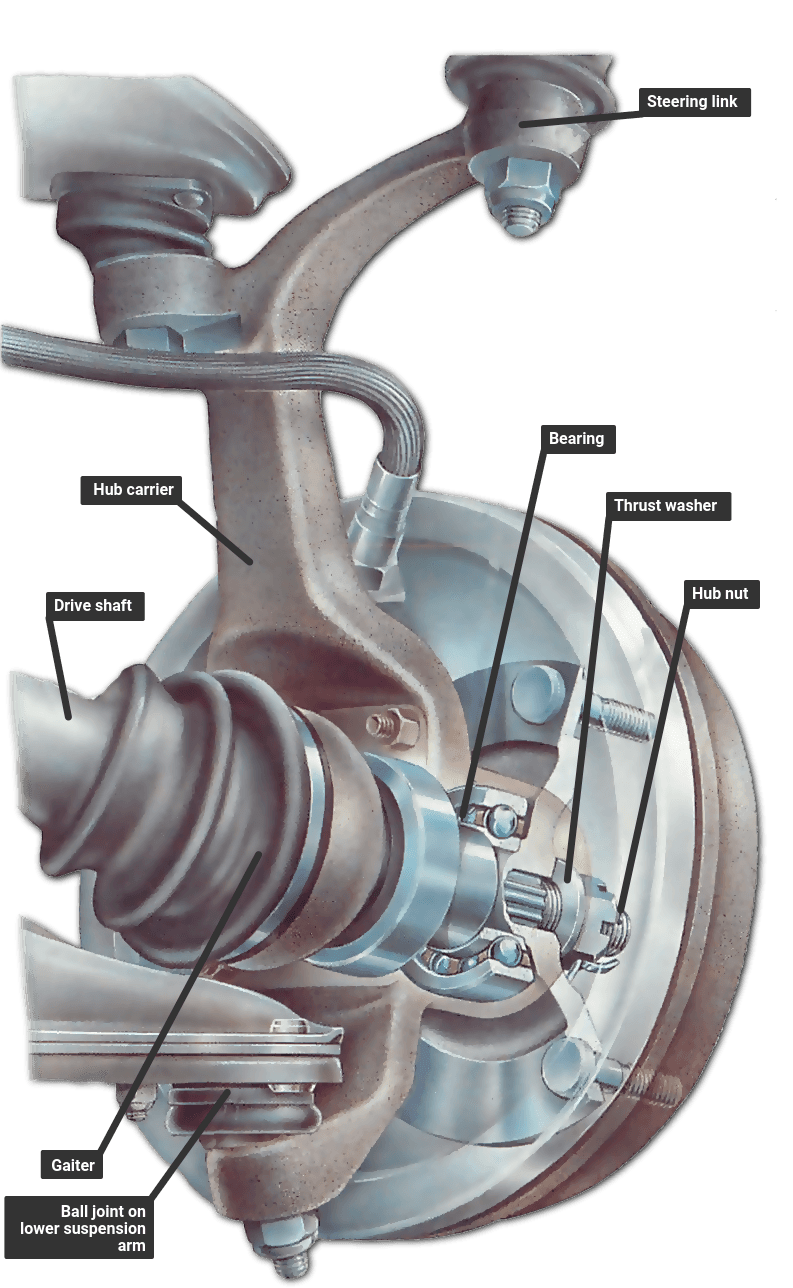
Credit: www.howacarworks.com
Frequently Asked Questions
How Do I Know If My Front Wheel Hub Assembly Is Bad?
Listen for humming or grinding noises from the wheels, feel for vibration in the steering wheel, or look for an ABS warning light. If your wheel feels loose when lifted, the hub assembly may be worn out.
Is It Safe To Drive With A Bad Wheel Hub Assembly?
No, it is risky. A failed hub can cause the wheel to wobble or even come off. It also affects braking and steering. Replace a bad hub as soon as possible.
Can I Replace Just The Wheel Bearing Instead Of The Whole Hub Assembly?
Some cars allow you to replace only the wheel bearing, but many modern vehicles use a one-piece hub assembly. Replacing the full assembly is often easier and safer for beginners.
What Torque Should I Use For Hub Assembly Bolts?
Always check your vehicle’s service manual for exact torque specs. Using the wrong torque can cause the hub to fail or come loose.
Do I Need An Alignment After Replacing The Hub Assembly?
Usually, you do not need an alignment unless you removed other suspension parts or noticed uneven tire wear. If the steering feels off after the repair, have an alignment check done.
Replacing a front wheel hub assembly is a valuable skill for any car owner. With patience, the right tools, and careful attention to detail, you can save money and keep your car running safely. Pay close attention to each step, use quality parts, and never rush—your safety and your car’s performance depend on it.
