
Applying a ceramic coating to your car at home is one of the best ways to protect its paint and make it shine like new. While the process might sound complex, with the right tools, patience, and attention to detail, you can achieve professional results.
Ceramic coating forms a hard, glass-like layer over your car’s paint, making it resistant to dirt, water, and UV rays. This guide will walk you through every step, help you avoid common mistakes, and give you insights that most beginners overlook.
Let’s get started.
What Is Ceramic Coating And Why Does It Matter?
Ceramic coating is a liquid polymer that bonds with your car’s paint. Once cured, it acts as a shield against scratches, chemical stains, and UV damage. Many car owners choose ceramic coatings because they offer a deep gloss and make washing easier—water and grime slide off with little effort.
Traditional waxes protect for only a few weeks, but a quality ceramic coating can last 2–5 years or more, depending on maintenance. The initial investment in time and products pays off with less frequent cleaning, improved appearance, and higher resale value.
Tools And Materials You Need
Before you start, gather all the essential tools. Using the right products ensures good results and prevents damage.
- Ceramic coating kit (includes coating and applicator pads)
- PH-neutral car shampoo
- Two buckets (for washing and rinsing)
- Microfiber wash mitt
- Clay bar kit (with lubricant)
- Isopropyl alcohol (IPA) solution (or panel prep spray)
- Multiple microfiber towels (at least 8–10)
- Polishing compound (optional, for paint correction)
- Dual-action polisher (optional, for swirl removal)
- Nitrile gloves (to protect your hands)
- Masking tape (for sensitive areas)
| Tool | Purpose | Essential? |
|---|---|---|
| Ceramic Coating Kit | Main protective layer | Yes |
| Clay Bar | Remove embedded dirt | Yes |
| Dual-action Polisher | Paint correction | No (but recommended) |
| Masking Tape | Protect trim and rubber | Yes |
Tip: Never use household cleaning products on your car before coating—they may leave residues that affect bonding.
Credit: www.youtube.com
Preparing Your Car For Ceramic Coating
Preparation is the most important step. Any dirt, grease, or swirl marks left on your car will be sealed under the coating.
1. Wash Thoroughly
Use a PH-neutral shampoo and the two-bucket method. One bucket holds soapy water, the other clean water for rinsing your mitt. This minimizes the risk of scratching.
- Rinse the car to remove loose dirt.
- Wash from top to bottom.
- Rinse again and dry with a microfiber towel.
2. Decontaminate The Surface
After washing, your paint may still have embedded contaminants like tar, sap, or industrial fallout. Use a clay bar with lubricant:
- Work in small sections.
- Glide the clay over the paint lightly.
- Wipe off residue with a clean towel.
3. Paint Correction (optional But Recommended)
If your car has scratches or swirl marks, remove them now. Once you apply ceramic coating, these imperfections will be locked in place.
- Use a dual-action polisher with a light polishing compound.
- Work slowly and check your progress.
- Wipe down each section after polishing.
4. Panel Wipe
Spray isopropyl alcohol solution (usually 70% diluted with water) or a panel prep spray to remove any oils or polish residue.
- Wipe with a clean microfiber towel.
- Repeat if needed.
- The surface should feel smooth and squeaky clean.
5. Masking
Apply masking tape to rubber trims, plastic, and areas you do not want to coat. Some ceramic coatings can stain or discolor these parts.
Applying The Ceramic Coating
Now you are ready for the main event. Work in a clean, shaded area—avoid direct sunlight or windy conditions.
1. Read The Instructions
Each ceramic coating kit is a bit different. Always read the manufacturer’s guide before opening the bottle. Some coatings require multiple layers; others need only one.
2. Apply The Coating
- Put on nitrile gloves.
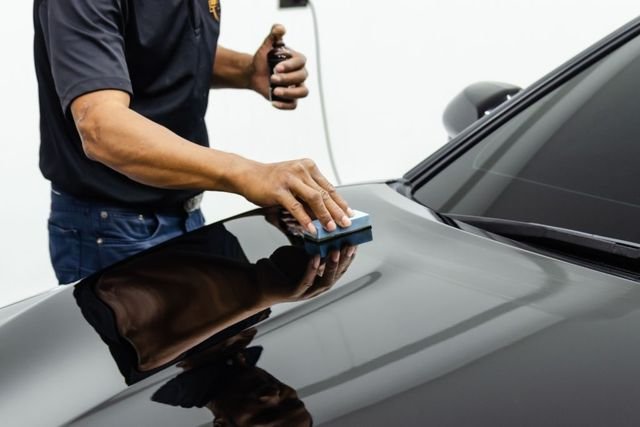
- Wrap the provided suede cloth around the applicator block.
- Add a few drops of ceramic coating to the cloth.
- Start with a small section (about 2×2 feet).
- Apply in straight lines: First horizontal, then vertical, for even coverage.
3. Level The Coating
After 1–5 minutes (check your product’s instructions), a rainbow effect or light haze appears.
- Use a clean, dry microfiber towel to gently buff the area.
- Move to a second towel for a final polish.
- Make sure there are no high spots or streaks.
4. Repeat
Continue section by section around the car. Always use fresh towels and change cloths if they become saturated.
| Step | Time Needed | Important Tip |
|---|---|---|
| Apply Coating | 15–30 min (whole car) | Don’t rush, especially on first section |
| Buffing | 10–20 min | Buff before it dries fully |
| Curing | 12–24 hours (no water) | Avoid overnight dew/rain |
5. Second Layer?
Some coatings allow for a second layer, which can add thickness and gloss. Wait the recommended time (often 1–2 hours) before applying another coat.
Insight: Most beginners overlook the importance of waiting between layers. Rushing this step can cause streaks or poor durability.
Curing And Aftercare
The coating must cure to form a strong bond.
- Initial cure: Do not let water touch the car for 12–24 hours.
- Full cure: Avoid washing or chemical cleaners for 5–7 days.
Parking in a clean garage during this period is ideal. If your car gets wet, gently blot with a microfiber towel—do not wipe.
Non-obvious tip: The first week is critical. Even fingerprints can affect the finish, so handle your car as little as possible.
Maintenance For Long-lasting Results
Ceramic coating makes maintenance easier, but not maintenance-free.
- Wash with PH-neutral shampoo only.
- Avoid automatic car washes with brushes.
- Use the two-bucket method and clean mitts.
- Dry with a soft microfiber towel.
A ceramic coating spray or booster can be used every few months to keep the shine and hydrophobic effect strong.
| Task | Frequency | Purpose |
|---|---|---|
| Hand Wash | Every 2–4 weeks | Remove dirt and keep coating working |
| Booster Spray | Every 2–3 months | Restore gloss and water repellence |
| Inspection | Every 6 months | Check for weak spots |
Another insight: It’s common for owners to forget regular washing, thinking the coating does everything. Dirt and grime can still build up, which may reduce the coating’s effectiveness.
Credit: www.youtube.com
Common Mistakes To Avoid
1. Skipping Paint Correction
Applying coating over swirls or scratches will lock in those flaws.
2. Not Using Enough Towels
Dirty or saturated towels can cause streaks. Always keep several clean ones on hand.
3. Coating In Direct Sun Or High Humidity
This causes the product to dry too fast, leading to high spots and uneven gloss.
4. Touching The Paint During Curing
Even fingerprints can be sealed in and ruin the finish.
5. Ignoring Instructions
Each product is different. Always follow the manufacturer’s timing for application and buffing.
Is It Worth Doing Ceramic Coating At Home?
Applying ceramic coating yourself can save hundreds of dollars compared to professional shops. You get to know your car’s paint, and the sense of satisfaction is hard to beat. However, the process is time-consuming and requires patience. If you want perfect, swirl-free paint, consider hiring a detailer for paint correction, then do the coating yourself.
Professional jobs often cost $500–$1500 or more, while a good DIY kit is $50–$150. Your main investment is time—expect to spend a full day if you do it right.
Credit: www.chicagoceramicgarage.com
Frequently Asked Questions
How Long Does Ceramic Coating Last?
A quality ceramic coating lasts 2–5 years with proper care. Some premium coatings can last up to 7 years, but regular washing and maintenance are essential for maximum durability.
Can I Apply Ceramic Coating On A New Car?
Yes, but new cars may still have light scratches or factory residue. Always wash, clay, and inspect the paint before applying the coating to ensure the best results.
What Happens If I Make A Mistake During Application?
If you notice high spots or streaks soon after application, gently polish them with a microfiber towel. If the coating has fully cured, you may need to polish the area and reapply. Always work in good light so you can spot mistakes early.
Is Ceramic Coating Better Than Wax?
Ceramic coating offers longer-lasting protection, stronger resistance to chemicals, and better gloss than traditional wax. Wax must be reapplied every few weeks, while ceramic coatings can last years.
Where Can I Learn More About Ceramic Coating Products?
For more information and product reviews, visit Autogeek Online, a well-known detailing community with expert advice.
Ceramic coating is a smart investment for anyone who wants their car to look great and stay protected. By following these steps and taking your time, you can achieve results that rival the professionals—and enjoy your car’s shine for years to come.
