If you find a red puddle under your car, it’s usually a sign of a transmission pan leak. This can feel worrying, but you don’t always need a mechanic to fix it. With some tools, patience, and the right steps, you can repair a transmission pan leak at home and keep your car running smoothly. Learning this skill saves money, helps you understand your vehicle better, and prevents bigger problems down the road.
What Is A Transmission Pan Leak?
The transmission pan is a metal or aluminum tray under your car, holding the transmission fluid. This fluid lubricates gears and keeps your transmission cool. If the pan leaks, you may notice stains on your driveway, slipping gears, or a burning smell. Fixing the leak quickly is important because low fluid can damage your transmission, leading to repairs that cost thousands of dollars.
Signs Of A Transmission Pan Leak
Catching a leak early makes repair much easier. Here are the main warning signs:
- Red or dark brown puddles under the car, usually near the middle.
- Low transmission fluid level—check your dipstick and look for drops.
- Burning smell—overheated transmission fluid smells sharp or burnt.
- Rough or delayed shifting—the car hesitates or jerks when changing gears.
- Warning lights on your dashboard, like the check engine or transmission light.
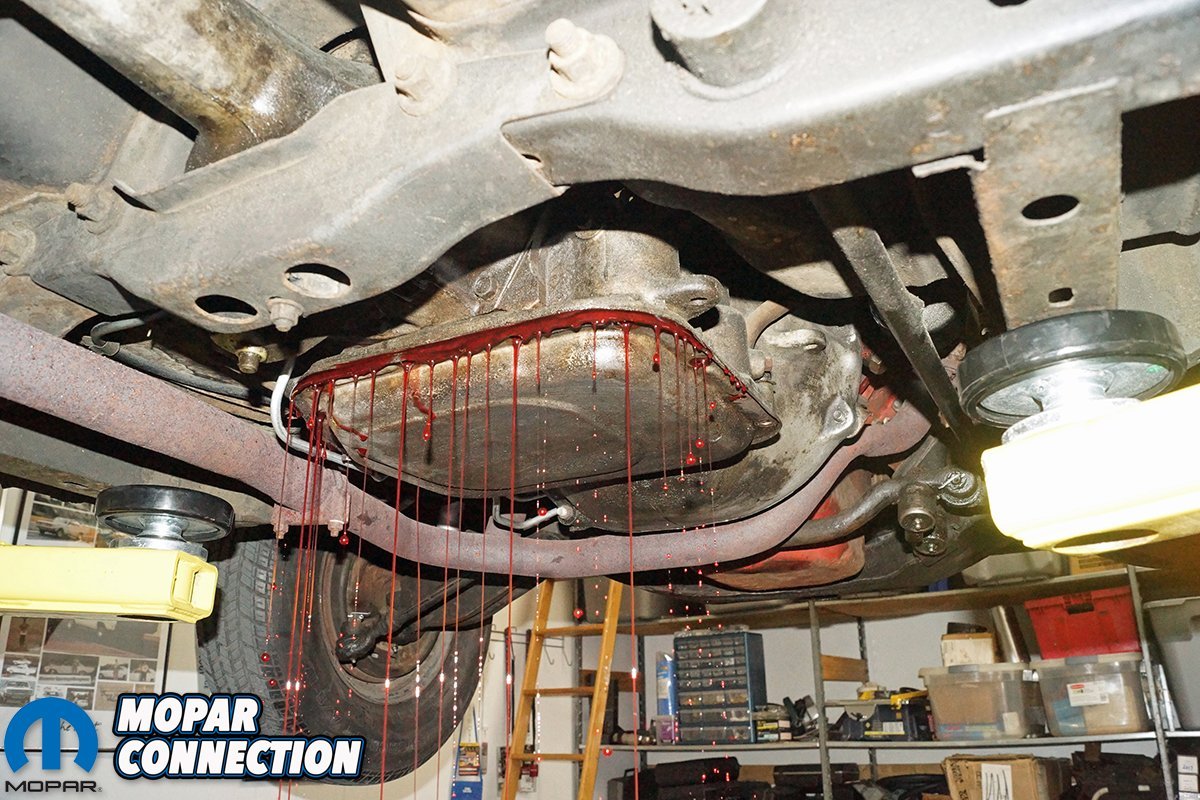
Credit: moparconnectionmagazine.com
Why Transmission Pans Leak
Understanding why pans leak helps you prevent future problems. The main causes are:
- Worn or damaged gasket: The gasket seals the pan to the transmission. Over time, it can crack or flatten.
- Loose or missing bolts: Vibrations can loosen bolts, letting fluid escape.
- Cracked or warped pan: Hitting debris or driving over rocks can bend or crack the pan.
- Over-tightened bolts: Too much force can squeeze and damage the gasket, causing leaks.
Tools And Materials You’ll Need
Before you start, gather these items:
- Socket set and ratchet
- Drain pan
- Screwdriver (flathead or Phillips)
- Replacement gasket
- Transmission fluid (check your owner’s manual for the type)
- Torque wrench
- Shop rags or paper towels
- Plastic scraper or gasket remover
- Jack and jack stands or ramps
- Safety gloves and glasses
Optional but helpful: Brake cleaner, a flashlight, and a funnel.
Step-by-step Guide To Fixing A Transmission Pan Leak
You don’t need to be a professional, but you do need to follow each step carefully. Here’s how to do it:
1. Park Safely And Prepare
Find a flat, stable surface. Put your car in park and set the parking brake. If your car was running, let it cool for at least 30 minutes—transmission fluid can get very hot and cause burns.
Use a jack to raise the front of the car and secure it with jack stands. Never rely on the jack alone.
2. Locate The Transmission Pan
Slide under the car and find the transmission pan. It’s usually a flat, rectangular or oval metal part under the center of the car, behind the engine.
3. Drain The Transmission Fluid
Place a drain pan under the transmission pan. Some cars have a drain plug—use your socket wrench to remove it and let the fluid flow out. If there’s no plug, you’ll need to loosen the pan bolts slowly, starting from one corner. Fluid will start to leak out, so have rags ready.
Used transmission fluid is toxic—dispose of it at a recycling center.
4. Remove The Transmission Pan
Loosen and remove all the pan bolts. Gently lower the pan; some fluid may still spill out. Be careful not to drop the pan or splash fluid.
5. Inspect The Pan And Gasket
Look for cracks, dents, or warping on the pan. A bent pan should be replaced, not reused. Remove the old gasket from the pan and transmission surface with a plastic scraper.
Inspect the old gasket for tears, hard spots, or flattening. These signs mean it caused the leak.
6. Clean The Surfaces
Clean the pan and the transmission surface with brake cleaner or a shop rag. Remove all old gasket material. Even a small piece left behind can cause a new leak.
7. Install The New Gasket
Set the new gasket on the pan, lining up the bolt holes. Some gaskets stick to the pan; others sit on the transmission. Do not use glue or silicone unless your car’s manual says so. Incorrect sealant can block fluid passages.
8. Reinstall The Transmission Pan
Hold the pan in place and insert each bolt by hand. Tighten bolts in a crisscross pattern (opposite corners) to avoid warping the pan or gasket. Use a torque wrench to tighten bolts to the manufacturer’s specs—usually 8–12 ft-lbs (check your manual).
Over-tightening is a common mistake. It can crush the gasket and start a new leak.
9. Refill The Transmission Fluid
Lower the car back to the ground. Use a funnel to add new transmission fluid through the dipstick tube. Start with the amount you drained, then check the dipstick with the engine running and the transmission in park.
Do not overfill—too much fluid can cause foaming and shifting problems.
10. Check For Leaks And Test Drive
Start the engine and let it run for a few minutes. Check under the car for drips. Move the gear selector through all positions, then recheck the fluid level and add more if needed.
Take a short test drive. Park and check for leaks again. If you see no drips and the fluid level is good, the repair is complete.
Comparing Gasket Types
Choosing the right gasket is important for a long-lasting repair. Here’s a quick comparison:
| Gasket Type | Material | Durability | Ease of Installation |
|---|---|---|---|
| Cork | Compressed cork | Medium | Easy |
| Rubber | Synthetic rubber | High | Very easy |
| Paper | Fiber/paper | Low | Easy |
| Reusable/Metal | Metal with rubber bead | Very high | Moderate |
Rubber and reusable/metal gaskets are best for home repairs—they last longer and are easier to install correctly.
Common Mistakes And How To Avoid Them
Many beginners make the same errors. Avoid these for a reliable fix:
- Not cleaning surfaces completely: Even a small piece of old gasket can cause a new leak.
- Over-tightening pan bolts: This crushes the gasket and makes leaks more likely.
- Using the wrong fluid type: Always check your owner’s manual.
- Skipping torque wrench: Tightening by feel is risky—always use the correct torque.
- Ignoring pan damage: Reinstalling a bent or cracked pan usually leads to another leak.
- Not checking for leaks after repair: Test before driving long distances.
How Much Does A Diy Transmission Pan Leak Repair Cost?
Fixing a transmission pan leak at home is much cheaper than a mechanic. Here’s a breakdown:
| Item | Typical Cost (USD) |
|---|---|
| Gasket | $10–$30 |
| Transmission fluid (3–6 quarts) | $20–$50 |
| Brake cleaner | $5 |
| Shop rags | $3–$8 |
| Total DIY cost | $40–$90 |
| Professional repair | $150–$400 |
You can save around $100–$300 by doing the work yourself.

Credit: thelandautorepair.com
When To Call A Mechanic
Some leaks are too serious for home repair. Call a professional if you notice:
- Cracked transmission case (not just the pan)
- Severe rust or corrosion
- Pan bolts stripped or broken
- Fluid mixed with coolant or metal shavings (may signal deeper issues)
If you have doubts, it’s better to be safe than sorry.
Extra Tips For A Better Repair
- Always wear gloves—transmission fluid can irritate skin.
- Use brake cleaner to remove all oil before installing the new gasket.
- Take photos as you remove bolts or parts—this helps with reassembly.
- Keep a magnet in your drain pan to catch metal shavings; finding a lot of metal means you should get the transmission checked.
- Replace the transmission filter if your car has one (usually when the pan is off).
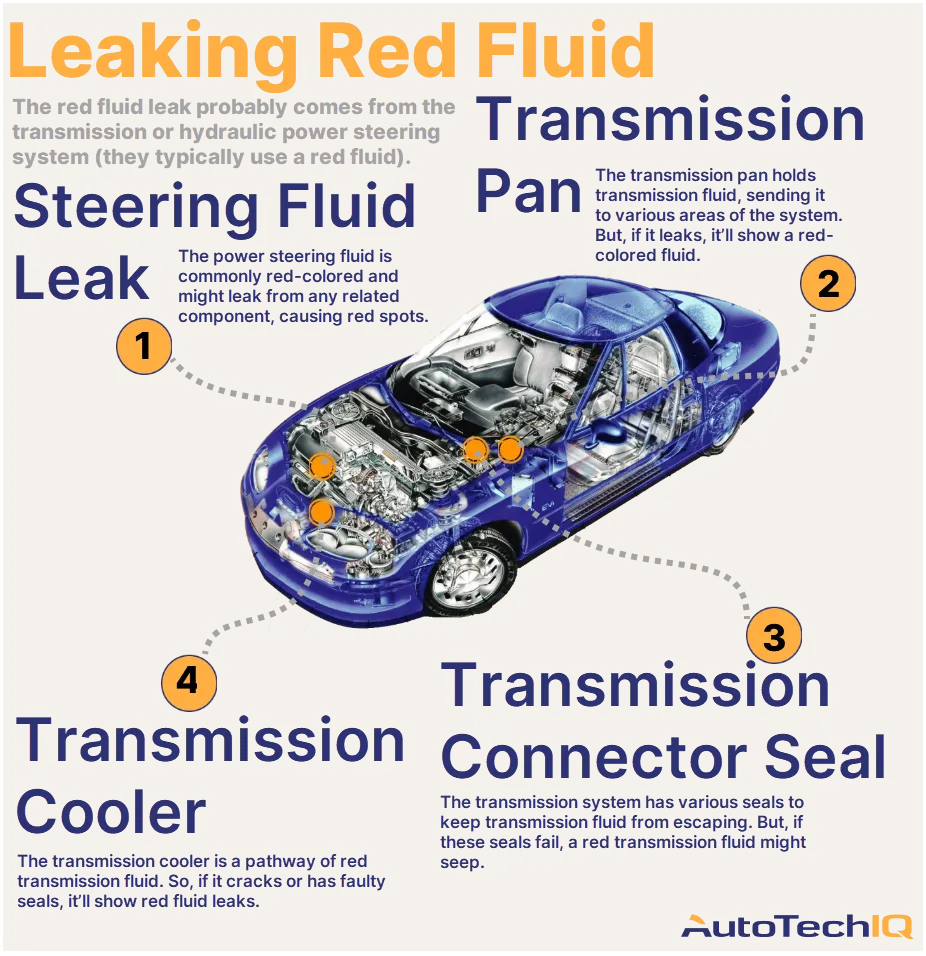
Credit: www.autotechiq.com
How Long Does It Take?
A first-time repair usually takes 2–3 hours. With experience, you can finish in about 1 hour. Most of the time is spent draining fluid and cleaning.
Environmental And Safety Notes
Never pour used transmission fluid down drains or on the ground. Take it to an auto parts store or recycling center. Always support your car with jack stands—never crawl under a car held up only by a jack.
Where To Learn More
For detailed instructions and diagrams, check your car’s service manual or a trusted resource like Family Handyman.
Frequently Asked Questions
How Do I Know If My Transmission Pan Is Leaking Or If It’s Another Part?
If the leak is near the center of the car and the fluid is red or dark brown, it’s likely from the transmission pan. Leaks at the front or rear of the car may come from the engine or differential. You can clean the area, drive for a day, and check where the new leak starts.
Can I Use Silicone Or Gasket Maker Instead Of A Regular Gasket?
Only use gasket maker if your car’s manual recommends it. Some transmissions require a specific gasket type. Using the wrong material can block passages or cause leaks.
What Happens If I Drive With A Leaking Transmission Pan?
Driving with a leaking pan can cause your transmission fluid level to drop. This leads to poor shifting, overheating, and possibly total transmission failure, which is very expensive to fix.
How Often Should I Check My Transmission Fluid Level After A Repair?
Check the fluid level right after the repair, then again after a few days and a week later. If the level stays steady, your repair worked. If it drops, re-inspect for leaks.
Is Fixing A Transmission Pan Leak A Permanent Solution?
A proper repair with a new gasket and correct torque should last several years. However, if you reuse an old pan or gasket, or over-tighten bolts, leaks can return sooner.
Fixing a transmission pan leak at home is a smart way to learn about your car and save money. Take your time, follow each step, and don’t hesitate to call a professional for serious problems. With care and attention, you can keep your car on the road and avoid expensive repairs.
