
If you love cars, you might dream about improving your ride’s look and handling. Lowering springs are one of the most popular and affordable ways to do this. They make your car sit closer to the ground, which often gives a sportier look and can improve how your car feels on the road.
But is it possible to install car lowering springs yourself? With patience, the right tools, and clear instructions, you can do it at home—even if you’re not a professional mechanic. This guide will show you, step by step, how to install lowering springs DIY style, with tips, warnings, and insights most beginners miss.
What Are Lowering Springs?
Lowering springs are special coil springs designed to replace your car’s original springs. They are shorter and often stiffer, which makes the car sit lower. This change can:
- Improve cornering and handling by lowering the center of gravity
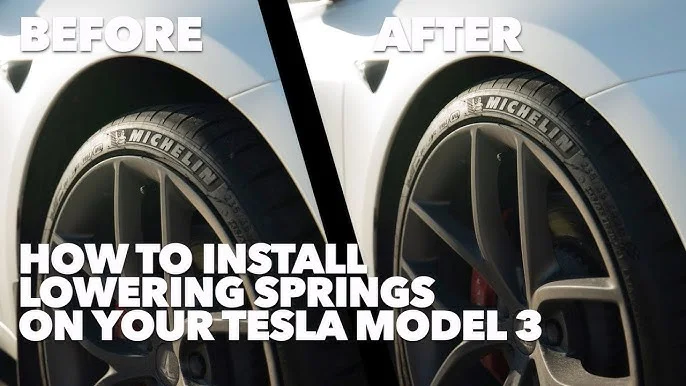
- Reduce the gap between the tire and fender for a better look
- Sometimes make the ride stiffer or less comfortable
Lowering springs are different from coilovers or air suspension. They’re simpler, cheaper, and often don’t need as many adjustments.
What You Need Before You Start
Before you start working, gather all the tools and parts. This saves time and lowers stress. Here’s what you’ll need for most cars:
- Lowering spring kit (make sure it fits your car model)
- Jack and jack stands (never work under a car with only a jack)
- Lug wrench or breaker bar
- Socket set and wrenches (common sizes: 12mm, 14mm, 17mm, 19mm)
- Spring compressor (this tool is a must for safety)
- Screwdrivers and pliers
- Torque wrench (to tighten bolts properly)
- WD-40 or penetrating oil (for rusty bolts)
- Gloves and safety glasses
Some cars may need extra tools, like Allen keys or an impact wrench. Check your car’s service manual to avoid surprises.
Credit: www.wikihow.com
Planning: What To Expect
Installing lowering springs usually takes 3–6 hours for a first-timer. Most cars have one of two main suspension types:
- MacPherson strut (common in front)
- Multi-link or double wishbone (often in the rear)
The basic steps are similar but details may change. For first-timers, it’s smart to do one side at a time so you can check the other side as a reference.
Preparing Your Workspace
A safe workspace is more important than you think. Here’s how to get ready:
- Work on a flat, level surface (like a garage floor)
- Keep children and pets away during the job
- Lay out your tools so you can reach them easily
- Read through all instructions before starting
Many people forget to check the weather if working outside. Rain or wind can make things dangerous.
Credit: www.youtube.com
Step-by-step Guide: Installing Lowering Springs
Let’s break down the process. Details matter here, so read each step before moving on.
1. Secure The Car
- Park the car on a level surface
- Set the parking brake
- Place wheel chocks behind the wheels you won’t be removing
2. Loosen Lug Nuts
- Use a breaker bar to loosen (not remove) the wheel lug nuts before you jack up the car
3. Lift The Car And Remove Wheels
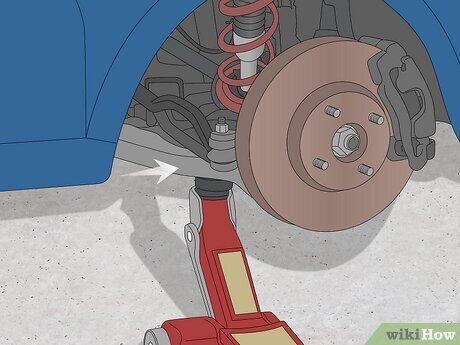
- Place the jack at the correct jacking point
- Raise the car high enough to remove the wheels
- Secure with jack stands under the car’s frame
- Remove the wheels completely
4. Remove The Old Springs
This step depends on your suspension design. Most cars require removing the strut assembly.
For Macpherson Struts (common Front Suspension):
- Disconnect the sway bar end link (if present)
- Remove the bolts holding the strut to the steering knuckle
- Open the hood and support the strut from below
- Remove the strut mount bolts from the top
- Pull out the full strut assembly
For Rear Springs (multi-link Or Separate Spring):
- You may only need to disconnect the lower control arm, then lower it until the spring is loose enough to remove by hand
Tip: Take photos before disassembly. This helps during reassembly.
5. Compress And Replace The Springs
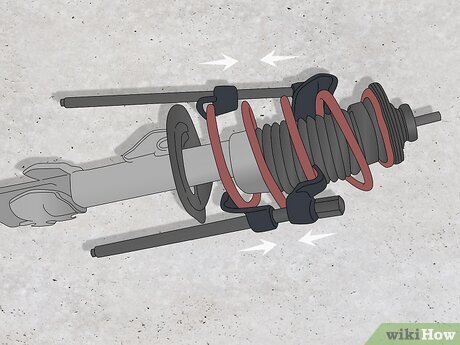
- Use a spring compressor on the old strut assembly (follow tool instructions closely)
- Compress the spring enough to relieve tension
- Remove the strut top mount
- Carefully remove the old spring
- Install the new lowering spring (make sure it’s seated properly)
- Replace the top mount and slowly release the spring compressor
Warning: Never remove a spring from a strut without a compressor. The stored energy can cause serious injury.
6. Reinstall The Strut Or Spring Assembly
- Place the completed assembly back in the car
- Tighten all bolts to the manufacturer’s recommended torque (use a torque wrench)
- Reconnect sway bar end links and any other removed parts
7. Repeat For All Corners
- Move to the next wheel and repeat steps 4–6
8. Reinstall Wheels And Lower The Car
- Put the wheels back on and hand-tighten the lug nuts
- Remove jack stands and lower the car slowly with the jack
- Fully tighten the lug nuts in a star pattern
9. Final Checks And Adjustments
- Double-check every bolt and nut
- Check that the springs sit correctly in their seats
- Bounce the car gently to help the springs settle
- Drive slowly at first and listen for unusual noises
Extra Insight: Most lowering springs will settle a bit more after a few days of driving. This is normal and not a sign of a problem.
After Installation: What Comes Next?
Lowering your car changes its suspension geometry. There are a few important steps to take after the springs are installed.
Get A Professional Alignment
Wheel alignment is critical after lowering. If you skip this, you might have:
- Uneven tire wear
- Pulling to one side when driving
- Poor handling
Even if the steering feels fine, get a professional alignment as soon as possible.
Check For Rubbing And Clearance
Lowering the car can make tires rub the fenders or inner wheel wells, especially if you use wider wheels or tires. Drive slowly over bumps and turn the steering wheel fully left and right to check for any issues.
Retorque Bolts
After 100–200 miles, recheck and retorque all suspension bolts. Springs and hardware can shift slightly as they settle.
Credit: www.wikihow.com
Common Mistakes To Avoid
Many DIYers make the same errors. Knowing them can save you time and money.
- Skipping the spring compressor – Dangerous and never recommended.
- Forgetting alignment – Leads to fast tire wear and poor handling.
- Mixing up left and right springs – Some kits have different springs for each side.
- Not seating the spring properly – Can cause clunks or even damage.
- Using low-quality tools – Cheap spring compressors can break and injure you.
- Rushing the job – Take your time; mistakes are often expensive.
Data: Lowering Springs Vs. Other Suspension Options
Here’s a quick comparison to help you see where lowering springs fit in the suspension world:
| Type | Cost (USD) | Adjustability | Ride Comfort | DIY Difficulty |
|---|---|---|---|---|
| Lowering Springs | $150–$400 | Low | Medium | Medium |
| Coilovers | $600–$2,000 | High | Can be stiff | High |
| Air Suspension | $1,500–$5,000 | Very High | High | Very High |
What To Look For In A Lowering Spring Kit
Not all lowering springs are created equal. Here’s what matters most when choosing a kit:
| Feature | Why It Matters | What to Check |
|---|---|---|
| Drop Height | Changes your car’s look and ride quality | 1–2 inches is common for daily drivers |
| Spring Rate | Affects comfort and handling | Stiffer rates = less comfort, more control |
| Brand Reputation | Quality control and fitment | Read reviews, buy from trusted brands |
| Warranty | Protects against defects | Look for at least 1-year warranty |
Non-obvious tip: Some cars need shorter shock absorbers when using lowering springs. Check if your kit recommends new shocks for best performance and safety.
The Real-world Impact: Pros And Cons
Lowering springs offer many benefits, but there are trade-offs. Here’s what you might notice:
Pros
- Better appearance – Most cars look sportier and more aggressive
- Improved handling – Tighter cornering, less body roll
- Affordable – Cheaper than coilovers or air suspension
Cons
- Stiffer ride – You may feel more bumps
- Reduced ground clearance – Speed bumps and steep driveways can scrape
- Possible alignment issues – Needs regular checks
Extra Insight: If you drive in areas with lots of potholes or rough roads, think carefully before lowering your car. The lower ride height can make daily driving harder.
Safety Reminders
Never rush suspension work. Springs store a huge amount of energy. One slip can lead to serious injury. Always use a spring compressor, jack stands, and safety glasses. If you feel unsure at any step, get help from a professional or someone with more experience.
For Further Learning
If you want more details about car suspensions, history, or types, check the Wikipedia page about vehicle suspension for in-depth information.
Frequently Asked Questions
Can I Install Lowering Springs Without A Spring Compressor?
No. Spring compressors are necessary for safety. Without one, the spring can fly out and cause serious injury. Never try to remove a loaded coil spring by hand.
Will Lowering Springs Ruin My Ride Comfort?
Lowering springs often make the ride stiffer because they are shorter and have a higher spring rate. You will feel more bumps, but many people find the trade-off worth it for better handling and looks.
Do I Need To Replace My Shocks When Installing Lowering Springs?
Not always, but it’s often recommended. Old or worn-out shocks may not work well with shorter springs, leading to bouncy or unsafe handling. Some lowering spring kits suggest using shorter “sport” shocks.
How Much Does It Cost To Install Lowering Springs Diy Versus At A Shop?
DIY installation usually costs just the price of the springs and tools (about $150–$600). Professional shops may charge $300–$600 in labor alone. Doing it yourself saves money, but you need time and patience.
Is It Legal To Lower My Car?
Laws vary by country and state. Some places have rules about minimum ground clearance or headlight height. Always check local regulations before you lower your car to avoid fines or failed inspections.
Lowering your car with springs is a rewarding project if you prepare well, follow the steps, and put safety first. You’ll enjoy a better-looking car, possibly sharper handling, and the pride of doing it yourself. Take your time, and your car will thank you for it.
