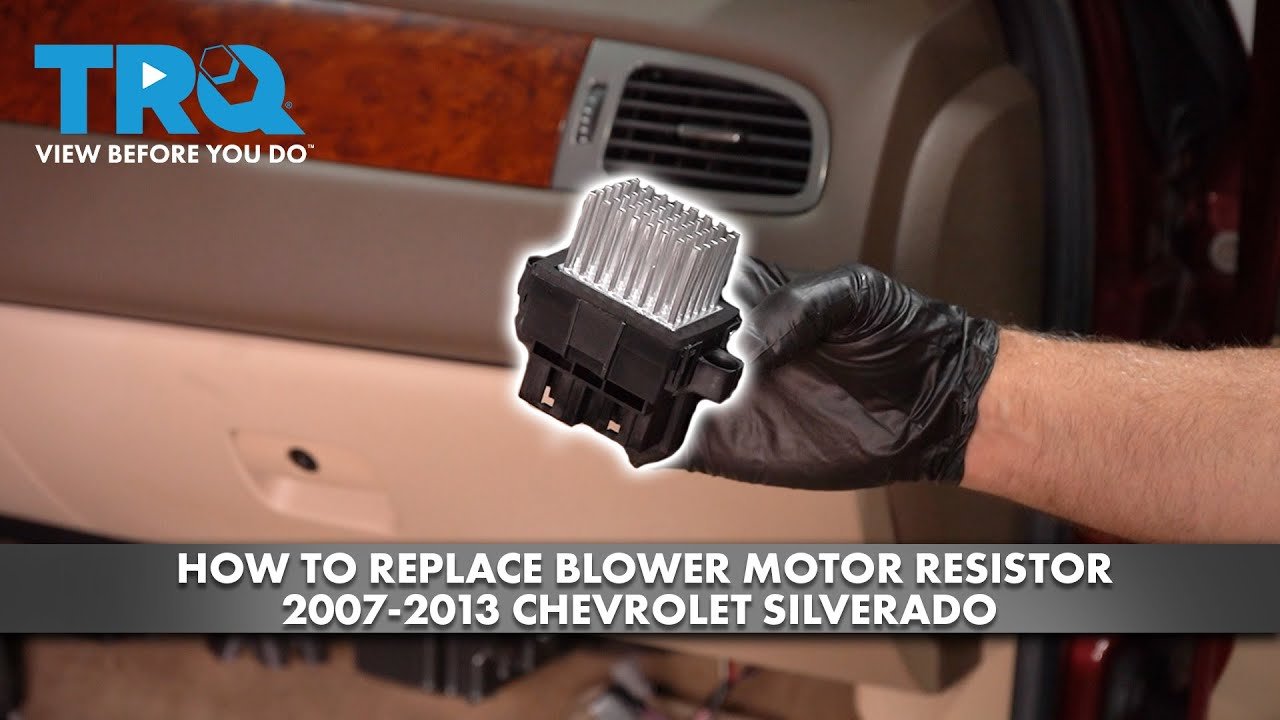
To replace a blower motor resistor, confirm the fan-speed symptoms, disconnect the battery, remove the glove box or lower dash panel, unplug the resistor connector, swap the old resistor, and test every fan speed before reassembling the trim. If the connector is melted or the blower motor draws too much current, repair that fault too or the new resistor can fail again.
What Is A Blower Motor Resistor?
The blower motor resistor is a small but essential part of your car’s climate control system. It controls the speed of the blower motor, which pushes air through the vents. When you turn the fan speed knob on your dash, the resistor adjusts the voltage, controlling how fast the fan spins.
A failed resistor usually means you lose some or all control over the fan speed. In most cars, the highest speed may still work, but the lower settings will not. This is because the highest speed often bypasses the resistor.
Understanding this function helps you diagnose problems and confirms if the resistor is the real issue.
Signs Your Blower Motor Resistor Is Failing
Recognizing symptoms early saves time and prevents other climate control issues. Here are the most common signs:
- Fan only works on one speed – Usually high.
- Fan doesn’t work at all – No air blows from the vents.
- Inconsistent airflow – Fan works sometimes, but stops randomly.
- Burnt smell or visible damage – Melting or burning near the resistor’s location.
Non-obvious insight: Sometimes, a failing resistor can cause the blower motor to get stuck on a low speed, not just high. Also, a failing blower motor can damage the new resistor if the motor pulls too much current.
Credit: www.youtube.com
Tools And Materials Needed
Gather these items before starting:
- Screwdrivers (Phillips and flathead)
- Socket set
- Torx bits (for some car models)
- New blower motor resistor
- Flashlight
- Work gloves
- Safety glasses
- Multimeter (for testing)
- Vacuum or small brush (to clean dust)
Having all tools ready avoids delays and makes the process smoother.
Safety Precautions Before You Start
Safety should always come first. Disconnect the negative battery terminal before working on any electrical parts. This prevents short circuits and accidental deployment of airbags. Also, make sure the vehicle is parked on a flat surface, and the key is removed from the ignition.
Many people forget to wear safety glasses. Small plastic pieces or dust can fall when you remove panels. Taking a few seconds to put on glasses protects your eyes.
Locating The Blower Motor Resistor
The resistor’s location depends on your car model, but it’s usually behind the glove box or under the passenger-side dashboard. Some vehicles have it attached directly to the blower motor housing.
Here’s a comparison of typical resistor locations for popular car types:
| Car Type | Resistor Location | Difficulty (1=Easy, 3=Hard) |
|---|---|---|
| Sedan | Behind glove box | 1 |
| SUV | Under dash, passenger side | 2 |
| Truck | Behind glove box or firewall | 2 |
| Compact car | Under center console | 3 |
Always check your owner’s manual or search for your specific car model online for exact location details.
Step-by-step Guide To Replacing The Blower Motor Resistor
Replacing the resistor involves several steps. Take your time and follow each one for a safe and successful repair.
1. Disconnect The Battery
Start by disconnecting the negative battery cable. This step is essential for safety. Use a wrench or socket to loosen the terminal and move it aside. If you are unsure, follow this guide on how to safely disconnect a car battery.
2. Remove Interior Panels
Most resistors are hidden behind panels. Remove the glove box or lower dash panel, depending on your vehicle. Use a screwdriver or socket as needed. Keep screws and clips organized-they are easy to lose.
3. Locate The Blower Motor Resistor
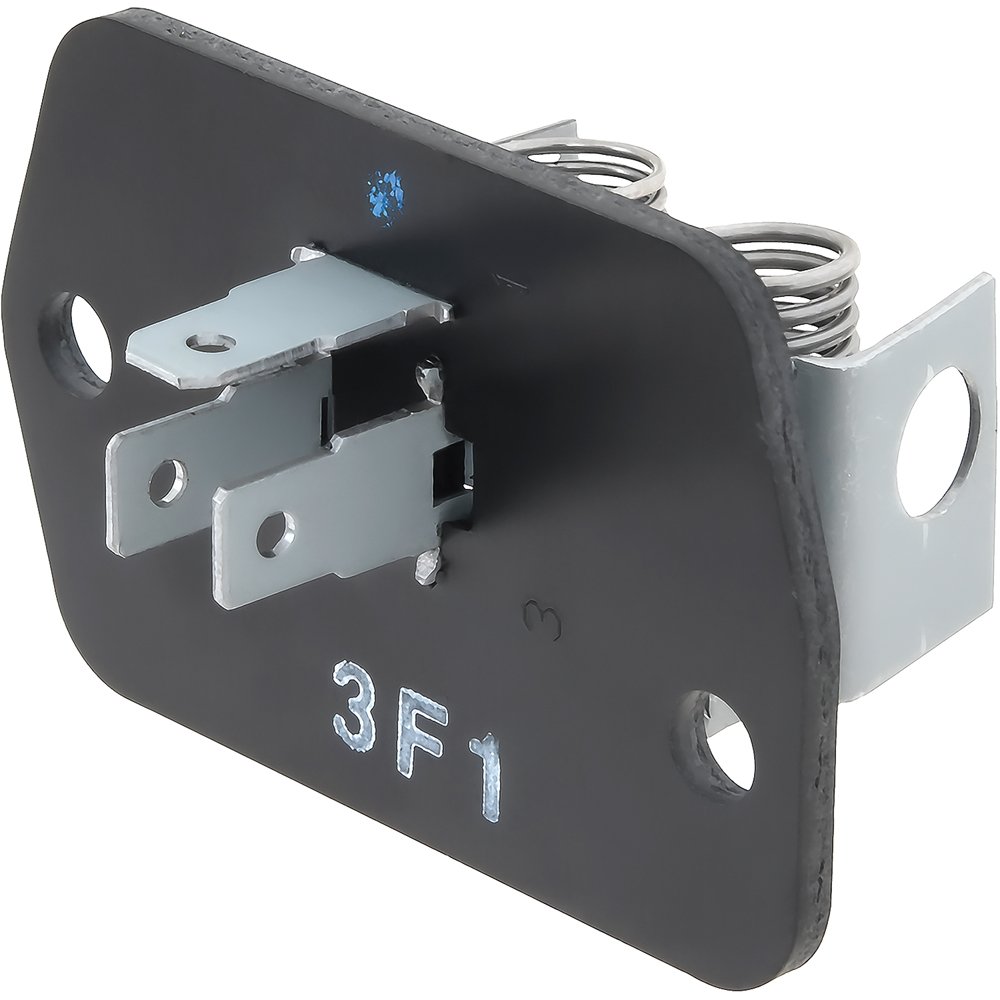
Find the resistor. It’s usually a small rectangular piece with wires connected, fixed with two or three screws. In most cars, it’s near the blower motor itself.
4. Unplug The Electrical Connector
Carefully press the tab on the electrical connector and pull it out. If it’s stuck, gently wiggle it, but don’t force it-old connectors can break.
5. Remove The Old Resistor
Use the correct screwdriver or socket to remove the screws holding the resistor in place. Pull out the resistor. It may be tight if there’s dust or corrosion.
6. Compare The Old And New Resistors
Before installing, compare the new part with the old one. Check that the pins and mounting holes match. This avoids problems if you bought the wrong part.
7. Clean The Area and check nearby airflow parts
Dust and debris can collect in the blower motor area. Use a small brush or vacuum to clean the opening. This step helps prevent future overheating and extends the life of the new resistor. Weak airflow can also come from a clogged cabin filter, so check the related guide on how to change a cabin air filter yourself.
8. Install The New Resistor
Fit the new resistor into place, aligning the holes. Tighten the screws firmly, but don’t over-tighten-they can strip easily.
9. Reconnect The Electrical Connector
Plug the connector into the new resistor. You should hear a click or feel it snap into place. If it’s loose, double-check alignment.
10. Reassemble Panels
Reinstall the glove box or dash panels. Make sure all screws and clips are back in their original spots. Test that everything feels secure.
11. Reconnect The Battery And Test
Reconnect the negative battery cable. Start the car and test all fan speeds. If everything works, the repair is complete. If not, check connections again.

Credit: mellajaarsma.com
Common Mistakes And How To Avoid Them
Even experienced DIYers make mistakes. Here are some errors to watch for:
- Skipping battery disconnection – This is dangerous and can damage electronics.
- Forcing electrical connectors – This can break pins, making the repair more expensive.
- Installing the wrong part – Always compare the new resistor before installing.
- Ignoring blower motor condition – If the motor is noisy or slow, replace it too. A bad motor can destroy a new resistor quickly.
- Not cleaning the area – Dust and debris cause overheating and early resistor failure.
Non-obvious insight: In some vehicles, a blown fuse may mimic resistor failure. Always check the HVAC fuse before replacing the resistor.
How Long Does The Replacement Take?
For most cars, the job takes 30 minutes to 1 hour. If it’s your first time, allow extra time to find all screws and panels. Some compact cars make access harder, which may take up to 90 minutes.
Here’s a quick time comparison for different car types:
| Car Type | Estimated Time | Panel Removal Needed |
|---|---|---|
| Sedan | 30-45 minutes | Glove box |
| SUV | 45-60 minutes | Lower dash |
| Truck | 45-60 minutes | Glove box/firewall |
| Compact car | 60-90 minutes | Center console |
Cost Of Replacing A Blower Motor Resistor
Doing it yourself is much cheaper than visiting a mechanic. The cost of the resistor itself usually ranges from $15 to $60 depending on car model and brand. If you choose to have a professional replace it, labor charges can add $50 to $150.
Here’s a quick look at cost differences:
| Replacement Method | Part Cost | Labor Cost | Total Cost |
|---|---|---|---|
| DIY | $15-$60 | $0 | $15-$60 |
| Mechanic | $20-$70 | $50-$150 | $70-$220 |
Remember, prices can vary based on location and car make.
What To Do After Replacement
Once you finish, always test the fan speeds at all settings. Make sure the air blows at each speed. Listen for odd noises, which could mean the blower motor itself is wearing out. If you notice a burning smell, turn off the system immediately and double-check your work.
Tip: If your car has a cabin air filter, consider replacing it at the same time. A clogged filter can make the blower motor work harder and wear out faster.
Should You Replace The Blower Motor Too?
It’s smart to check the blower motor when you replace the resistor. If the fan makes noise, spins slowly, or doesn’t work on any speed, the motor could be worn out. In that case, replacing both parts at once saves time and ensures a longer-lasting repair.
Many beginners miss this: a failing blower motor can make the new resistor burn out within weeks. Use a multimeter to check the motor’s current draw. If it’s higher than the service manual’s recommendation, replace the motor.
When To Seek Professional Help
While most people can handle this job, some situations call for a pro:
- If you’re not comfortable with car electronics.
- If the resistor is buried deep behind the dash.
- If you have a luxury car with complex climate controls.
A professional can diagnose related issues, like wiring problems or a failing control switch.
For more technical details, you can also check the Wikipedia page on blower motor resistors.
Credit: www.gemefindustries.com
Frequently Asked Questions
What Does A Blower Motor Resistor Do?
The blower motor resistor adjusts the electrical current sent to the blower motor, controlling the fan speed. When you change the fan setting on your dashboard, the resistor helps set the airflow level.
How Do I Know If My Blower Motor Resistor Is Bad?
Common symptoms include the fan working only on one speed (usually high), no air from the vents, or the fan working inconsistently. Sometimes you may smell burning plastic or see melted connectors.
Can A Bad Blower Motor Resistor Drain My Battery?
Normally, a failed resistor will not drain your battery. However, if it causes the blower motor to run constantly, even with the ignition off, it could lead to battery drain.
Is It Safe To Drive With A Faulty Blower Motor Resistor?
Yes, but your climate control won’t work properly. This can make driving uncomfortable in extreme weather, and you may struggle to clear foggy windows in winter.
Can I Replace The Blower Motor Resistor Myself?
Yes, most people can replace this part with basic tools. Just make sure to disconnect the battery and follow each step carefully. If you feel unsure, ask a friend or visit a mechanic.
Replacing a car’s blower motor resistor is a practical way to save money and learn more about your vehicle’s electrical system. With clear steps and a bit of patience, you can restore comfort and enjoy full control of your car’s climate system again.
