Replacing the coolant reservoir tank in your car might sound complicated, but with the right guidance, you can handle it yourself. This job not only saves money on labor costs but also helps you understand your vehicle better. A faulty coolant reservoir can lead to overheating, leaks, and even engine damage.
In this article, you’ll learn every step, what tools you need, how to avoid mistakes, and how to finish the job safely—even if you’re a complete beginner.
Why The Coolant Reservoir Tank Matters
The coolant reservoir tank is crucial for your car’s cooling system. It collects excess coolant when your engine gets hot, then returns it when your engine cools down. If it cracks or leaks, the system loses coolant, and your engine can overheat. Sometimes the tank cap or connections fail, causing pressure loss and leaks.
Common signs your coolant reservoir tank needs replacing:
- Visible cracks or leaks on the tank
- Coolant puddles under your car
- Engine overheating warning light
- Low coolant levels, even after topping off
- Steam from the engine bay
Ignoring these symptoms can damage the engine and cost you much more in repairs.
Tools And Parts You Will Need
Before you start, gather all tools and parts. Having everything ready saves time and reduces frustration.
| Tool/Part | Purpose | Notes |
|---|---|---|
| Replacement coolant reservoir tank | New tank to install | Buy the correct one for your car’s make and model |
| Coolant (antifreeze) | Refill system after replacement | Check owner’s manual for type |
| Socket set & ratchet | Remove bolts | Metric or standard, depending on car |
| Pliers | Detach hose clamps | Needle-nose preferred |
| Screwdriver | Loosen screws or clamps | Flathead/Phillips as needed |
| Drain pan | Catch old coolant | Large enough for 1-2 gallons |
| Gloves & safety glasses | Protect hands and eyes | Coolant can irritate skin |
| Funnel | Pour new coolant | Prevents spills |
| Rags or paper towels | Clean up spills | Keep work area tidy |
Pro Tip: Always buy a tank designed for your specific car. Universal tanks rarely fit perfectly and may leak.

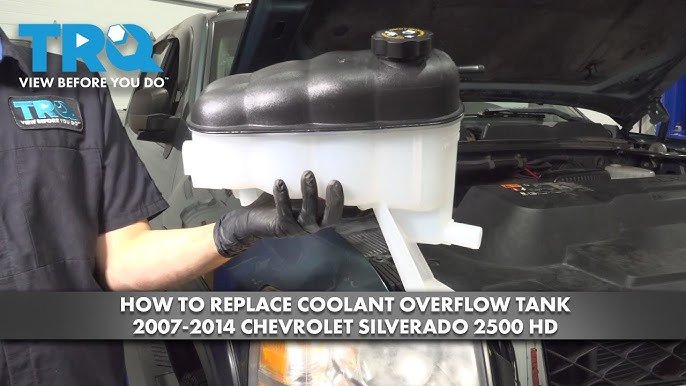
Credit: www.youtube.com
Preparation: Safety And Setup
Safety comes first. Coolant is toxic and can burn skin or eyes. Here’s how to prepare:
- Park on a level surface and turn off the engine. Let it cool for at least 30 minutes. Never open the reservoir cap on a hot engine.
- Disconnect the negative battery terminal if the tank is close to electrical parts.
- Wear gloves and safety glasses to protect from spills and fumes.
- Set the parking brake and block the wheels if needed.
- Place a drain pan under the reservoir area to catch old coolant.
Common mistake: People forget to let the engine cool down, causing burns from hot coolant spray.
Step-by-step Guide To Replacing The Coolant Reservoir Tank
Let’s break down the process clearly. Each car is a bit different, so check your owner’s manual for special instructions.
1. Locate The Coolant Reservoir Tank
Pop the hood and find the translucent plastic tank—usually near the radiator or on the side of the engine bay. It’s often marked with “engine coolant only” or a similar label. Note the hose connections and mounting bolts.
2. Drain The Old Coolant
- Place the drain pan underneath the tank.
- Slowly unscrew the reservoir cap to release any pressure.
- If your tank has a drain hose or plug, use it. Otherwise, disconnect the lowest hose and let coolant flow into the pan.
- Save coolant if it’s clean and less than two years old. Otherwise, plan to dispose of it safely.
Non-obvious insight: Many tanks have a hidden lower hose—check carefully so you don’t miss draining all the fluid.
3. Remove Hoses And Connections
- Use pliers or a screwdriver to loosen and slide hose clamps away from the tank.
- Gently twist and pull hoses off the tank. If they stick, use a little penetrating oil or carefully cut them if replacing.
- Disconnect any electrical connectors, like a coolant level sensor.
Tip: Take a photo of the hose arrangement before removing. It’s easy to mix them up during reassembly.
4. Unbolt And Remove The Old Tank
- Use your socket set or screwdriver to remove mounting bolts or screws.
- Carefully lift out the old tank. Some tanks are wedged in tight—wiggle gently without forcing.
Common error: Rushing and breaking plastic clips or brackets. Take your time.
5. Compare The Old And New Tanks
Before installing, check that the new tank matches the old one:
- Same shape and size
- Matching hose connections and sensor ports
- Includes new cap, if required
| Feature | Old Tank | New Tank |
|---|---|---|
| Number of hose ports | 2 | 2 |
| Coolant sensor port | Present | Present |
| Cap type | Screw-on | Screw-on |
| Mounting brackets | Plastic | Plastic |
If anything is different, do not install. Return it for the correct part.
6. Install The New Reservoir Tank
- Position the new tank in place.
- Reinstall the bolts or screws, tightening firmly but not over-tightening (plastic cracks easily).
- Reattach the hoses to the correct ports, securing clamps tightly.
- Reconnect any electrical connectors.
Non-obvious insight: If your new tank doesn’t come with a new cap, use the old one only if it’s in perfect condition. A bad cap can cause leaks or pressure loss.
7. Refill The Coolant
- Use a funnel to pour new or recycled coolant into the reservoir up to the “MAX” line.
- Mix coolant with water if required (usually 50/50; check bottle or manual).
- Some cars need specific types (e.g., orange, green, or pink coolant). Using the wrong type can cause corrosion or poor cooling.
8. Bleed The Cooling System
Air trapped in the system can cause overheating. Here’s how to bleed it:
- Start the engine with the reservoir cap off.
- Set the heater to max hot, fan on low.
- Let the engine idle and watch coolant level. Add more as it drops.
- When bubbles stop and the coolant stays steady at the “MAX” line, replace the cap.
- Check for leaks around the tank and hoses.
Practical tip: Some cars have a bleed screw on the thermostat housing—loosen it slightly to let air escape.
9. Clean Up And Dispose Of Old Coolant
- Wipe up any spills—coolant is toxic to pets and wildlife.
- Pour old coolant into a sealed container and take it to a recycling center or auto shop. Never pour it down the drain.
10. Final Checks
- Drive the car for 10-15 minutes, monitoring the temperature gauge.
- Let the engine cool, then recheck coolant level. Top off if needed.
- Inspect for leaks again after your first drive.
How To Choose The Right Coolant Reservoir Tank
Buying the correct tank is vital. Here’s what you need to know:
- Match your vehicle: Use your car’s VIN or exact year, make, and model.
- Check for sensors: Some tanks have built-in level sensors—make sure yours does if required.
- Cap compatibility: Some tanks come without caps; others include them.
- Quality: Avoid no-name brands. OEM (Original Equipment Manufacturer) or trusted aftermarket brands last longer.
Common mistake: Choosing a universal tank to save money. They rarely fit well and often leak.
Cost And Time Estimates
Replacing the coolant reservoir tank is usually affordable and quick if you do it yourself.
| Item | DIY Cost Range | Shop Labor Cost | Time Required (DIY) |
|---|---|---|---|
| Reservoir tank | $25–$80 | — | — |
| Coolant (1-2 gallons) | $10–$25 | — | — |
| Labor (shop) | — | $60–$150 | — |
| Total (DIY) | $35–$105 | — | 1–2 hours |
| Total (shop) | — | $70–$230 | — |
Note: Some luxury or rare vehicles may have higher part prices.
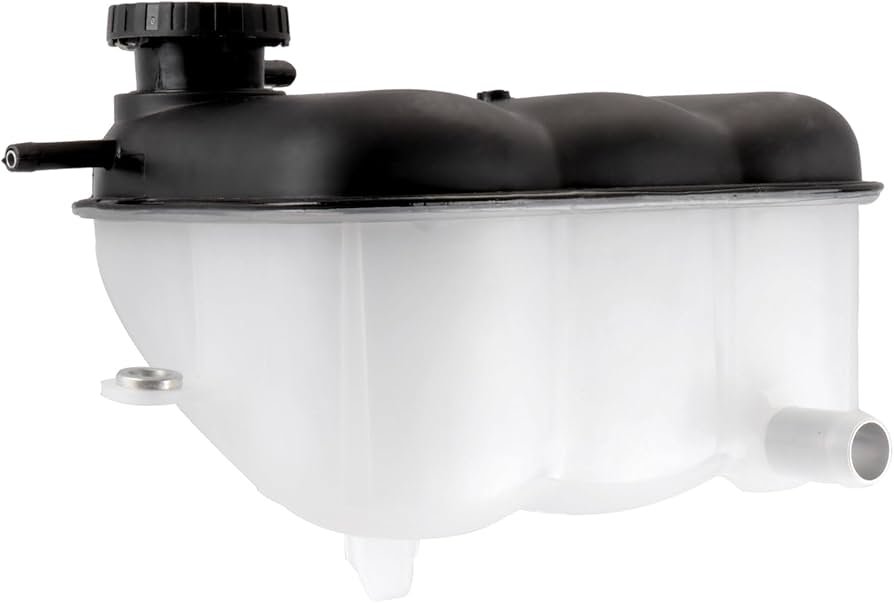
Credit: www.amazon.com
Extra Tips For Success
- Photograph connections before removing anything. It’s easy to forget where hoses or wires go.
- Buy extra coolant. Sometimes you spill more than you expect.
- Check hoses and clamps for cracks or rust—replace them if worn.
- Don’t overtighten plastic parts. They crack easily.
- Dispose of coolant responsibly. It’s dangerous for the environment.
When To Call A Mechanic
While most people can replace a reservoir tank, call a mechanic if:
- The tank is hard to reach (under covers, behind the engine)
- Hoses are rusted or fused and won’t budge
- The system leaks after install and you can’t find the cause
- You’re not comfortable bleeding the system
Credit: www.youtube.com
Frequently Asked Questions
What Happens If I Drive With A Cracked Coolant Reservoir Tank?
Driving with a cracked coolant reservoir tank is risky. Coolant can leak out, which may cause your engine to overheat. Overheating can result in engine damage, blown head gaskets, or a breakdown. It’s best to replace the tank before driving any farther.
How Do I Know Which Coolant To Use?
Check your owner’s manual for the correct type of coolant. Coolants come in different colors and chemical types (like ethylene glycol or propylene glycol). Using the wrong coolant can cause corrosion, clogs, or poor cooling. Most auto parts stores can also help identify the right one for your car.
Is It Safe To Reuse Old Coolant?
You can reuse old coolant if it’s clean, not cloudy, and less than two years old. Strain it through a clean cloth or filter before refilling. However, if it looks rusty, oily, or contaminated, use fresh coolant for best results.
Can I Use Water Instead Of Coolant?
Using water instead of coolant is only a temporary solution in emergencies. Coolant contains chemicals to prevent freezing, boiling, and corrosion. Plain water can cause rust, overheating, and damage to your radiator and engine.
Where Can I Dispose Of Old Coolant Safely?
Take old coolant to an auto parts store, recycling center, or hazardous waste facility. Never pour it down the drain or on the ground. For more details, check local government websites or visit the EPA’s recycling page.
Replacing your car’s coolant reservoir tank is a practical, money-saving job if you follow the steps carefully. With a few basic tools and attention to detail, you’ll keep your engine cool and avoid costly repairs. Remember to work safely, double-check your work, and enjoy the satisfaction of fixing your car yourself.
