
Replacing a car’s map sensor yourself might sound complicated, but it’s actually a task many drivers can handle with the right guidance. The map sensor (Manifold Absolute Pressure sensor) is a small but crucial part of your car’s engine. It measures air pressure in the intake manifold and helps the engine control fuel and ignition. When this sensor fails, your car may idle roughly, lose power, or show a check engine light. Learning to replace it on your own can save you money and keep your car running smoothly.
Many people avoid working on their cars because they fear mistakes or lack tools. But by understanding the basics, using proper steps, and following safety rules, you can do this DIY job confidently. In this guide, you’ll learn how to identify a faulty map sensor, choose the right replacement, and swap it out safely—even if you’ve never done it before.
What Is A Map Sensor And Why Does It Matter?
The map sensor sends real-time pressure data to your car’s computer. The computer uses this information to adjust fuel injection and ignition timing. If the sensor fails, the engine may run too rich or too lean, causing:
- Poor fuel economy
- Engine stalling
- Rough idling
- Loss of power
- Check engine light
A faulty map sensor can even damage other engine parts over time. It’s important to replace it quickly to avoid bigger repair bills.
Signs Your Map Sensor Needs Replacement
Before you grab your tools, look for these common symptoms:
- Check Engine Light: The most obvious sign is the dashboard warning.
- Engine Misfires: If your car sputters or shakes, the sensor may be failing.
- Poor Acceleration: Slow response when you press the gas pedal.
- Black Smoke: Excess fuel causes dark exhaust smoke.
- Hard Starting: Trouble getting the engine to turn over.
- High Fuel Consumption: You notice you’re refueling more often.
- Erratic Idle: The engine speed jumps or drops unexpectedly.
Many beginners miss that some symptoms overlap with other problems—like faulty spark plugs or clogged filters. Always check codes with an OBD-II scanner before replacing parts.
Tools And Materials Needed
You don’t need a full mechanic’s kit. For most cars, you only need:
- New map sensor (make sure it matches your car’s model)
- Socket set (usually 8mm or 10mm)
- Screwdriver (flat or Phillips, depending on sensor)
- OBD-II scanner (for diagnosing and clearing codes)
- Safety gloves
- Shop towel
- Dielectric grease (optional, for protecting connections)
A few vehicles use unusual fasteners. Always check your car’s manual or look online for specifics. Buying the right sensor is crucial—using a mismatched part can cause more issues.
How To Replace Car Map Sensor Diy
Follow these detailed steps to replace your map sensor safely and correctly.
Step 1: Confirm The Sensor Location
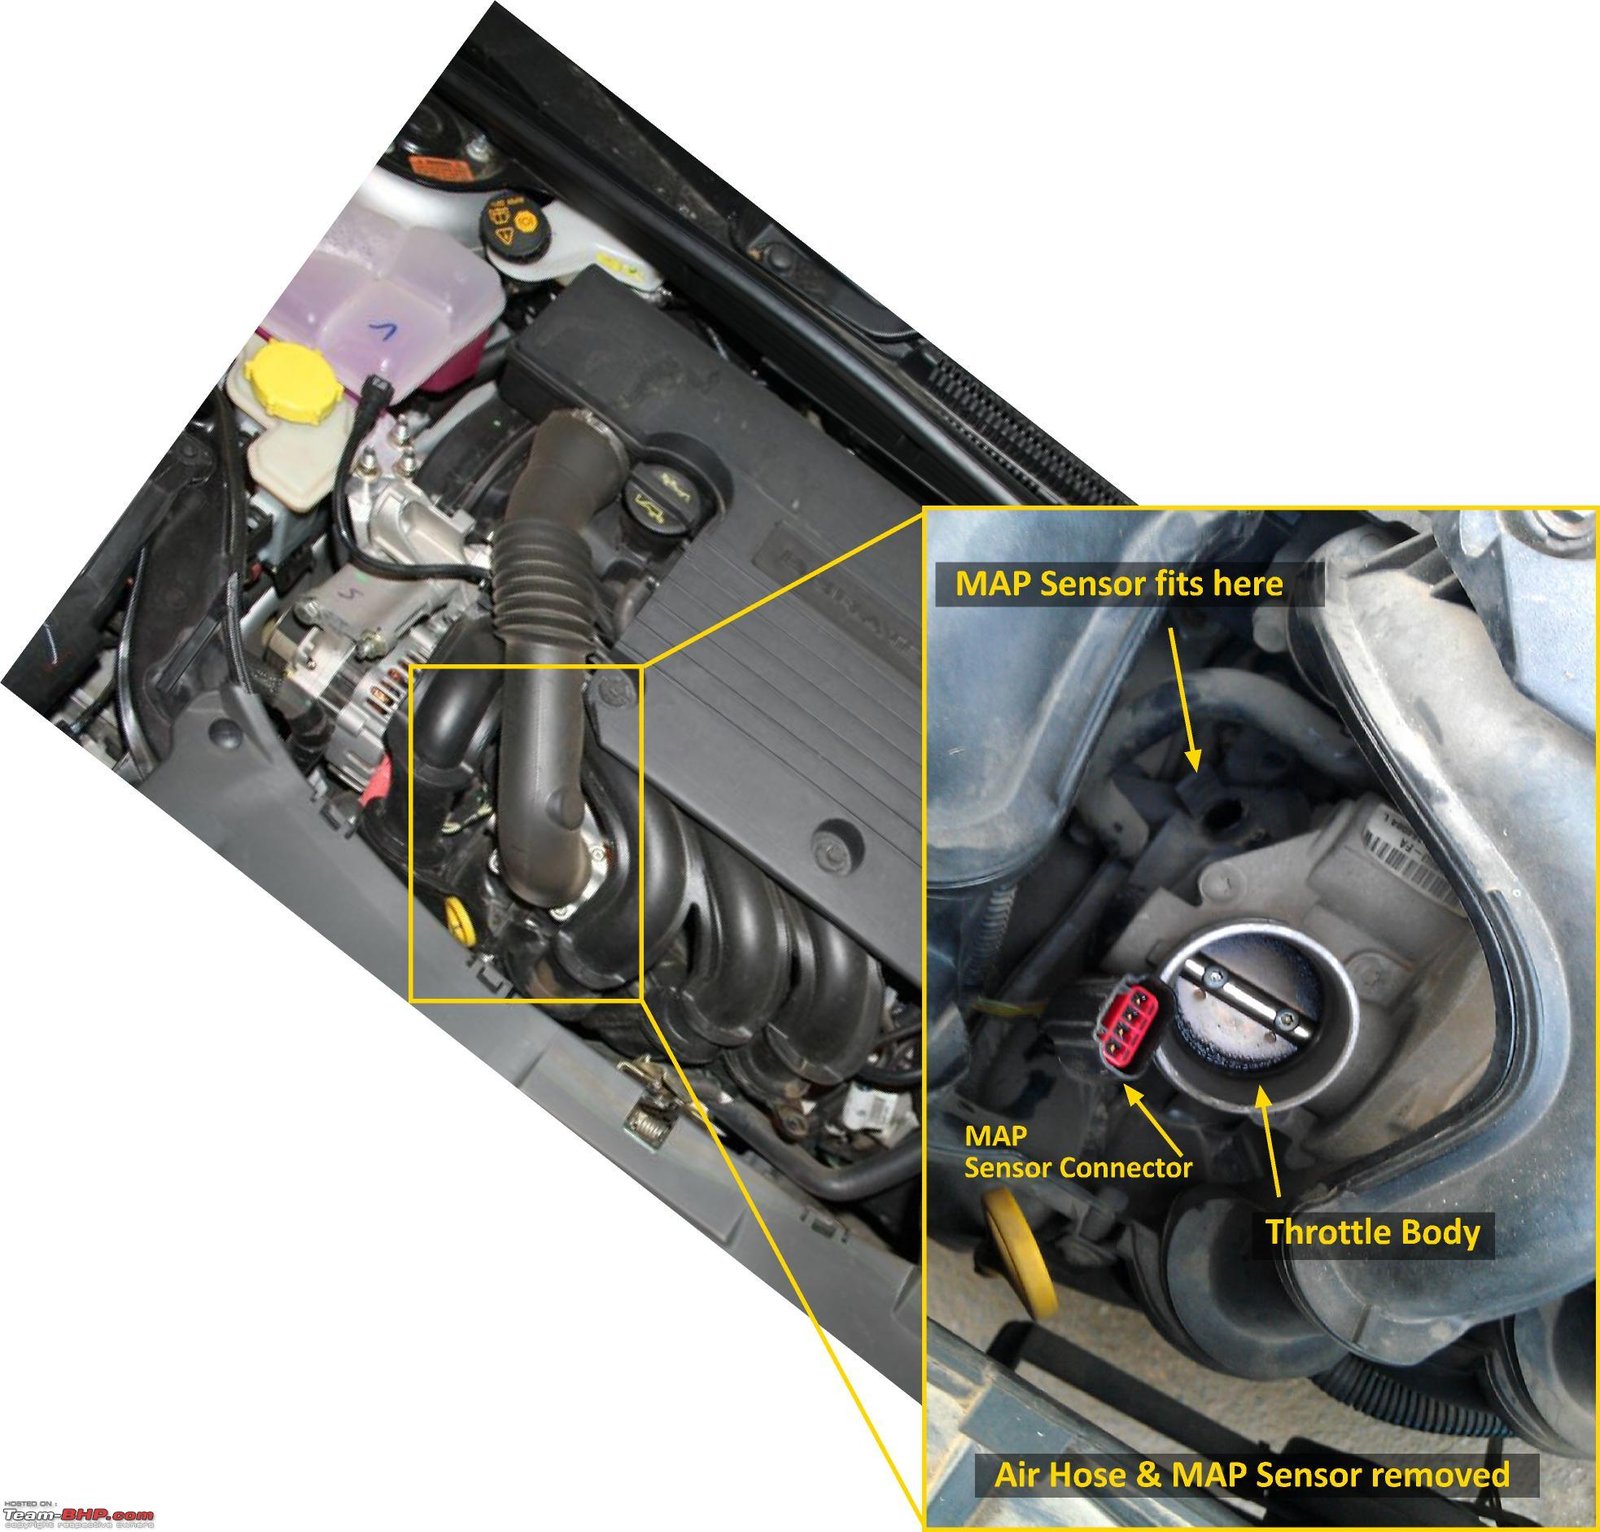
Most map sensors are mounted directly on the intake manifold, near the throttle body. Some models place them on a vacuum line or in the air intake. Look for:
- A small, rectangular or cylindrical plastic part
- An electrical connector with 2-4 wires
- Usually held in place by one or two bolts
If you’re unsure, search for your car’s map sensor location online or check your owner’s manual. Some engines have multiple sensors—make sure you’re replacing the correct one.
Step 2: Disconnect The Battery
This is a safety step often skipped by beginners. Disconnecting the negative battery terminal prevents accidental shorts and keeps the car’s computer safe.
- Use a wrench to loosen the terminal.
- Move the cable away from the battery.
Step 3: Remove The Sensor Connector
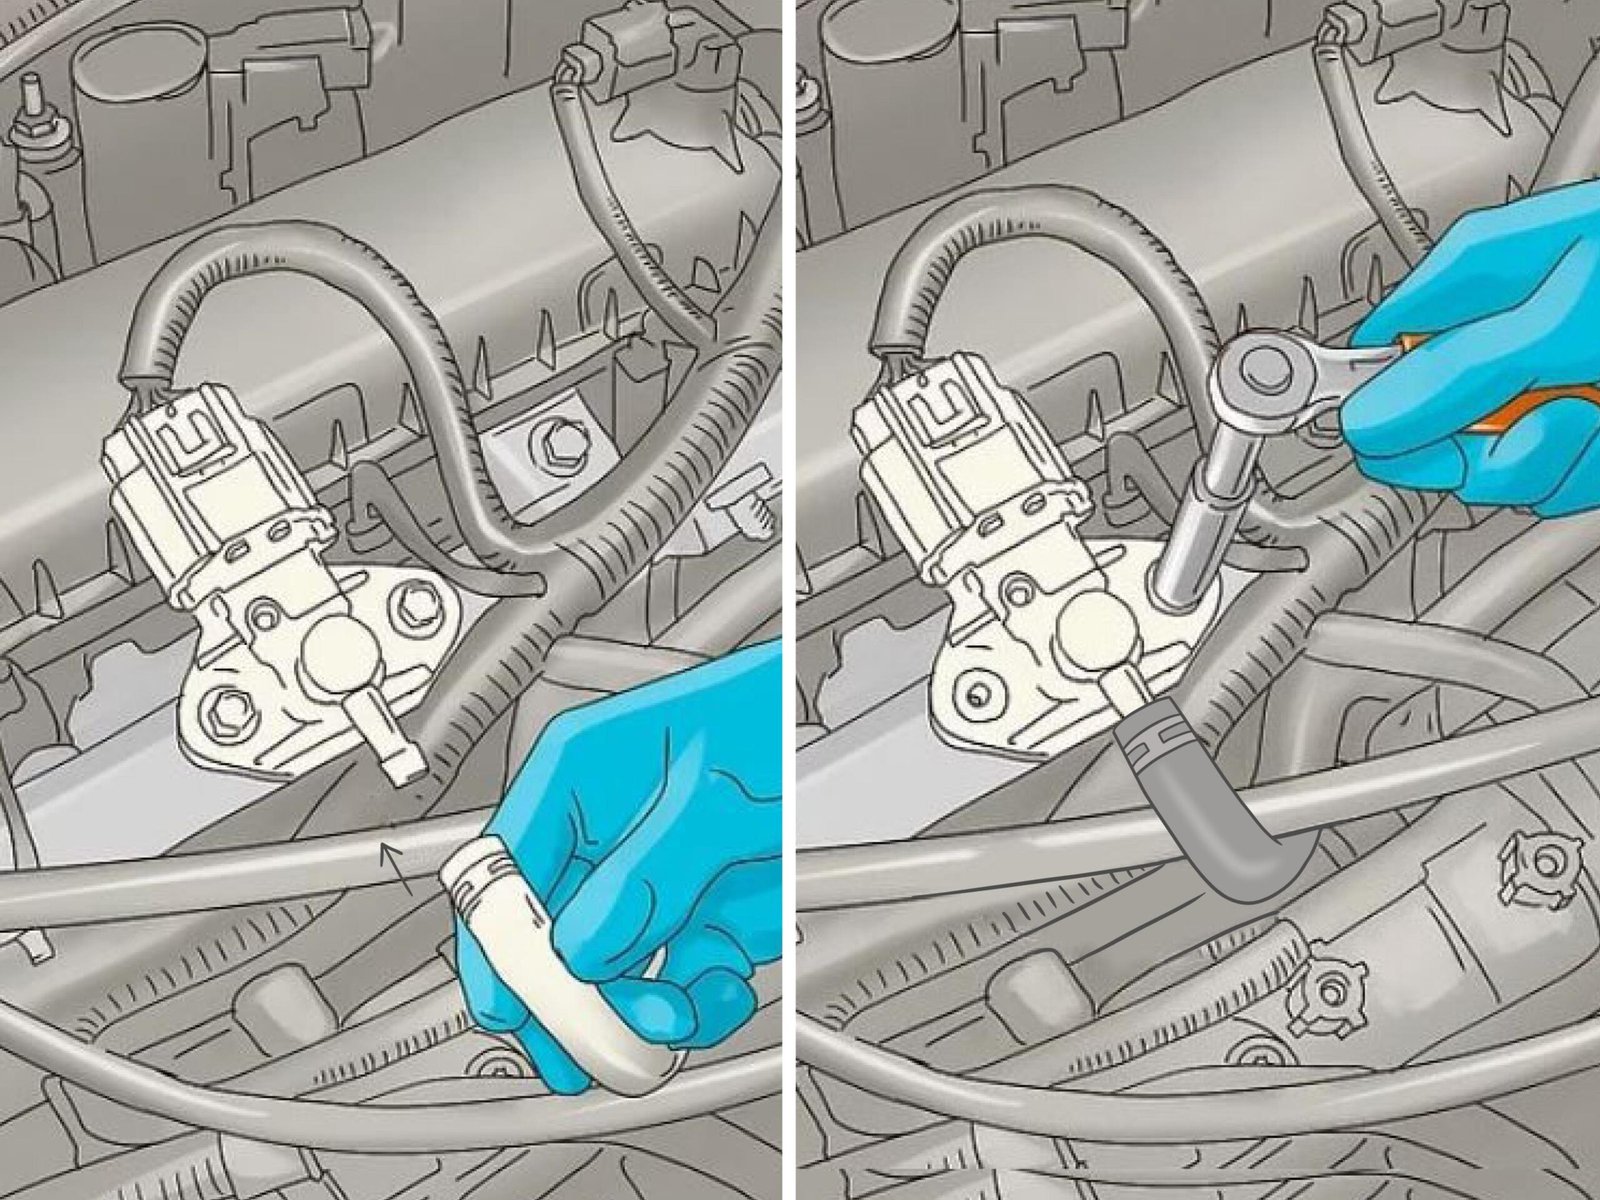
Gently pull off the electrical connector from the sensor. Some connectors have a small tab you must press before pulling. Avoid tugging on the wires, as this can damage the harness.
Step 4: Unscrew And Remove The Old Sensor
Use your socket set or screwdriver to remove the sensor’s mounting bolts. Once loose, carefully pull the sensor out. If it sticks, wiggle gently—never force it.
Pro tip: Place the old bolts and sensor on a shop towel to avoid losing small parts.
Step 5: Inspect The Mounting Area
Check the sensor port for dirt, oil, or debris. Clean it with a towel. If the area is oily, your engine might have a deeper problem—like a leaking gasket.
Step 6: Install The New Sensor
Slide the new sensor into place. Align it carefully so the connector faces the right direction. Tighten the bolts until snug, but don’t over-tighten—this can crack the sensor or manifold.
If you have dielectric grease, apply a small amount to the sensor’s electrical pins before connecting. This helps prevent corrosion.
Step 7: Reconnect The Electrical Connector
Push the connector onto the sensor until it clicks. Make sure it’s firmly attached.
Step 8: Reconnect The Battery
Attach the negative battery terminal and tighten with your wrench.
Step 9: Start The Engine And Check Codes
Turn the ignition key and let the engine idle. Use your OBD-II scanner to check for new codes or clear old ones. If the check engine light stays off and the car runs smoothly, you’ve succeeded.
Step 10: Test Drive
Drive the car for about 10–15 minutes. Check for smooth acceleration, steady idle, and improved fuel economy. Listen for abnormal sounds and watch for warning lights.
If problems continue, double-check your installation and sensor compatibility.
Credit: www.team-bhp.com
Common Mistakes And How To Avoid Them
DIY jobs can go wrong if you overlook details. Here are mistakes to watch out for:
- Wrong sensor type: Buying the wrong sensor is a frequent issue. Always match part numbers.
- Skipping battery disconnection: This can cause electrical shorts or erase important engine data.
- Forcing connectors or bolts: Applying too much force can break plastic parts or strip threads.
- Ignoring cleanliness: Dirt in the sensor port can cause faulty readings.
- Skipping code check: Not scanning for codes after installation may leave hidden problems.
A less obvious mistake is forgetting to clear old error codes after replacement. This can confuse the car’s computer and mask new issues.
Comparison: Diy Vs Professional Replacement
Here’s a look at the differences between doing the job yourself and hiring a mechanic.
| Aspect | DIY Replacement | Professional Replacement |
|---|---|---|
| Cost | $20–$70 (sensor + tools) | $120–$300 (labor + sensor) |
| Time | 30–60 minutes | 1–2 hours |
| Skill Needed | Basic | None (for customer) |
| Warranty | Sensor warranty only | Parts & labor warranty |
| Risk | Possible installation errors | Very low |
DIY replacement is much cheaper and faster, but you must pay attention to detail. Mechanics offer warranties and expertise but charge more.
Credit: www.youtube.com
Choosing The Right Map Sensor
Not all map sensors are equal. Here’s what matters when selecting the right one:
- Brand and compatibility: Always buy sensors made for your car’s make, model, and year.
- OEM vs aftermarket: OEM (Original Equipment Manufacturer) sensors are reliable but pricier. Aftermarket sensors can be cheaper, but quality varies.
- Warranty: Look for sensors with at least a one-year warranty.
- Connector type: Make sure the plug matches your wiring harness.
A common mistake is buying universal sensors. These often require wiring changes and rarely work as well as factory-fit parts.
Here’s a simple comparison of sensor types:
| Type | Pros | Cons |
|---|---|---|
| OEM | Reliable fit, good quality | Expensive |
| Aftermarket | Lower cost, more options | Quality can vary |
| Universal | Fits many models | Often poor compatibility |
Practical Tips For A Smooth Diy Job
Even experienced DIYers miss these small but important steps:
- Read sensor instructions: Some sensors require calibration or special installation steps.
- Have a flashlight ready: Engine bays are dark and cramped.
- Keep a backup sensor: If your new sensor fails, you can reinstall the old one temporarily.
- Don’t rush: Take your time to avoid mistakes.
- Record error codes: Write down any codes before clearing, in case new issues pop up.
If you’re unsure about your car’s sensor, check online forums or visit trusted sources like Wikipedia for detailed explanations.
What To Do If Problems Persist
If your car still runs poorly after sensor replacement, check:
- Vacuum leaks: Broken hoses or gaskets can cause incorrect readings.
- Faulty wiring: Damaged wires or connectors can disrupt sensor signals.
- Other sensors: Sometimes, the mass airflow sensor or throttle position sensor is the real culprit.
In rare cases, a car’s computer needs to be reset or updated after replacing a sensor. Contact a mechanic if you’re stuck.
Environmental And Safety Considerations
Map sensor replacement is safe, but you should:
- Work in a well-ventilated area
- Wear gloves to avoid skin irritation
- Dispose of old sensors responsibly—they contain plastic and electronic parts
A small but important tip: Don’t leave tools in the engine bay. Always double-check before closing the hood.
Credit: www.wikihow.com
Frequently Asked Questions
Can I Drive With A Faulty Map Sensor?
Driving with a bad map sensor can cause engine damage, poor fuel economy, and safety risks. It’s best to replace it as soon as possible.
How Much Does A Map Sensor Cost?
Most sensors range from $20–$70 for standard cars. High-performance or luxury models may cost more.
Will Replacing The Map Sensor Fix The Check Engine Light?
If the sensor is the cause, replacing it will usually clear the light. Always scan for codes before and after replacement.
How Often Should I Replace The Map Sensor?
There’s no fixed interval. Replace it when symptoms appear or when your car’s computer reports a sensor failure.
Can I Clean A Map Sensor Instead Of Replacing It?
Some sensors can be gently cleaned if they’re dirty. But if they’re electrically faulty, cleaning won’t fix the issue.
Replacing your car’s map sensor yourself is a practical way to save money and learn more about your vehicle. With careful steps, the right tools, and attention to detail, most drivers can do this job in under an hour. Always double-check compatibility and follow safety precautions.
If you face difficulties, don’t hesitate to ask for help or consult professional resources. Your car—and wallet—will thank you.
