
Replacing your car’s brake master cylinder can seem intimidating, especially if you’re not a professional mechanic. But with the right tools, a methodical approach, and a bit of patience, it’s a task that even beginners can handle. The brake master cylinder is the heart of your car’s braking system—it converts pressure from your foot into hydraulic force, making your car stop safely. If you notice a soft brake pedal, leaking brake fluid, or reduced braking power, your master cylinder could be failing. Ignoring these signs can lead to dangerous situations, so acting quickly is crucial. This guide will walk you through every step, from diagnosis to installation, and help you avoid mistakes that could cost you time and money.
Understanding The Brake Master Cylinder
The brake master cylinder pushes brake fluid through the brake lines when you press the pedal. There are two main types: single reservoir (older cars) and dual reservoir (modern cars). Dual reservoir cylinders provide a backup if one circuit fails, increasing safety. When the master cylinder wears out, it can cause a loss of braking pressure, warning lights on the dashboard, or visible leaks around the engine bay.
Tools And Materials Needed
Before starting, gather all the tools and parts. This ensures you won’t have to stop mid-job, which can be frustrating and risky.
- New brake master cylinder (exact fit for your make/model)
- Brake fluid (type recommended by your car manufacturer)
- Wrenches (typically 10mm, 12mm, 14mm)
- Line wrench (prevents rounding off brake line nuts)
- Ratchet and socket set
- Screwdrivers
- Brake bleeder kit (or clear hose and bottle)
- Turkey baster or syringe (for fluid removal)
- Safety glasses and gloves
- Funnel and rags
- Jack and jack stands
Some cars may require specialty tools, so check your owner’s manual or a repair guide for your specific vehicle.
Preparing For Replacement
Safety should always come first. Park your car on a flat surface and engage the parking brake. Let the engine cool down if you’ve been driving. Wear gloves and eye protection to avoid contact with brake fluid, which is corrosive.
- Disconnect the battery – This prevents accidental electrical shorts or airbag deployment.
- Lift the car (if necessary) – Some master cylinders are easier to access from underneath, but most can be reached from the engine bay.
- Remove engine cover or air intake duct – In some cars, these parts block access to the master cylinder.
Pro tip: Take clear photos of the area before you remove anything. This helps during reassembly, especially with hose routing and sensor connectors.
Removing The Old Master Cylinder
This step requires patience and care. Rushing can damage brake lines or nearby components.
- Remove brake fluid – Use a turkey baster to empty as much fluid as possible from the master cylinder reservoir. This minimizes spills when disconnecting lines.
- Label brake lines – Mark each brake line with tape or tags. This avoids confusion during reassembly—mixing them up can lead to brake failure.
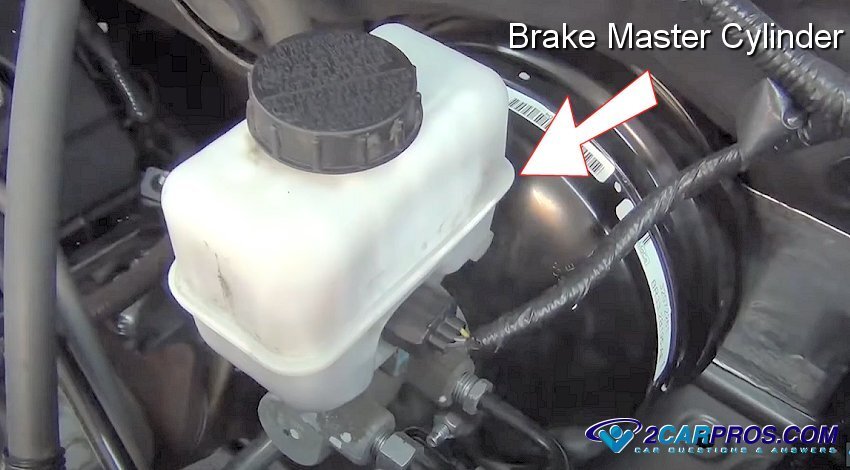
- Disconnect sensor connectors – Most modern master cylinders have an electrical connector for the fluid level sensor. Gently unplug it.
- Loosen brake lines – Use a line wrench to break loose the brake line fittings. Do not remove them completely yet; just loosen them.
- Unbolt the master cylinder – Remove the mounting nuts or bolts (usually two) attaching the master cylinder to the brake booster.
- Remove brake lines – Carefully unscrew and pull out the brake lines. Some fluid may drip—use rags to catch it.
- Remove the master cylinder – Pull the unit straight off the brake booster. Some resistance is normal due to the rubber seal.
Credit: www.2carpros.com
Bench-bleeding The New Master Cylinder
This is a step many beginners miss, leading to spongy brakes after installation. Bench-bleeding removes air trapped inside the new cylinder before it goes on the car.
- Secure the master cylinder in a vice or hold it steady on a workbench.
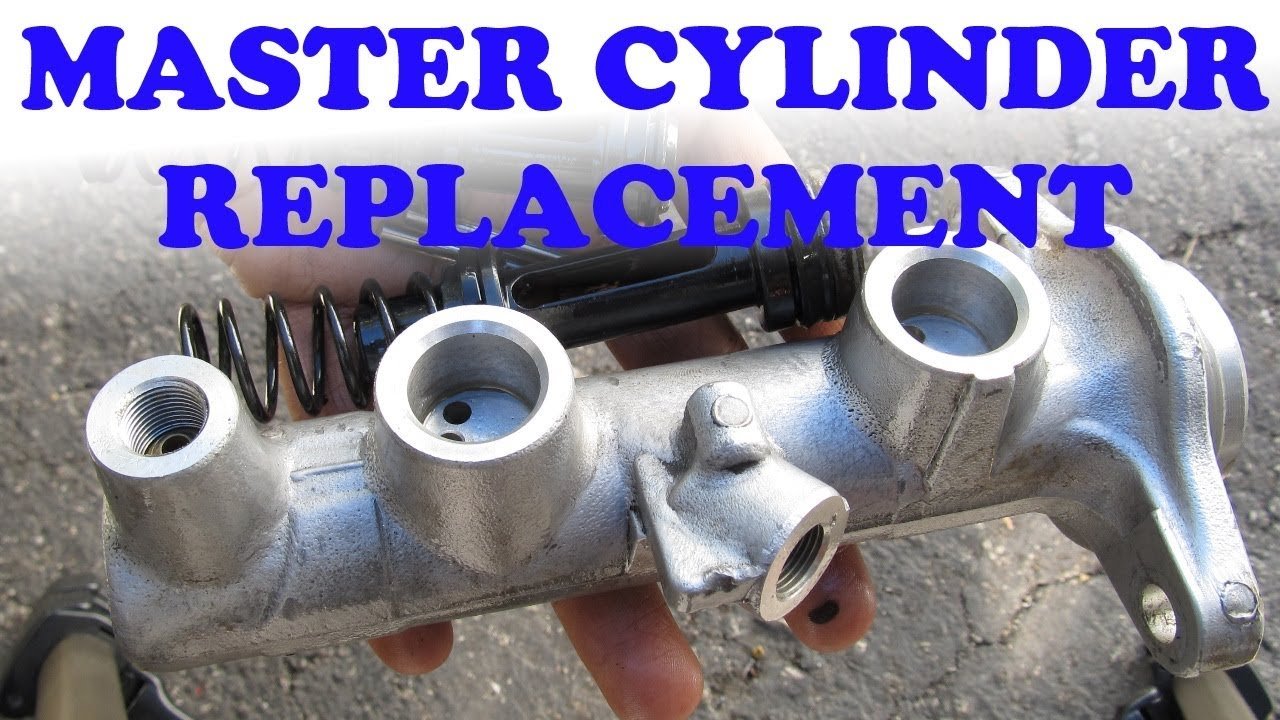
- Install the provided bench-bleed kit (short hoses looping from outlets back into the reservoir).
- Fill with fresh brake fluid.
- Use a screwdriver to gently push the piston in and out, watching for air bubbles.
- Repeat until only fluid (no bubbles) comes out of the hoses.
Skipping this step often results in a soft pedal—even after regular bleeding—because air remains inside the master cylinder.
Installing The New Master Cylinder
Now you’re ready to install the new, bench-bled master cylinder.
- Place the new master cylinder onto the brake booster, lining up the mounting studs.
- Hand-tighten the mounting nuts or bolts, then torque them to the manufacturer’s specification.
- Reconnect the brake lines, starting by hand to prevent cross-threading. Tighten with the line wrench.
- Reconnect any sensor connectors.
- Reinstall any removed covers or intake ducts.
Pro insight: Double-check that brake lines are not twisted or kinked. Even a slight bend can restrict fluid flow and cause uneven braking.
Refilling And Bleeding The Brake System
Air in the brake lines is dangerous—it compresses easily, leading to a soft or sinking pedal. Bleeding removes this air.
Bleeding Sequence
Most cars follow a specific order, usually starting with the wheel farthest from the master cylinder:
- Right rear
- Left rear
- Right front
- Left front
Check your manual for the correct order.
Bleeding Methods
- Two-person method: One person pumps the pedal, the other opens the bleeder valve.
- One-person kit: Uses a hand vacuum pump or a hose submerged in fluid.
Bleeding Steps
- Fill the master cylinder reservoir to the max line with new brake fluid.
- Attach the clear hose to the bleeder valve on the first wheel.
- Have your helper pump the brake pedal several times, then hold it down.
- Open the bleeder valve—old fluid and air will flow out.
- Close the valve, then release the pedal.
- Repeat until only clear fluid (no bubbles) comes out.
- Move to the next wheel in the sequence.
Tip: Keep the reservoir full at all times. If it runs dry, you’ll suck air into the system and need to start over.
Testing And Final Checks
Never skip this step. Even a small leak or error can make your brakes unsafe.
- Check all connections for leaks—especially the brake lines at the master cylinder.
- Top off the brake fluid as it settles.
- Pump the pedal several times. It should feel firm, not spongy.
- Start the engine and check for warning lights.
- Test brakes at very low speed in a safe area before driving normally.
If the pedal feels soft or the car doesn’t stop as it should, re-bleed the brakes or check for leaks.
Credit: www.youtube.com
Common Mistakes To Avoid
- Forgetting to bench-bleed the master cylinder.
- Mixing up brake lines during installation.
- Using the wrong brake fluid type—always follow your car’s specification.
- Not tightening lines enough—can cause leaks.
- Letting the reservoir run dry during bleeding.
- Skipping final checks before driving.
Example Comparison: Old Vs. New Master Cylinder
Here’s how a worn master cylinder compares to a new one:
| Feature | Old Master Cylinder | New Master Cylinder |
|---|---|---|
| Brake Pedal Feel | Soft, spongy, may sink to floor | Firm, responsive |
| Brake Fluid Leaks | Often present | None (if installed correctly) |
| Stopping Distance | Longer, unsafe | Short, normal |
| Warning Lights | Possible brake warning light | None |
Credit: www.brownsautoexperts.com
Average Replacement Cost: Diy Vs. Professional
The cost to replace a master cylinder varies based on car type and labor rates. Here’s a quick comparison:
| Replacement Method | Parts Cost | Labor Cost | Total Cost |
|---|---|---|---|
| DIY | $50 – $200 | $0 | $50 – $200 |
| Professional Mechanic | $50 – $200 | $100 – $300 | $150 – $500 |
Signs Your Master Cylinder Needs Replacement
Not sure if it’s time to replace? Watch for:
- Brake pedal sinks to the floor with constant pressure.
- Brake warning light on the dash.
- Visible leaks around the master cylinder or booster.
- Decreased stopping power or increased stopping distance.
- Contaminated brake fluid (dark or dirty).
If you notice any of these signs, inspect your master cylinder promptly.
Non-obvious Insights And Pro Tips
- Use only new brake fluid—old fluid absorbs moisture and can damage new parts.
- Inspect the brake booster seal—if it’s damaged during removal, it can cause vacuum leaks and poor braking.
- Avoid over-tightening brake lines—it can crack the master cylinder housing.
- Keep all tools and work area clean—even small dirt can contaminate the brake system.
When To Seek Professional Help
While DIY replacement is possible, some situations need an expert:
- ABS systems—modern cars with advanced braking systems may require special procedures or diagnostic tools.
- Unusual brake pedal feel after installation—persistent problems can indicate a deeper issue.
- Severe rust or corroded lines—may need replacement or custom work.
If you’re unsure, consult your mechanic or refer to an official resource like the Wikipedia – Master Cylinder page for more information.
Frequently Asked Questions
How Long Does It Take To Replace A Brake Master Cylinder?
Most DIYers can complete the job in 2-3 hours. Professionals may finish faster, but taking your time reduces mistakes and ensures safety.
Can I Drive With A Bad Brake Master Cylinder?
No. A failing master cylinder can lead to total brake failure. If you notice symptoms like a sinking pedal or fluid leaks, do not drive the car until it’s repaired.
Do I Need To Bleed All Four Brakes After Replacing The Master Cylinder?
Yes. Air enters the system during replacement, so you must bleed all four brakes to remove it. Skipping this step leads to poor braking and safety risks.
What Type Of Brake Fluid Should I Use?
Always use the brake fluid type specified in your owner’s manual (usually DOT 3, 4, or 5.1). Mixing types can damage the braking system.
Why Is My Brake Pedal Still Soft After Replacement?
A soft pedal usually means air is still trapped in the system. Bleed the brakes again, and make sure you bench-bled the new master cylinder before installation.
Replacing your car’s brake master cylinder is a rewarding project that improves both safety and confidence in your car’s performance. If you follow each step carefully, use the right tools, and don’t rush, you’ll have a firm brake pedal and reliable stopping power for years to come.